disposedwww.13aaa.com
www.13aaa.com 时间:2021-04-08 阅读:()
www.
barco.
com2User'sGuide–GettingtoknowtheprojectorCTseriesUserManual3Contents1Introduction71.
1Thankyou1.
2Training1.
3Symbolsusedinthisdocumentation2Safetyandcompliance92.
1Generalsafetyconsiderations2.
2Information/Warning-PotentialMercuryVapourHealthIssues2.
3FCCcompliance2.
4Disposalinformation2.
4.
1StatementWEEE(WasteElectricalandElectronicEquipment)2.
4.
2Disposalofbatteriesintheproduct2.
4.
3TurkeyRoHScompliance2.
5Service3Whatisinthebox134Installation154.
1Systemconsiderations4.
2Ventilation4.
2.
1Ventilationaccessories4.
3Ceilingandrigmounting4.
4Lockingtheprojector4.
5Projectorangle(tilt)4.
6Selectingalens4.
6.
1Insertingalens4.
6.
2Changing/removingalens4.
6.
3Lensrange4.
7Lenslock4.
8Lensshift4.
9Lensplanarity(Scheimpflugadjustment)4.
10Zoom,focusandiris4.
11Makingtheconnections4.
12Connectingvideoanddatasources4.
13Connectingcontrolinterfaces4.
14Sourceformatintegrity–EDID4.
15Imagesizes4UserManual-Introduction5Overview255.
1Keypadandindicator5.
2Wirelessremotecontrol5.
3Connectors5.
3.
1Signalconnectors5.
3.
2Controlconnectors5.
4Menusystem5.
4.
1Topmenu5.
53Dmainmenu5.
5.
13D>Dualheadsetupsubmenu5.
6Picturemainmenu5.
6.
1Picture>RealColorsubmenu5.
6.
2Picture>Advancedsubmenu5.
7Installationmainmenu5.
7.
1Installation>EDIDsubmenu5.
7.
2Installation>Synchronizationsubmenu5.
8Settingsmainmenu5.
8.
1Settings>PinCodesubmenu5.
8.
2Settings>Networksubmenu5.
8.
3Settings>FactoryResetsubmenu5.
8.
4Settings>Servicesubmenu5.
9Languagesmainmenu5.
10Statusmainmenu5.
10.
1Status>SourceInformationsubmenu5.
10.
2Status>SourceInformation>Advancedsubmenu5.
10.
3Status>SourceSynchronisationsubmenu6Functionality496.
1PoweringOnandOff6.
1.
1Manualpowercontrol6.
1.
2DPMS-powerdown6.
2Imagealignment6.
2.
1Imageorientation6.
3Language6.
4Systemstatus6.
5Lamppower6.
6Sourceselection,sourcescan6.
7Onscreendisplay(OSD)messages6.
7.
1DisablingtheSTATUSindicator6.
7.
2Settingthebackgroundcolor6.
7.
3SettingOSDmenutimeout6.
7.
4Selectingthestartuplogo6.
8PicturebyPicture(PbP)6.
9StandbyECOmodeCTseriesUserManual-Introduction56.
10PINcode6.
11Disablingthewirelessremotecontrol(IR)receivers6.
12Softwareupgrades7Optimisingtheimage557.
1Calibrationdata7.
1.
1UpdatingRealColorcalibrationdata7.
1.
2RealColormodes7.
2Settingawhitepointorcolortemperature7.
2.
1Definingthesystemcolorgamut7.
3Gamma8Technicalspecifications639Lampchange656UserManual-IntroductionCTseriesUserManual-Introduction71Introduction1.
1ThankyouThankyouforpurchasingthisprojector.
WhenreferringtothetermCTseriesinthisdocumentthecontentisapplicableforthefollowingBarcoproducts:CTHD-61B(1920x1080)CTWU-61B(1920x1200)CTWQ-51B(2560x1600)CTPN-41B(2560x1080)TheCTseriesprojectorssetanindustrybenchmarkforprojectorsinitssizeandperformancecategory.
IfrealismandreliabilityarekeycriteriathishighresolutionDLP-technologyprojectorwithhighperformanceopticsandlenses,updatedsignalprocessingandbuilt-inframe-locksynchronisation,makesittheidealprojectorformulti-channelvisualizationandsimulationapplications.
InadditiontotheexcellentimageperformanceitiscapableofshowingActiveStereo3D.
1.
2TrainingTogetthebestperformanceoutoftheprojectoraswellasthesystem,trainingatBarcoishighlyadvised,inadditiontostudyingthisuserguide.
Variouscoursesareavailable.
AttheUniversity,skilledtrainerswillteachyoubasicprojectoruseaswellasmoreadvancedset-upandconfigurationacrossmultipleapplicationareas.
Gotowww.
barco.
comforeasyaccesstomoreinformation.
1.
3SymbolsusedinthisdocumentationWARNING:Usedtopointoutpotentialdangertopeopleorequipmentwhenusingtheproductincertainways.
NOTE:Usedtopointoutessentialhandlingrequirementsfortheprojector.
Ifnotactedon,theymaycauseproductmalfunctioning.
TIP:Presentingadvicewhichbenefitstheprojectorusageorconditionsrelatedtoprojectorperformance.
Thespecificationsandfunctionalityofthisprojectormaychangewithoutpriornotice.
Pictures/drawingsorfeaturesinthisuserguidemaybedifferentfromyourprojectordependingonmodel/version.
8UserManual-IntroductionCTseriesUserManual-Introduction92Safetyandcompliance2.
1GeneralsafetyconsiderationsUseonlythecablesandcordssuppliedwiththeprojectorororiginalreplacementcables.
Usingothercablesorcordsmayleadtomalfunctionandpermanentdamagetotheunit.
Alwaysuse3-prong(grounded)powercordtoensurepropergroundingoftheunit.
Neveruse2-prongpowercords,asthisisdangerousandcouldleadtoelectricalshock.
Forthegroundingofthecoaxconnection,equalgroundpotentialmustbeensured.
Tobeinstalledbytrainedpersonnel.
Neveropentheunit.
Theprojectorcontainsnouserserviceableparts.
Referallrepairstoqualifiedpersonnelonly.
Makesurethatnoobjectsenterintotheventsandopeningsoftheset.
Donotspillanyliquidsontheprojectororintotheventsoropeningsoftheunit.
Alwaysremovelenscapbeforeswitchingontheprojector.
Ifthelenscapisnotre-moved,itmaymeltduetothehighenergylightemittedthroughthelens.
Meltingthelenscapmaypermanentlydamagethesurfaceoftheprojectionlens.
Donotlookintotheprojectionlenswhentheprojectorisswitchedon.
Thestronglightmaypermanentlydamagesight.
Onlyplacetheprojectoronastablesurface,ormountitsecurelyusinganapprovedceiling-mount.
Donotdroptheprojector.
Alwaysoperatetheprojectoraccordingtotherotationguidelines.
Operatingtheunitinotherpositionsmayreducelamplifesignificantly,andmayleadtooverheating,resultinginmalfunctioning.
Alwaysallowampleairflowthroughtheprojector.
Neverblockanyoftheairvents.
Nevercovertheunitinanywaywhilerunning.
Allowforsufficientdistancetowallsandceilingstoavoidoverheating.
Minimumsafetydistancetoanysideoftheunitis50cm/20"inanydirection(15cm/6"toceiling).
Hotairisexhaustedfromtherearvent.
Donotplaceobjectsthataresensitivetoheatnearerthan50cm/20"totheexhaustvent.
Theprojectorisdesignedforindooruseonly.
Neveroperatetheunitoutdoors.
Donotoperatetheprojectoroutsideitstemperatureandhumidityspecifications,asthismayresultinoverheatingandmalfunctioning.
Onlyconnecttheprojectortosignalsourcesandvoltagesasdescribedinthetechnicalspecification.
Connectingtounspecifiedsignalsourcesorvoltagesmayleadtomalfunc-tionandpermanentdamageoftheunit.
Inordertopreventdamagetotheprojectorcausedbyover-voltages(e.
g.
lightning),werecommendconnectiontoaline(mains)circuitwhichhasovervoltageprotection.
Allowlamptocooldownforatleast60minutesbeforechanging.
USEONLYORIGINALLAMPS.
Connectingsourcestoapoweredprojectormayresultinproductfailure.
Itisrecom-mendedthatthepowercableconnector(projector-end)orthemainspowersocketisaccessiblewhilsttheproductisinusetoenablemainspowertobedisconnectedorswitchedoffwhenconnectingsourcedevices.
Thisshouldbeconsideredduringproductinstallation.
10UserManual-Introduction2.
2Information/Warning-PotentialMercuryVapourHealthIssuesThisprojectorusesaverypowerfulUHPlampforilluminationtoproduceanextremelybrightimage.
Thistechnologyissimilartootherhigh-pressuredischargelampsthatareextensivelyusedincars,streetlightsandotherlightingappliancestoday.
Theselamps,likefluorescentlighting,containsmallamountsofmercury.
Theamountofmercurypresentinalampisfarbelowthelimitsofdangersetbytheauthorities.
Itishoweververyimportantthatlampscontainingmercuryaretreatedproperlytominimizepotentialhealthhazards.
TheUHPlamp,likeanyotherhighbrightnessprojectorlamp,isoperatingunderhigh-pres-sure.
Evenifthelampandtheprojectorarecarefullydesignedtominimizetheprobabilityoflamprupture,thelampmaybreakwhileoperatingandsmallamountsofmercuryvapourmaybeemittedfromtheprojector.
Theprobabilityofruptureincreaseswhenthelampreachesitsexpectedlifetime.
Itisthereforehighlyrecommendedthatthelampisreplacedwhenthespecifiedlifetimeisreached.
Asageneralprecaution,securegoodventilationintheroomwhenoperatingtheprojector.
Iflampruptureoccurs,evacuatetheroomandsecuregoodventilation.
Childrenandpregnantwomeninparticularshouldleavetheroom.
Whenreplacingawornlamp,disposeoftheusedlampcarefullybyproperrecycling.
Mercuryisanaturallyoccurring,stablemetallicelementthatmayposeasafetyrisktopeopleundercertainconditions.
AccordingtothePublicHealthStatementforMercurypublishedbytheAgencyforToxicSubstancesandDiseaseRegistry("ATSDR",partoftheUnitedStatesPublicHealthService),thebrain,centralnervoussystemandkidneysaresensitivetotheeffectsofmercury,andpermanentdamagecanoccuratsufficientlyhighlevelsofexposure.
Acuteexposuretohighconcentrationsofmercuryvapourcancauseconditionssuchaslungandairwayirritation,tightnessinthechest,aburningsensationinthelungs,coughing,nausea,vomitinganddiarrhoea.
Childrenandfetusesareparticularlysensitivetotheharmfuleffectsofmetallicmercurytothenervoussystem.
Seekmedicalattentionifanyoftheabovesymptomsareexperiencedorifotherunusualconditionsareexperiencedfollowinglamprupture.
Thisproductcontainschemicals,includinglead,knowntotheStateofCaliforniatocausebirthdefectsorotherreproductiveharm.
Recycleproperly;donotdisposeofinordinarywaste!
2.
3FCCcomplianceFCCregulationsstatethatchangesormodificationsnotexpresslyapprovedbythepartyresponsiblemanufacturercouldvoidyourauthoritytooperatetheequipment.
ThisequipmenthasbeentestedandfoundtocomplywiththelimitsforaClassAdigi-taldevice,pursuanttopart15oftheFCCRules.
Theselimitsaredesignedtoprovidereasonableprotectionagainstharmfulinterferencewhentheequipmentisoperatedinacommercialenvironment.
Thisequipmentgenerates,uses,andcanradiateradiofrequencyenergyand,ifnotinstalledandusedinaccordancewiththeinstructionmanual,maycauseharmfulinterferencetoradiocommunications.
Operationofthisequipmentinaresidentialareaislikelytocauseharmfulinterferenceinwhichcasetheuserwillberequiredtocorrecttheinterferenceathisownexpense.
Thisdevicecomplieswithpart15oftheFCCRules.
Operationissubjecttothefollowingtwoconditions:(1)Thisdevicemaynotcauseharmfulinterference,and(2)Thisdevicemustacceptanyinterferencereceived,includinginterferencethatmaycauseundesiredoperation.
CANADAThisClassAdigitalapparatuscomplieswithCanadianICES-003.
/CetappareilnumériquedelaclasseAestconformeàlanormeNMB-003duCanada.
CTseriesUserManual-Safetyandcompliance112.
4Disposalinformation2.
4.
1StatementWEEE(WasteElectricalandElectronicEquipment)Thissymbolontheproductindicatesthat,undertheEuropeanDirective2012/19/EUgovern-ingwastefromelectricalandelectronicequipment,thisproductmustnotbedisposedofwithothermunicipalwaste.
Pleasedisposeofyourwasteequipmentbyhandingitovertoadesignatedcollectionpointforthewasterecyclingofelectricalandelectronicequipment.
Topreventpossibleharmtotheenvironmentorhumanhealthfromuncontrolledwastedisposal,pleaseseparatetheseitemsfromothertypesofwasteandrecyclethemresponsiblytopro-motethesustainablereuseofmaterialresources.
Formoreinformationaboutrecyclingofthisproduct,pleasecontactyourlocalcityofficeoryourmunicipalwastedisposalservice.
Fordetails,pleasevisittheBarcowebsiteat:http://www.
barco.
com/en/AboutBarco/weee.
2.
4.
2DisposalofbatteriesintheproductThisproductcontainsbatteriescoveredbytheEuropeanDirectivewhichmustbecollectedanddisposedofseparatelyfrommunicipalwaste.
Ifthebatterycontainsmorethanthespecifiedvaluesoflead(Pb),mercury(Hg)orcadmium(Cd),thesechemicalsymbolswillappearbelowthecrossed-outwheeledbinsymbol.
Byparticipatinginseparatecollectionofbatteries,youwillhelptoensureproperdisposalandtopreventpotentialnegativeeffectsontheenvironmentandhumanhealth.
2.
4.
3TurkeyRoHScomplianceTürkiyeCumhuriyeti:AEEEYnetmeliineUygundur.
(RepublicofTurkey:InconformetywiththeWEEERegulation)2.
5ServiceThisproductcontainsnouserserviceableparts.
Iftheproductfailstofunctionasexpected,pleasefirstcheckthatallconnectionsareproperlymade,andthatthepowercordisproperlyconnected.
Pleasecheckthattheprojectoraswellasthevideoandcomputersourcesareallswitchedon.
Cablesandcordsmaybreakovertime.
Trytochangecablesandcords,incasethereisabadorintermittentconnection.
Checkifthecircuitbreakerormainsfuseisintact.
Intheeventofproductfailure,pleasecontactyourreseller.
Youshouldprepareadescrip-tionofthesymptomsoffailureyouexperience.
Pleasealsostateproductnumberandserialnumberasprintedonthelabelonthebottomorsideoftheprojector.
ServicepersonnelmustuseUVradiationeye-andskinprotectionduringservicingPb12UserManual-IntroductionCTseriesUserManual-Safetyandcompliance133WhatisintheboxThefollowingcomponentsarestandarddelivery:ProjectorPowerCable(CountryDependent)RemoteControlUserDocumentationAdditionalaccessoriesavailablefortheprojector:Exhaustairkit(forceilingmount):A:Air-inletfilter(alsosoldseparately)B:Sidecover/Air-inletC:Ceilingmountcover/Air-outlet(alsosoldseparately)D:Exhaustairduct**Flexiblehose(2m)withclampinncludedAcousticsilencerkit(forceilingmount):B:Sidecover/Air-inletC:Ceilingmountcover/AiroutletCheckthatyouhaveallcomponentslistedwhenunpackingtheunit.
Pleasesavepackagingmaterialsforfutureuse,shoulditbenecessarytoshiptheunit.
ACBD14UserManual-IntroductionCTseriesUserManual-What'sinthebox154Installation4.
1SystemconsiderationsPleaserefertoChapter5Overviewforanexplanationonthevariousfeaturesoftheprojector.
Installationshouldonlybeperformedbytrainedandskilledpersonnelinordertoachievethedesiredresults.
Safetyfirst:Projectorsandotherequipmentthatarenotmountedproperlyrepresentapotentialdangertopeopleandmayresultininjuryordeath!
Creatingasuccessfulsysteminstallationrequiresproperskills,competenciesandknowledgeoftheparticularsystemrequirements.
Inadditiontoknowingtheexpectedperformance,ambientconditionsandallthecomponentsthatformthecompletesystem,includingImageGeneration(IG),cabling,controlsystem,screensandprojectors.
Aninstallationoftenconsistsofmultipleprojectors,longcablesandseveralIG's,aswellasintermediatesystemcomponentslikesignalconvertersandlinebuffers.
Makesurethat:IGpropertieslikepixelresolutionandframerefreshmatchthoseoftheprojectorChoiceofsignalinterfaceandcablelengthsmatch.
oHDBaseTand3G-SDIaresocalledlong-haulinterfaces,suitableforbespokeinstallationonthepremisesusingrelativelylongcables.
oDP,HDMI,DVIandVGAareallshort-haulinterfacesusingpre-assembledcableswithlimitedcablelengths.
UsingextendedcablelengthsmayresultinreducedimagequalityaswellaslossofcontrolinformationsuchasEDID(ExtendedDisplayInformationData).
Signalamplifiers,switchesandothercomponentsshouldconveyEDIDandothercontrolinformation.
However,unfortunatelymanytimesEDIDdataislostintranslationunderway,potentiallyresultinginimagesofreducedpixelresolutionandwrongaspectratio.
Asuccessfulinstallationtakesallrelevantparametersintoaccounttoachievegreatimagery!
16UserManual-Introduction4.
2VentilationMinimumsafetydistancetoanysideoftheunitis50cm/20"inanydirection.
Hotairisexhaustedfromtherearvent.
Donotplaceobjectsthataresensitivetoheatcloserthan50cm/20"totheexhaustvent.
Figure4-1.
PositioningtheprojectorWhentheprojectorisceilingmountedusinganexhaustairkit*(accessory)theminimumdistancebetweenprojectorandroofis15cm.
4.
2.
1VentilationaccessoriesAsetofoptionalaccessoriesisavailableforthisprojector,coveringanythingfromcablesandlensestoairflowpartsandlenscontrol.
Forinformationonavailability,specificationsandpricing,pleaserefertoourwebsite:www.
barco.
comCTseriesUserManual-Installation50cm15cm*50cm50cm174.
3CeilingandrigmountingUsethethreemountingholesprovidedinthebottomparttosecurelyfixtheprojectortoaceilingorrigmount.
UseM6screwsthatprotrudemaximum9mmintotheprojectorbody.
Figure4-2.
Ceiling/rigmountingmountingholes4.
4LockingtheprojectorTheprojectorcanbelockedphysicallybyusingasocalledKensingtonlock.
TheKensingtonlockhole,wherethelockitselfisattached,canbefoundonthebackoftheprojector.
Useanapprovedlockingcabletosecuretheprojectortoasolidobject.
4.
5Projectorangle(tilt)Theprojectorshouldbetiltedmaximum+/-20degreesfromlevel(flat/ceiling)position.
Itcanberotated360degreesaroundthelensaxis.
Tiltingathigherdegreesmayreducelamplifeandincreasetheprobabilityofoverheat-ingtheprojector.
Installationoutsidethesespecificationscanvoidtheguarantee.
Figure4-3.
Tiltingangles-20o+20o360o18UserManual-Introduction4.
6SelectingalensTheprojectorisdeliveredwithoutalens,enablingyoutoselectalensaccordingtoyourdesiredimagesizeandprojectiondistance.
Theprojectorusesabayonetmountsystemtopreciselyfixthelensinplace.
Thelensesaremanual,meaningzoom,focusandirisadjust-mentsaredonebyhandmanually.
Lensshiftismotorized(horizontallyandvertically).
Useonlytheoriginalprojectionlensesorlensesthathavebeenapprovedforusewiththeprojector.
Figure4-4.
TheprotectionlidAprotectionlidismountedontheprojectorlensopeningtoprotecttheinterioroftheprojectorfromdustanddamage.
Theprotectionlidmustalwaysbeinplacewheneverthereisnolensmountedontheprojector!
Theprotectionlidmustberemovedbeforeattachingalens!
Theprojectionlensesaresuppliedwithprotectioncapsonboththeentryandexitsides.
Pleasekeepthecapsonuntilmountingthelensontheprojector!
Removelensprotectioncapsbeforemountingthelensandusingtheprojector.
Figure4-5.
ProjectionlensreleasebuttonCTseriesUserManual-InstallationProtectionlidReleasebutton194.
6.
1Insertingalens1.
Removetheprotectionlidontheprojectorbyturningthelidanti-clockwiseuntilitcomesloose2.
Removetheprotectionlidsfromthelens3.
Insertthelens,makingsuretheredlinemarkingonthelenspointsstraightuptowardsthetopofthecabinet.
Ifthelensdoesnotenteronthefirstattempt,retractthelensandtryagainfromaslightlydifferentangle.
Donotuseforce!
4.
Whenthelensentersalltheawayin,firmlytwistthelensclockwiseuntilitclicksintoposition4.
6.
2Changing/removingalens1.
Pressinthelensreleasebutton2.
Twistthelensfirmlyanti-clockwiseuntilitcanbepulledgentlyout3.
Removetheexistinglensandputthe2lensprojectioncapsbackontheremovedlens4.
Replacewithanotherlens,orifnolensistobeinstalled,remounttheprojectorprotec-tionlidNotethatthelenspositioningwhenusinglensshiftmayaffecttheaccessibilityofthelensbutton.
Ifso,repositionthelenstogainaccess.
4.
6.
3LensrangeThetableshowsaselectionoflensesavailable.
Pleaseseewww.
barco.
comformoreinformationaboutlensavailability.
ITEMTYPETHROWRATIO(WQXGA)F#f(mm)RANGE(m)SHIFTEN51Zoom1.
71-2.
37:12.
60-3.
0933.
9-46.
51.
5-10Ver:110%Hor:80%EN52Fixed0.
99:12.
6019.
71.
0-10Ver:100%Hor:70%EN53Fixed0.
79:1@1.
65m2.
6015.
80.
8-3.
3Ver:65%Hor:55%EN54Zoom2.
68-4.
18:12.
60-3.
2652.
6-81.
55-25Ver:110%Hor:80%EN55Zoom0.
86-1.
16:12.
50-2.
7217.
2-23.
10.
8-5.
0Ver:105%Hor:75%EN56Zoom1.
14-1.
74:12.
50-2.
7222.
8-34.
71.
3-7.
0Ver:105%Hor:75%20UserManual-Introduction4.
7LenslockAlens-lockfeatureisavailablewherebythreescrewsonthelensbarrelareusedtoperma-nentlyfixthezoom,focusandirispositions.
Forinformationonlockingtheadjustmentringsinoneposition,pleaserefertosection3.
10Zoom,focusandiris.
Figure4-6.
ZoomandFocusLenslockscrews(oneoneachlensring)4.
8LensshiftMostoftheprojectionlensesareshiftablehorizontally(bothdirections)andvertically(up).
Somelenses,typicallywideanglelenses(on-axistype)onlyhaveaverylittleshiftrange.
Pleaserefertotheindividuallensspecificationsfoundonthewebforactualshiftrange.
Figure4-7.
Horizontal(bothdirections)andvertical(up/down)lensshiftLensshiftismotorizedandthelenscanbeshiftedeitherbyusingthekeypad,thewirelessremotecontrolorthroughthewiredcontrolinterface.
Foranoverviewofthelensshiftadjust-mentrangeforthevariouslenses,pleaserefertosection3.
6.
3Lensrange.
Usingthekeypadontheprojector,pressOKandthenOKagaintocenterlensmanually,orusethearrowkeystoposition(restricteddownwardsmovability).
Usingtheremotecontrol,presstheOKkeytocenterthelensorarrowkeystopositionit(restricteddownwardsmovability).
UsingtheRS-232orLANcontrolinterfaces,pleaserefertotherelevantSIS(SimplifiedInstructionSet)commandsavailablefordownloadonwww.
barco.
comCTseriesUserManual-Installation214.
9Lensplanarity(Scheimpflugadjustment)Thisadjustmentisrarelyneeded,donotapplyitunlessitisrequired.
Certainapplicationsrequirefineadjustmentofthelensplanarityinordertoobtainanimagethatisfocused.
Theprojectorisfittedwiththreeadjustmentscrews(Allenkey3mm/5mm)aroundthebayonetmountthatfacilitatesuchadjustment,asocalledScheimpflugadjust-ment.
Donotattemptadjustingwithouttherequiredtechnicalcompetenceandrefertotheservicemanualfoundonourwebforfurtherinfo.
Figure4-8.
ScheimpflugAdjustmentScrews4.
10Zoom,focusandirisTheselensfunctionsaremanual(notmotorized).
Firstadjustzoomtoachievethedesiredimagesize(ifthelenshasazoom-function).
Thenadjustfocustoachieveasharpimage.
Iftheimageisnotsharpalloverthesur-face,pleasecheckthesurfaceflatnessandwhetherthelensaxisisperpendiculartotheprojectionsurface.
Usetheiristoadjustthecontrastandfocusdepthoftheimage.
Adjustingtheiriswillaffectthebrightness;stoppingtheirisdownincreasescontrastandimagedepth,butreducesbrightness.
Thezoom,focusand,irisringscanbelockedinpositionfortypicalmotionbasedinstal-lationstosecurethatthepicturesettingsarenotchanged.
Tightenthepre-installedM3screwsoneachringtolockthemovement,usinga1.
5mmAllenkey,untiltheringscannotbeturned.
Figure4-9.
PositioningofZoom,FocusandIrisrings(mayvaryonsomelenses)ZoomIrisFocus22UserManual-Introduction4.
11MakingtheconnectionsTheprojectorisequippedwithmultiplesignalandcontrolinterfacestosupportvariousvideoanddatasources(seeconnectorpanelbelow),aswellasdifferentcontrolsystems.
Alwaysmakesurethattheprojectorispoweredoffbeforeconnectinganysignaland/orcontrolcables.
Longcablesmaycausedistortedorevenfailingsignalquality.
Alwaysmakesurebestqualitycablesareused,andtakeintoconsiderationthecablelengthlimitationsapply-ingtothevariousinterfacestandards.
4.
12ConnectingvideoanddatasourcesChoiceofconnectivitydependsontheinstallationrequirementsaswellasthesourcesconnected.
Generally,digitalinterfacesarepreferredoveranalog.
Multiplesignalscanbeconnectedinparalleltoallowforaselectionofsourcestobeviewedinsequence.
Attachtheinterfacesofchoiceandmakesureallconnectorsarefullyinsertedandretained.
4.
13ConnectingcontrolinterfacesPowerofftheprojectorandthesource!
Choiceofcontrolinterfacedependsontheinstallationrequirements.
Attachtheinterfacesofchoiceandmakesureallconnectorsarefullyinsertedandretained.
PleaseseetherelevantSIS(SimplifiedInstructionSet)commandsavailablefordownloadonwww.
barco.
comforeasyaccesstomoreinformation.
Poweruptheprojectorandthesource!
4.
14Sourceformatintegrity–EDIDIfusing3rdpartysystemequipment,suchassignalrepeatersorswitchers,pleasemakesurethatEDID(ExtendedDisplayIdentificationData)informationisnotlostintranslation.
WrongEDIDdatamayresultindistortedimages,wrongaspectratiosorreducedimageresolutions.
CTseriesUserManual-Installation234.
15ImagesizesLenstypesandspecificationsmaychangewithoutpriornotice.
Forcorrectlensinformationpleaserefertowww.
barco.
com1920x1200/1920x1080(WUXGA/1080)UltraWideFixed(EN53)0.
74:1(0.
8-3.
3m)WideAngle(EN52)0.
92:1(1.
0-10m)LongThrowZoom(EN54)2.
68-4.
18:1(5–25m)ProjectiondistanceImagewidthm12.
0011.
0010.
009.
008.
007.
006.
005.
004.
003.
002.
001.
000Screendiagonalm13.
7512.
5011.
2510.
008,757.
506.
255.
003.
752.
501.
2500.
000.
501.
001.
502.
002.
503.
004.
004.
505.
005.
506.
006.
503.
5001020SuperWideZoom(EN55)0.
80-1.
08:1(0.
8-5.
0m)WideZoom(EN56)1.
06-1.
62:1(1.
3-7m)StandardZoom(EN51)1.
60-2.
21:1(1.
5-10m)24UserManual-Introduction2560x1600/2560x1080(WQXGA/Panorama)Lenstypesandspecificationsmaychangewithoutpriornotice.
Forcorrectlensinformationandotherresolutionspleaserefertowww.
barco.
comUltraWideFixed(EN53)0.
79:1(0.
8-3.
3m)WideAngleFixed(EN52)0.
99:1(1.
0-10m)LongThrowZoom(EN54)2.
68-4.
18:1(5-25m)SuperWideZoom(EN55)0.
86-1.
16:1(0.
8-5.
0m)StandardZoom(EN51)1.
71-2.
37:1(1.
5-10m)WideZoom(EN56)1.
14-1.
74:1(1.
3-7m)ProjectiondistanceImagewidthScreendiagonal15.
0013.
7512.
5011.
2510.
008,757.
506.
255.
003.
752.
501.
2500.
000.
501.
001.
502.
003.
004.
004.
505.
005.
506.
006.
507.
007.
503.
502501020mm2.
5012.
0011.
0010.
009.
008.
007.
006.
005.
004.
003.
002.
001.
000CTseriesUserManual-Installation255OverviewFigure5-10.
ProjectorfrontFigure5-11.
ProjectorrearFigure5-12.
ProjectortopRemoteControlReceiverInterchangeableProjectionLensProjectionLensReleaseButtonMainsPowerConnectorHotAirExhaustSignalandControlConnectorPanelRemoteControlReceiverKeypad26CTseriesUserManual-OverviewFigure5-13.
MountingfeaturesFigure5-14.
ProjectorleftandrighthandsideLampDoorAirInletCeiling/RigMountingFeaturesAccessoryMountingFeatures275.
1KeypadandindicatorFigure5-15.
ProjectortopkeypadKEYVALUEPOWERPoweronorpoweroff(standby)MENUActivateordeactivateon-screenmenusystemUP,DOWN,LEFT,RIGHTSelectsourcewhennotinShiftorMenumodeShiftlenswhennotinMenuandafterSHIFT/OKpressedNavigatewheninMenusystemSHIFT/OKShiftlenswhennotinmenusystemShiftoptionwheninmenusystemAUTOAutomaticset-upSTATUSCOLOROn(active)BlueWaitonBlueflashingStandby(off)YellowWaitYellowflashingLampfailureRedOverheatingRedflashingConfigure/upgradeYellowfastflashingErrorRedfastflashingIndicatorlightPoweron/offMenuLeftRightUpDownShift/OKBack28CTseriesUserManual-Overview5.
2WirelessremotecontrolFigure5-16.
RemotecontrolBUTTONFUNCTIONPOWERTurnsprojectorON/OFFINFOShowsStatusmenu;infoonnumbers&versions,lampinfo*ActivatestheprojectorautosettingsSHIFTActivateslensshiftfunction#ReservedforfutureuseOK/ARROWSConfirmstheselection/DirectionalnavigationtoolsBACKReturnstopreviousalternativeMENUActivatestheprojectormenuSOURCETogglesbetweenavailablesources(forward/backwardsarrows)SOURCEPOWERINFOSHIFTMENUBACKiOKBatteriescanbereplacedbyend-user.
Toreplacethe2standardAAA-batteriesforthisremotecontrol,slidethelidatthebackofthecontroldownwards.
Liftitoffandremovethebatteries.
Replacewithnewbatteriesandslidethelidbackinplace.
295.
3ConnectorsFigure5-17.
Connectorpanel(seetechnicaldatafordetails)5.
3.
1SignalconnectorsCONNECTORNAMECONNECTORTYPEFUNCTIONHDBaseTRJ45VideoovertwistedpairDVIDVI-I*)duallinkDigitalvideo(dual-link)HDMIHDMItypeADigitalvideoDP(DisplayPort)DPDigitalvideo(2)VGA9pinminiDSUBAnalogRGBHVvideo3G-SDIBNC75ΩDigitalVideo*)theDVIconnectionisdigital-only,althoughitusestheDVI-Iphysicalconnectorforconvenience5.
3.
2ControlconnectorsCONNECTORNAMECONNECTORTYPEFUNCTIONSYNC1BNCMultipurposebi-directionalsyncronizationportSYNC2BNCMultipurposebi-directionalsyncronizationportSYNC33-pinmini-DINPoweredmultipurposebi-directionalsyncronizationportUSBAUSBAUSBconnectorsforSWupgradeanddiagnosisLANRJ45ControlRS2329PINDSUBControl30CTseriesUserManual-Overview5.
4MenusystemThevariousprojector-settingscanbecontrolledviatheon-screenmenusystem.
Themenusystemisaccessedbythekeypadontheprojectororusingthewirelessremotecontrol.
PresstheMENUkeytoenterorleavethemenusystem.
Navigatetheoptionsusingthearrow-keys.
SelectoptionwiththeOKkey.
Themenu-systemwillbereferencedthroughouttheuserguide.
Pleasefamiliarizeyourselfwiththemenusandtherichfunctionalityprovided.
5.
4.
1Topmenu3D:3Danddualheadsetuppicture:Basicandadvancedpicturecontrols.
installation:Systemcontrolsandinformation.
settings:Settingsthataffecthowtheprojectorbehavesorinteractswiththirdpartydevices,suchasnetworksandcontrolsystemslanguage:Selectsmenulanguage.
status:Systeminformation.
Thetoplevelmenuitem3DisonlyvisibleforActiveStereo3Denabledprojectors.
315.
53DmainmenuThe3Dmenucontainssettingsforturning3Donandoff,inadditiontodefiningvariousaspectsofsetupusingDualHeadandspecifyingthetypesofglassestobeused.
3D:Offersthepossibilitytoswitchthe3Dfunctionoffandtochosebetweenthefollowingalternativesforsetup:off,sidebyside(Dualheadsetupsubmenusource1:Choiceofsource.
AlternativesareSDI1,SDI2,DVI,HDMI,VGA,HDBaseT,DisplayPort1,DisplayPort2.
Forpossiblesetupcombinations,seeFigure5-18.
Dualheadsetuppossibilities.
source2:Choiceofsource.
AlternativesareSDI1,SDI2,DVI,HDMI,VGA,HDBaseT,DisplayPort1,DisplayPort2.
Forpossiblesetupcombinations,seeFigure5-18.
Dualheadsetuppossibilities.
Figure5-18.
DualheadsetuppossibilitiesDP1DP2HDBaseTDVI(SL)HDMIDVI(DL)VGA3GSDI(A)3GSDI(B)DP1DP2HDBaseTDVI(SingleLinkMode)HDMIDVI(DualLinkMode)VGA3GSDI(A)3GSDI(B)NotpossiblePossible335.
6PicturemainmenuThepicturemenucontainsbasicandadvancedsettingsandadjustmentsfordetailedpictureenhancementcontrol.
Alladjustmentsareglobalandarestoredindepentantlyofsource.
Theexceptionis2D/3Dforwhichtheprofilesarestoredindividually.
profile:Aselectionofpredefinedprofileswithdifferentattributes:standard,presentation,bright,video,cinema,DICOM,SRP,custom,advanced(onlyavailableifenabledfromservicemenu).
Iftheprofileismarkedbyanasterisk(*),thisindicatesthattheoriginalsettingshavebeenchanged.
RealColor:Barco'sproprietarycolormanagementsuite.
SeedescriptioninRealColorsubmenu.
gamma:10predefinedgammacurves:Film2.
2:Exponential2.
2curveFilm2.
4:Exponential2.
4curveFilm2.
6:Exponential2.
6curveFilm2.
8:Exponential2.
8curveVideo1:RelaxedS-shapeVideo2:IncreaseS-shapeComputer1:SteepS-shapeComputer2:VerysteepS-shapeDynamic:IncreaseS-shapeDICOM180Lux:Curveshapedependingontypeofcolorwheelused.
WhenenteringDICOMprofiletherearemoreDICOMgammacurves,forinstanceDICOM10LuxandDICOM400Luxlamppower:Adjustmentoflamppowerbetween280-350Wprofilereset:Resetsanyenteredprofiles,eithercurrentorall,todefaultbrightness:Electronicimagebrightness.
Range-50to+50contrast:Electronicimagecontrast.
Range-50to+50saturation:Electronicimagesaturation.
Range-50to+50aspect:Aspectratioofimagescaling.
5options:Fillaspectratio:Fillstheimagingdeviceinhorizontaland/orverticaldirectiontomaintheinputimageaspectratio.
Fillall:Fillstheentireimagingdeviceregardlessoftheinputaspectratioandresolution.
Fill16:9:Fillstheimagingdevicewitha16:9aspectratio(scaled)imageregardlessofinputaspectratioandresolution.
Fill4:3:Fillstheimagingdevicewitha4:3aspectratio(scaled)imageregardlessoftheinputaspectratioandresolution.
One-to-one:Showstheinputimagemappedpixel-by-pixelwithoutscalingontheimagingdevice.
advanced:Advancedfeatures.
SeeChapter5.
6.
2.
reset:Restorepicturesettingstofactorydefault.
sourceinformation:Detailedinformationabouttheacquiredsource.
34CTseriesUserManual-Overview5.
6.
1Picture>RealColorsubmenuBrilliantColor:TexasInstrumentsDLPcolorprocessing.
3settings*:Bright:Maxbrightness,boostedcolorprofileforhighestperceivedbrightness.
Inthismodeallsegmentsandspokesofthecolorwheelareinuse.
Color:Maxbrightness,balancedcolorprofileforbettercolorperformance.
Inthismodeallsegmentsandspokesofthecolorwheelareinuse.
Auto:Onlyavailablein3DOff:Inthismodethespokes(transitionbetweensegments)andallsecondarysegments(cyanandwhite)andoncolorwheelareoff.
Lesscolorandbrightnessboostwillreduceimagenoise.
SRPHalf:SmearReductionProcessing(halfrevolution),wizzim/wizzimbrightonlySRPFull:SmearReductionProcessing(fullrevolution),wizzim/wizzimbrightonlycolorcorrection:Enableordisablecolorcorrection.
desiredvalues:Desiredcoordsmode(RGB,RGBCMY)forRealColorandspecificationofred,greenblue,cyan,magenta,yellowandwhite(ifincoordinatesmode)coordinates(x,y)colorandgain.
Resetalltonative:Resetsalltomeasuredvalues/projectornative)whiteDecideswhichmethodtobeusedforsettingofthewhitepoint;temperatureofx-/y-coordinate.
temperature:Setsthesystemcolortemperature(whitepoint)ontheKelvinscalefrom3200Kto9300Kinstepsof100K.
Allcolortemperaturesaretrackedontheblackbodycurve.
Theexactcoordinatesforthetemperaturewillbeshownincoordinates(x,y)whenadjustingthetemperature.
x-coordinate:SetstheXco-ordinateofthewhitepoint.
y-coordinate:SetstheYco-ordinateofthewhitepoint.
resettoD65:ResetthewhitepointtoD65coordinates.
resettonative:Resetswhitepointtomeasuredvalues.
RealColorcalibration:Selectscolorcalibrationtestimages(off,uncorrectedred/green/blue/fullwhite)andcolorprocessedtestimages(red,green,blue,white,black,cyan,magenta,yellow).
PresentsmeasuredvaluesforRealColor(seebelow).
Calibrationsettingshavetobemadeindividuallyforeachseparateprofile.
*InadvancedprofileadditionalBCmodes:-Color(rgbonly),bright(rgbonly),-SRPHalf(rgbonly),SRPFull(rgbonly)355.
6.
2Picture>Advancedsubmenuhorizontalposition:Shiftstheimagesideways(VGAonly)verticalposition:Shiftstheimageupordown(VGAonly)phase:Adjustforstableimage.
AjitteryimagemayappearwithcertainVGAsources.
YoumayalsopresstheAUTObuttononthekeypadorremotecontroltooptimize.
frequency:Adjustimagewidth.
Anincorrectsettingmayproducevertical,unstablebandsintheimage,andpartsoftheimagemaynotbedisplayedonscreen.
PushtheAUTObuttontofindacorrectsetting,ormanuallyadjustthefrequencyuntiltheverticalbandsdisappear.
Frequencyadjuststhepixelclocksamplingfrequencycolorspace:EnablesselectingbetweenAuto,RGB,YCbCr601,YCbCr709inputlevel:Choicebetween;auto,computer,video.
Dependingonsourceselectbetween0-255(computer),16-235(video).
sourcecorrection:Givesaccesstoindividualbrightnessoffsetsettings(seebelow).
InadditionyoucanstarttheADcalibrationprocesswhichrequiresVGAsourcewhichdisplaysaGrey16image(righthandimagebelow).
36CTseriesUserManual-Overview5.
7Installationmainmenuimageorientation:Rotatetheimageontheimagingdeviceindesktopfront,desktoprear,ceilingfront,ceilingrear.
sourcescan:Searchthroughallinputconnectorsforanactivesignalorstayononeconnector.
IRfrontEnableordisablefrontIR-receiver.
IRrearEnableordisablerearIR-reciever.
OSDenable:SetshowtheOSDmessagesshouldappear.
On:AllOSDmessagesareshown.
Onlywarnings:OnlycriticalOSDmessagesareshown.
Off:NoOSDmessagesareshown.
TheOSDmenuisstillaccessiblebyclickingmenuoneithertheremoteorthekeypad.
testimage:Displaysinternaltestimagesforprojectoralignmentandsetup.
Optiontoshow4:3,16:9,16:10,1.
85:1,2.
35:1,5:4,combined,off4:3:fillstheimagingdevicewithawhiteimage,butmarksoutthe4:3areainthecenteroftheimage.
16:9:fillstheimagingdevicewithawhiteimage,butmarksoutthe16:9areainthecenteroftheimage.
16:10:fillstheimagingdevicewithawhiteimage,butmarksoutthe16:10areainthecenteroftheimage.
1.
85:1:fillstheimagingdevicewithawhiteimage,butmarksoutthe1.
85:1areainthecenteroftheimage.
2.
35:1:fillstheimagingdevicewithawhiteimage,butmarksoutthe2.
35:1areainthecenteroftheimage.
5:4:fillstheimagingdevicewithawhiteimage,butmarksoutthe5:4areainthecenteroftheimage.
Combined:fillstheimagingdevicewithawhiteimageandmarksoutthealloftheaboveaspectratios.
syncterminationVGA:Enablesyncterminationto75Ω/2.
2kΩsyncterminationSYNC1:Enablesyncterminationto75Ω/2.
2kΩsyncterminationSYNC2:Enablesyncterminationto75Ω/2.
2kΩsyncterminationSYNC3:Enablesyncterminationto75Ω/2.
2kΩDisplayPort1eqChoicebetweenNormal,High,Low(enablesreceivingsignalsvialongercables/withhigherbitrate)DisplayPort2eqChoicebetweenNormal,High,Low(enablesreceivingsignalsvialongercables/withhigherbitrate)picturebypictureShowtwosourcessidebysidepicturebypicturesetupChoosethetwosourcestobeshownsidebysideEDID:SubmenuforEDID,seechapter5.
7.
1.
synchronization:Submenuforsynchronizationseechapter5.
7.
2.
375.
7.
1Installation>EDIDsubmenuVGA:DefinethedetailedtimingdescriptorintheEDIDdataforVGAconnector.
Selectbetweenauto,WUXGA,1080@60Hz,SX+,SXGA,1366x768,720@60Hz,720@50Hz,XGA,SVGA,VGA.
DVI:DefinethedetailedtimingdescriptorintheEDIDdataforDVIconnector.
Selectbetweenauto,WQXGA@60Hz,WUXGA@120Hz,WUXGA@60Hz,1080@120Hz,1080@60Hz,SX+,SXGA,1366x768,720@60Hz,720@50Hz,XGA,SVGA,VGA.
Herearetheauto-settingsforvariousprojectors:1080projector:1920x1080@120Hz.
DuallinkWUXGAprojector:1920x1200@120Hz.
DuallinkWQXGAprojector:2560x1600@60Hz.
DuallinkHDMI:DefinethedetailedtimingdescriptorintheEDIDdataforHDMIconnector.
Selectbetweenauto,WUXGA@60Hz,1080@60Hz,SX+,SXGA,1366x768,720@60Hz,720@50Hz,XGA,SVGA,VGA.
Allsettings,exceptauto,usesDVIastype.
Herearetheauto-settingsforvariousresolutions:1080projector:1920x1080@60HzWUXGAprojector:1920x1200@60HzWQXGAprojector:1920x1200@60HzHDBaseT:DefinethedetailedtimingdescriptorintheEDIDdataforHDBaseTconnector.
Selectbetweenauto,WUXGA@60Hz,1080@60Hz,SX+,SXGA,1366x768,720@60Hz,720@50Hz,XGA,SVGA,VGA.
Allsettings,exceptauto,usesHDMIastype.
Herearetheauto-settingsforvariousresolutions:1080projector:1920x1080@60HzWUXGAprojector:1920x1200@60HzWQXGAprojector:1920x1200@60HzDisplayPort1:DefinethedetailedtimingdescriptorintheEDIDdataforDisplayPort1connector.
Selectbetweenauto,WQXGA@120Hz,WQXGA@60Hz,WUXGA@120Hz,WUXGA@60Hz,1080@120Hz,1080@60Hz,SX+,SXGA,1366x768,720@60Hz,720@50Hz,XGA,SVGA,VGA.
Herearetheauto-settingsforvariousresolutions:1080projector:1920x1080@120HzWUXGAprojector:1920x1200@120HzWQXGAprojector:2560x1600@120HzDisplayPort2:DefinethedetailedtimingdescriptorintheEDIDdataforDisplayPort2connector.
Selectbetweenauto,WQXGA@60Hz,WUXGA@120Hz,WUXGA@60Hz,1080@120Hz,1080@60Hz,SX+,SXGA,1366x768,720@60Hz,720@50Hz,XGA,SVGA,VGA.
Herearetheauto-settingsforvariousresolutions:1080projector:1920x1080@120HzWUXGAprojector:1920x1200@120HzWQXGAprojector:2560x1600@60Hz*InadditiontothelistedoptionstherearethefollowingoptionsavailableforPicturebyPicture-usage:960x1080@60Hz/120Hz,960x1200@60Hz/120Hz,1280x1600@60Hz/120Hz-dependingonprojectormodel.
38CTseriesUserManual-Overview5.
7.
2Installation>Synchronizationsubmenu2Dframelock:Selectsthe2Dframelocksyncsignal.
Optionsfor2Dframelock:source,SYNC1,SYNC2,SYNC3.
SYNC1:SelectsusageofSYNC1connectorin2Dmode.
OptionsforSYNC1:input,displaysync,SYNC2,SYNC3SYNC2:SelectsusageofSYNC2connectorin2Dmode.
OptionsforSYNC2:input,displaysync,SYNC1,SYNC3SYNC3:SelectsusageofSYNC3connectorin2Dmode.
OptionsforSYNC3:input,displaysync,SYNC1,SYNC23Dsourcesync:Selectsthe3DsourceLRsyncsignal.
Optionsfor3Dsourcesync:source,SYNC1,SYNC2,SYNC33Ddisplaysync:Selectsthe3DdisplayLRsyncsignal.
Optionsfor3Dsourcesync:source,SYNC1,SYNC2,SYNC3SYNC1:SelectsusageofSYNC1connectorin3DmodeOptionsforSYNC1:input,displaysync,glasssync,SYNC2,SYNC3SYNC2:SelectsusageofSYNC2connectorin3DmodeOptionsforSYNC2:input,displaysync,glasssync,SYNC1,SYNC3.
SYNC3:SelectsusageofSYNC3connectorin3DmodeOptionsforSYNC3:input,displaysync,glasssync,SYNC1,SYNC2Ifyouuseoneofthesyncconnectorsas2Dor3Dsyncinput,thismayblocktheuseofthesameconnectorasoutput.
Forfurtherinfoonthevariouspossibleuserscenarios,pleaserefertoourwebpage.
395.
8SettingsmainmenuPINcode:ProtecttheprojectorfromusagewithaPIN.
IfenabledtheprojectorwillaskforthePINateverystartup.
network:SetIPaddress,SubnetmaskanddefaultgatewayTCP/UDPportnumber.
DHCPissupportedandisenabledbydefault,butcanbedisabled.
factoryreset:Restoreallsettingstothefactorydefinedvalues.
service:Enduserprotectedsettings.
AccessPINcoderequired.
standbyECOmodePowersavingmodesendingtheprojectorintoadeepsleepsettingwheninstandby.
Wakeupcanbeperformedeitherbypressingthepowerbuttonontheprojector/remotecontrolorremotelyviatheRS232connectorusingtheASCIIprotocol/wakeonLANviatheethernet.
IfDPMSisenabledandasourcesignalbecomesactiveagaintheprojectorwillreturntonormaloperation.
WheninstandbyECOmode,thebaudrateoftheRS232communicationisfixedat19200.
DPMS:EnableordisableDPMSpowersaving.
Thisfeatureisusedtoautomaticallypowerdowntheprojectorifnosourceisdetectedforagivenperiodoftime(definedbyDPMStimeout).
IftheprojectorispowereddowninDPMSpowersave,itwillautomaticallypowerbackonifavalidsourceisacquired.
DPMStimeout:SettheperiodoftimebeforetheprojectorautomaticallyentersDPMSmode.
DPMSmustbeenabledforthismenuitemtoactivate.
LEDindicatorsmute:DisableallLEDindicatorsontopoftheprojector.
Acriticalerror(statusLEDflashingRED)willstillbeenabled.
menutimeout:ThetimeintervalbeforetheOSDisautomaticallydisabled.
Optionof"never"isavailableiftheOSDisnevertotimeout.
background:Givesachoicebetweenwhite,grayorblackbackgroundcolor.
splash:Possibilitytochoosebetweenlogoorblackforthestartupsplashscreen.
baudrate:Presentsalternativebauderatesettings:4800,9600,19200,38400,57600,11520040CTseriesUserManual-Overview5.
8.
1Settings>PinCodesubmenuPINcodeenable:ThePINcodeisdisabledbydefault.
Ifyouwanttoenable/disablethePINcodeyouhavetoenterthecurrentPIN(DefaultPIN:1234).
WhencompletedyoucanenableordisabletheuseofPINcode.
IfPINisenteredincorrectly3times,itwillaskforaPUKcode,whichisprovidedinprintedforminthebox.
IfthePUKisenteredincorrectlyitwillrequireaspecialunlockcodeprovidebyaservicepartnertounlocktheprojector.
changePINcode:TochangethePINcodeyoufirsthavetoenterthecurrentPINcode(DefaultPIN:1234).
Thenyouenteranew4digitcodeandconfirmthiscodebyenteringthesamecodeagain.
ClickOKandthenewcodeisset.
415.
8.
2Settings>NetworksubmenuchangeLANsettings:Inthissub-menuyoucanswitchtheDHCPenabledfunctiononoroff.
IfoffyoucansetafixedIP-address.
LANDHCP:DHCPissupportedandisenabledbydefault,butcanbedisabledunderchangeLANsettingsLANIPaddress:InfofieldstatingthecurrentLANIPaddress.
LANsubnetmask:InfofieldstatingthecurrentLANsubnetmask.
LANdefaultgateway:InfofieldstatingthecurrentLANdefaultgateway.
42CTseriesUserManual-Overview5.
8.
3Settings>FactoryResetsubmenupicture:Restorespicturesettingstofactorydefault.
3D:Restores3Dsettingstofactorydefault.
communication:Restorescommunicationsettingstofactorydefault.
RealColorTM:RestoresRealColorTMsettingstofactorydefault.
other:Restoresothersettingsofyourchoicetofactorydefault.
5.
8.
4Settings>Servicesubmenuservice:Restrictedareawithinformationintendedforqualifiedservicepersonnelonlyentercode:Enterthe5-digitaccesscodetogainassesstotheserviceinformation.
435.
9LanguagesmainmenuSelectthedesiredmenulanguage.
Supportedlanguages:English,French,German,Spanish,Norwegian,Swedish,Russian,Korean,Japanese,ChineseTraditional,ChineseSimplified,Portuguese,Italian.
Default:English44CTseriesUserManual-Overview5.
10Statusmainmenusourceinformation:Simpleandadvancedsourceinformation.
synchronisationinformation:Displaysthecurrentsynchronizationinformation.
Includes2Dframelock,3Dsourcesyncand3Ddisplaysync.
partnumber:Projectorpartnumber.
serialnumber:Projectorserialnumber.
manufactured(y):Yearofmanufacturing.
manufactured(w):Weekofmanufacturing.
softwareversion:Softwareversioninstalledintheprojector.
Thisisveryimportantforservicerequests.
colorwheel:Typeofcolorwheelinstalled.
lampremaining:Remaininglamptime.
lamptime:Lamptimeused.
totaloperating:Totaloperatingtimeforprojector.
lamppower:Lamppowerinwatts.
IPaddressLAN:ProjectorLANIPaddressforuseinnetwork/remotecontrol.
455.
10.
1Status>SourceInformationsubmenuadvanced:Accesstosubmenuformoresettingsdependingonsourceused.
See4.
10.
2Status>SourceInformation>Advancedsubmenusource1:Infoonwhichsourceisinuse.
format:Displaysresolutionandfrequencyforthesourceinuse.
source2:Infoonwhichsourceisinuse.
format:Displaysresolutionandfrequencyforthesourceinuse.
brightness:Infoonbrightnesssettings.
contrast:Infooncontrastsettings.
saturation:Infoonsaturationsettings.
gamma:Infoongamma-variantused.
46CTseriesUserManual-Overview5.
10.
2Status>SourceInformation>Advancedsubmenuresolution:Infooncurrentsourceresolution.
totalimagesize:Infooncurrenthorizontalandverticalimagesize.
syncfrequency:Infooncurrenthorizontalandverticalsyncfrequencyfortheprojector.
pixelclock:Weekofmanufacturing.
scan:Projectorserialnumber.
modeid:Infooncurrentmodesetup(VGAsourceonly).
cromasampling:Thecurrentsourcecromasamplingtype.
Typically4:4:4or4:2:2.
bitsperchannel:Thenumberofbitsperchannel.
Forinstance,fora24bitRGBsource,thenumberofbitsperchannelis8.
475.
10.
3Status>SourceSynchronisationsubmenu3D:Indicateswhich3Dmodeisused.
2Dframelock:Indicateswhattheprojectorlockstoin2Dfrequency:Showsthecurrentfrequencyofthelockingsignalstatus:Indicatesthelockingstatusphase:Indicatesphasebetweenthesourceandthelockingsignal3Dsourcesync:IndicateswherethesourceL/Rsyncisconnectedsourcehasin-bandsync:IndicatedifthesourcehasembeddedL/Rsync,onlysupportedonDisplayPortfrequency:Showsthecurrentfrequencyofthesignaldutycycle:Showsthedutycycleofthesignalstatus:Indicatesthesyncstatusphase:IndicatesphasebetweenthesourceandtheL/Rsyncsignal3Ddisplaysync:Indicateswhattheprojectorlockstoin3Dfrequency:Showsthecurrentfrequencyofthelockingsignaldutycycle:Showsthedutycycleofthesignalstatus:Indicatesthelockingstatusphase:Indicatesphasebetweenthesourceandthelockingsignal48CTseriesUserManual-Overview496FunctionalityThevariousfunctionsoftheprojectoraredescribedindetailinthefollowingchapters.
6.
1PoweringOnandOff6.
1.
1ManualpowercontrolSwitchtheprojectorbetweenOnandStandbyusingthePOWERswitchonthekeypadorthewirelessremotecontrol.
ThekeypadSTATUSindicatorisbluewhentheprojectorisupandrunning,flashingyellowwhencoolingdownandyellowwheninstandby.
Nostatuslightindicatesthatthepowerhasbeenswitchedoffcompletelyintheinstallation.
6.
1.
2DPMS-powerdownThisisapowerdownmodewhichneedstobeactivatedintheSETTINGSmenu.
Whenactivateditpowersdownafteraspecifiedperiodoftimeafterasourcehasbeenremoved.
ThetimeoutsettingcanbespecifiedintheDPMSTIMEOUTfunctioninthesamemenu,usingthearrowkeys.
6.
2ImagealignmentTestimagesarebuiltintothesystemforeasieralignmentoftheprojectorToaccessthetestimages,gotothemenuentryINSTALLATION>TESTIMAGE.
Runthroughthevarioustestimagesusingthearrowkeys.
Whenatestimagematchingtheas-pectratioofyourscreenhasbeenfound,youcanmatchthescreenusingthezoom,focus,lensshiftandaligningtheprojectorphysically.
6.
2.
1ImageorientationTheprojectorsupportsthefollowinginstallationorientations(inrelationtothescreen):Desktopfront(default)CeilingfrontDesktoprearCeilingrearTosettheimageorientationgotomenuentryINSTALLATION>IMAGEORIENTATION.
50UserManual-Introduction6.
3LanguageThemenusystemhasatotalof11user-selectablelanguagesavailable.
ThedefaultlanguageisEnglish.
Theavailablelanguagesare:EnglishFrenchGermanSpanishRussianNorwegianSwedishKoreanJapaneseChineseSimplifiedChineseTraditionalPortugueseItalianTochangethelanguageofthemenusystem,justclicktopmenuandselectyourdesiredlanguage.
6.
4SystemstatusSystemstatuscanbereadatanytime.
STATUSiseasilyaccessiblefromthetopmenuorbypushingtheINFObuttonthewirelessremotecontrol.
PartnumberSerialnumberTheyear/weektheprojectorwasmanufacturedCurrentsoftwareversionRuntimeandremainingtimeforlampTotalnumberofoperatinghoursAllnetworkinformationCurrentlyactivesourceFurthersourceinformationisavailablebyselectingSTATUS>SOURCEINFORMATION.
Ifadeeperanalysisisrequiredforthecurrentlyactivesource,selectSTATUS>SOURCEINFORMATION>ADVANCED.
Thismenuprovidesdetailedtiminginformationforthecur-rentlyactivesource.
SettingcustomcolorspaceanddigitallevelTheprojectorwillautomaticallytrytosetthecorrectcolorspaceanddigitaldrivelevelbasedoninformationfromthesource.
Formanualoverrideoftheautomaticallydetectedcolorspaceanddigitallevel,gotoPICTURE>ADVANCEDinthemenu.
SettheCOLORSPACEandINPUTLEVELtooneofthemanualsettings,choosingyourdesiredcolorspaceanddigitaldrivelevel.
CTseriesUserManual-Functionality516.
5LamppowerTheprojectionlampcanberunatdifferentpowerlevels.
Higherlevelsgivehigherbrightnessandshorterlamplifetime.
Lowerlevelssaveenergy,extendlifetimeandreducebrightness.
Inthemenusystem,gotoPICTURE>LAMPPOWERandadjustthesettingaccordingtoneed.
6.
6Sourceselection,sourcescanTheprojectorcanautomaticallyscanthroughalltheinputconnectorsforavalidsignal.
Ifavalidsignalisfound,theimagewillsetupautomatically.
Thisiscalledsourcescan.
Sourcescanisbydefaultdisabled.
Whensourcescanisdisabled,theprojectorwillonlydis-playtheselectedsource.
Usethekeypad,remotecontrolorthecontrolinterfacetochangetheselectedinputsource.
Inthemenusystem,gotoINSTALLATION>SOURCESCAN.
Directsourceselectioncanbedoneusingthekeypadorthewirelessremotecontrol.
Usingthekeypad,pressthearrowkeystoselectdesiredsource(whennotinmenuandnotshiftingthelens)Usingthewirelessremotecontrol,pressthedesireddedicatedsourceselectbuttonUsingtheRS232orLANcontrolinterfaces,pleaseseetherelevantSIS(SimplifiedIn-structionSet)commandsavailabletodownloadonwww.
barco.
com6.
7Onscreendisplay(OSD)messagesWhendetectingsourcesandusingthevariousfeaturesoftheprojector,OSDmessageswillappearonthescreen.
Whichmessageswillbeappearingcanbepartiallycontrolledbytheuser.
TheOSDcanruninthesemodes:On.
Allmessages,warningsandinformationisdisplayed.
Off.
Nomessagesareshown.
Onlywarnings.
Onlycriticalwarningmessagesliketemperatureoverheatingwillbeshown.
GotomenuentryINSTALLATION>OSDENABLEtocontroltheOSDbehaviour.
6.
7.
1DisablingtheSTATUSindicatorIncertaininstallationsitmayrequiredtocompletelydisabletheSTATUSindicatorinthekey-pad.
DisabletheindicatorinthemenuSETTINGS>LEDINDICATORSMUTE.
6.
7.
2SettingthebackgroundcolorThebackgroundcolordisplayedwhentheprojectorissearchingforasourcecanbesettoasetofpredefinedcolors(white/grey/black).
GotomenuentrySETTINGS>BACKGROUNDtosetthedesiredcolor.
6.
7.
3SettingOSDmenutimeoutIftheOSDmenuisopenandnotusedforadefinedperiodoftime,itwillautomaticallybedisabled.
Thistimeoutintervalcanberegulatedfrom5secondsto60seconds,withthedefaulttimesetto30seconds.
ThetimeoutcanalsobesettoNEVERfortheOSDmenutonevertimeout.
GotomenuentrySETTINGS>MENUTIMEOUTtochangethetimeperiod.
6.
7.
4SelectingthestartuplogoWhentheprojectorisstartingup,alogoisdisplayedintheentireimage.
ThelogocanalsobesettoBLACKifitisdesirabletodisablethemanufacturersdefaultlogo.
GotomenuentrySETTINGS>SPLASHtochangethissetting.
52UserManual-Introduction6.
8PicturebyPicture(PbP)Youmaychoosetoviewtwosourcessimultaneouslyasapicturebypicture.
ThePbP-functionallowsviewingoftwoimagessidebysideorontopofeachother.
CertainrestrictionsapplytohowsourcescombinewhenusingPbP.
ToviewPbP:EntertheINSTALLATIONmenuandactivatethePICTUREBYPICTUREfunctionMovedowntoPICTUREBYPICTURESETUPSetupbyselectingthesourcesyouwantunderSOURCE1&SOURCE2ThefollowingspecialoptionsareavailableforPicturebyPicture-usage:960x1080@60Hz/120Hz,960x1200@60Hz/120Hz,1280x1600@60Hz/120Hz,dependingonprojectormodel,see5.
7.
1Installation>EDIDsubmenu6.
9StandbyECOmodePowersavingmodesendingtheprojectorintoadeepsleepsettingwheninstandby.
Wakeupcanbeperformedeitherbypressingthepowerbuttonontheprojector/remotecontrolorremotelyviatheRS232connectorusingtheASCIIprotocol/wakeonLANviatheethernet.
IfDPMSisenabledandasourcesignalbecomesactiveagaintheprojectorwillreturntonormaloperation.
WheninstandbyECOmode,thebaudrateoftheRS232communicationisfixedat19200.
6.
10PINcodeTheprojectorcanbelockedbyaPIN(PersonalIdentificationNumber)codetocontrolaccess.
ThePINcodeis4digits,andifthePINcodeisactivated,youmustenterthecorrectcodetounlocktheprojector.
FactorysetPIN(1234).
Toactivate,deactivateorchangethePINcode,seetheSETTINGS>PINCODEsubmenu.
IfanincorrectPINcodeisentered,youmaytryagaintwotimes.
Ifyoufailthreetimesinarow,enteringaPUK(unlock)codeisneeded.
ThePUKcodeissuppliedwiththeproduct.
IfyoualsofailthreetimeswiththePUKcode,theprojectorlocksuppermanently,andcanonlybeunlockedbyaspecialserviceunlockcode.
Toaccessthiscode,youwillneedtocontactyourdealeroraservicestation.
Theserviceunlockcodewillbegeneratedbasedonasecure,encryptednumberthatisproducedbytheprojectoritself.
Theprojectorwillproduceanewnumbereverytime.
Inordertounlocktheprojectorviaadealer/servicestation,proofofownershipmustbeprovidedbythecustomer.
6.
11Disablingthewirelessremotecontrol(IR)receiversTheprojectorhas2IRreceivers,oneinthefrontandoneattherear.
Thesereceiverscanbeindividuallydisabledifnecessary.
GotomenuentryINSTALLATION>IRFRONT/IRREARtodisablethereceivers.
CTseriesUserManual-Functionality536.
12SoftwareupgradesWhenupgradingthesoftwaretheprojectormustalwaysbeinstandbyposition!
IfyouareorhavebeeninECOmodeyouMUSTusethefollowingprocedurebeforeupgradingyourprojector:1.
Starttheprojector2.
DisabletheOSDmodeintheOSDmenu3.
Poweroff(entersstandbyandnotECOmode)4.
Disconnectandreconnectthepowercable5.
Waitforstandby(yellowlight)6.
ConnectUSBcableandproceedwiththeupradingprocessbelowInordertoupgradeyourprojector,pleasefollowthemethodandsequencedescribedbelow:1.
YouwillneedaUSBmemorysticksetupwithaFAT-filesystemtoperformthisupgrade2.
Accesstheupgradesoftwarefromthefollowingweb-address;www.
barco.
com3.
Downloadandsavethefirmware.
zip-filetoyourPCdesktop4.
Downloadandsavethefirmware_.
tarfiletotherootofamemorystickItisimportantthattheUSBissafelyremovedfromcomputer,usingtheejectfunctiononyourPC.
5.
Settheprojectorinstandbymode6.
Insertthememorystickintheprojectorandwaitafewseconds7.
IftheprojectorisinstandbymodeitwillstartflashingautomaticallyIftheprojectorisinasleepmode,pushtheonbuttontoinitiateflashingRapidblueblinkingindicatesthatupgradeisinitiated8.
RemovetheUSBstickwhenblueblinkingturnstoyellowblink.
Rapidyellowblinkingindicatesthattheupgradeprocessisrunning9.
Donotturnoffprojector/removethepowercablewhiletheupgradeisstillinprogress!
10.
Theprojectormayrestartseveraltimesduringtheupgrade11.
Theupgradehasfinishedsuccessfullywhenyellowrapidblinkhaschangedtostableyellowlight54UserManual-IntroductionCTseriesUserManual-Functionality557OptimisingtheimageTheprojectorhaspowerfulfeaturesforpictureoptimization.
Thischapterdescribesdetailsinusingthesefeatures.
AllcolorcalibrationisdoneusingBarco'sproprietaryRealColorsolu-tion.
7.
1CalibrationdataAllBarcoprojectorsaremeasuredandcalibratedwithhighprecisionequipmentatthefactoryforthebestout-of-boxexperience.
Overthelifetimeofthelampsthecharacteristicsoftheprojectormightchangeslightly.
Thesameapplieswhenreplacinglamps.
7.
1.
1UpdatingRealColorcalibrationdataForaccurateresultswiththeRealColorsystem,accuratemeasurementdataisrequired.
RealColorcalibrationdatacanbefoundunderthemenuentryPICTURE>REALCOLOR>REALCOLORCALIBRATION>MEASUREDVALUESX/Yandrelativeluminancevaluesforred,green,blue,whiteandBrilliantColor1areenteredinthismenu.
TheBrilliantColorshouldallbesetto0.
000fortheVizSim(RGB)colorwheel.
AllvaluescanalsobeupdatedusingthecommunicationsprotocoloverRS-232orLAN.
Beforesettingthesevalues,itisimportanttoselectthedesiredBrilliantColorsetting.
GotomenuentryPICTURE>REALCOLOR>BRILLIANTCOLORtoselectthedesiredBrilliantColorlook.
Measurementsmustbedoneonthebuiltintestpatterns.
ThisisinparticularlyimportantfortheBrilliantColor1testpatternsinceitisimpossibletogeneratethispatterncorrectlyusingacomputersource.
IntheusermenuthesepatternscanbeaccessedthroughPICTURE>CALIBRATION>REALCOLORCALIBRATION>COLORCALIBRATIONTESTIMAGE/COLORPROCESSEDTESTIMAGE.
Usethearrowkeystocyclethroughtheimages.
Performingafactoryresetoftheprojectorwillrestorethemeasuredvaluestothevaluesmeasuredinthefactory.
Whenmeasuringdata,ahighqualitymeasurementinstrumentishighlyrecommendedforaccurateresults.
Spectrometers(likePhotoResearchPR-655)arepreferred.
56UserManual-Introduction7.
1.
2RealColormodesBeforeanycolorcorrectionisappliedtotheimage,RealColormustbeenabled.
GotomenuPICTURE>REALCOLOR>COLORCORRECTIONtoenableRealColor.
RealColorcanoperatein3modes:Colortemperature/whitepointcorrectiononly.
Red,Green,Blue,Whitecorrection.
InthismodeoptimalcolorcoordinatesforCyan,MagentaandYellowwillbecomputedautomatically.
Red,Green,Blue,Cyan,Magenta,Yellow,White.
Inthismodecolorpointsandintensityforeachcolorcanbemanipulatedseparately.
TochangetheRealColormodepleasegothemenuPICTURE>REALCOLOR>DE-SIREDVALUES>DESIREDCOORDSMODE.
CTseriesUserManual-Optimisingtheimage577.
2SettingawhitepointorcolortemperatureAfterenablingRealColorsetthecolortemperatureinthemenuPICTURE>REALCOLOR>TEMPERATURE.
Valuesbetween3200Kand9300Kcanbeselected.
Thesecolortemperaturesaretrackingthe"blackbodycurve"-theblackcurvedlineinthecenterofCIEChartinFigure7-1.
ThedefaultistheD65illuminantat6500K.
Thewhitepointcanalsobesettoacustomvaluedefinedbyanx,ycoordinatenotlinkedtotheblackbody.
GotomenuPICTURE>REALCOLOR>X-COOR-DINATEandPICTURE>REALCOLOR>Y-COORDINATEtochangethewhitepoint.
Figure7-1.
CIEchart7.
2.
1DefiningthesystemcolorgamutAllcolorsvisibletotheeyearedefinedbyCIEChartinFigure7-1.
Theboundaryofthecolorstheprojectorcandisplayiscalledthesystemcolorgamut.
Thewhitetriangleinthefigureisanexampleofasystemcolorgamut.
Bydefaulttheprojectorhasthewidestpossiblesystemgamut.
Thesystemcolorgamutcannotbeexpandedoutsidenativecolorgamut.
Itmaybedesirabletochangethesystemcolorgamutoftheprojectorto:Color-matchmultipleprojectors.
Meetdefinedcolorstandards,likeREC709.
Createaspecial"look"totheimage.
Beforethesystemcolorgamutcanbechanged,thedesiredRealColormodehastobedefined.
TochangetheRealColormodepleasegothemenuPICTURE>REALCOLOR>DESIREDVALUES>DESIREDCOORDSMODE.
RealColorhastobeenabledforthedesiredsystemgamuttobeapplied.
GotomenuPICTURE>REALCOLOR>COLORCORRECTIONtoenableRealColor.
AfterRealColorisenabledandthedesiredcolorcorrectionmodeisselected,pleasegothemenuentryPICTURE>REALCOLOR>DESIREDVALUEStochangethecolorpointstoyourdesiredsystemcolorgamut.
58UserManual-Introduction7.
3GammaTheprojectorfeaturesasetof6builtingammacurves:Film2.
2,Film2.
4,Film2.
6,Film2.
8,Video1,Video2,Computer1,Computer2,DynamicandDICOM180.
Thedifferentgammacurvesaredisplayedbelow.
Thenamesofthecurvesaredescriptivefortheirrecommendeduse.
Usinganyofthecomputercurvesforvideoapplicationswillresultsinsignificantimagenoise.
Figure7-1.
Film2.
2gammaFigure7-2.
Film2.
4gammaFigure7-3.
Film2.
6gammaCTseriesUserManual-Optimisingtheimage59Figure7-4.
Film2.
8gammaFigure7-5.
Video1gammaFigure7-6.
Video2gamma60UserManual-IntroductionFigure7-7.
Computer1gammaFigure7-8.
Computer2gammaFigure7-9.
DynamicgammaCTseriesUserManual-Optimisingtheimage61Figure7-10.
DICOM180Lux*(exampleHBcolorwheel:othershapeswithotheralternatives)*SeveralDICOMsettings(10,60,180,250,400Lux-ThehigherLuxnumber(ambientlight),thesteeperthecurve.
62UserManual-IntroductionCTseriesUserManual-Optimisingtheimage638TechnicalspecificationsPleaseseewww.
barco.
comformoretechnicalinformation.
64UserManual-IntroductionCTseriesUserManual-Technicalspecifications659LampchangeTheindicatoronthekeypadwillturnREDwhenlamplifeisexpired.
Changethelampwhenlifetimeexpires.
Alwaysreplacelampwiththesametypeandrating.
USEORIGINALLAMPSONLY.
Thelampholderemploysanelectroniclamptimerthatistrackingthelifetimeofthelamp.
Alwaysdisconnectthepowercordandwaituntiltheprojectorhascooleddown(60minutes)beforeopeningthelampcover.
Becarefulnottotouchtheprotectiveglasswhenreplacingthelamp,thismaycausetheprotectiveglasstooverheatandbreakwhileinuse.
Beextremelycarefulwhenremovingthelampmodule.
Intheunlikelyeventthatthebulbruptures,smallglassfragmentsmaybegenerated.
Thelampmoduleisdesignedtocontainthesefragments,butusecautionwhenremovingthelampmodule.
Removetheusedlamp:1.
Unscrewthelampdoorscrew2.
Openthelampdoor3.
Unscrewthethreescrewsthatholdthelampinplace4.
PullthelampoutusingthehandleReplacewithanewlampinreverseorder:1.
Insertanewlamp.
Observetheguidepinsandmakesurethelampisfullyinserted2.
Fastenthethreescrewssecurely3.
Closethelampdoor4.
TightenthelampdoorscrewfirmlyIntheunlikelyeventofalamprapture,alimitedamountofmercuryvapourmaybeemittedintotheroom.
Toavoidinhalingthismercuryvapour(whichistoxic,andcanbeharmfulforlungsandnervoussystem)theroomshouldbethoroughlyventilatedforaperiodofatleast30minutes.
Therearenoknownhealthhazardsfromexposuretolampsthatareintactandwhichareusedwithinanenclosedfixture.
Noadverseeffectsareexpectedfromoccasionalexposuretobrokenlamps.
Asamatterofgoodpractise,avoidprolongedorfrequentexposuretolampsunlessthereisadequateventilation.
Themajorhazardfrombrokenlampsisthepossibilityofsustainingglasscuts.
66UserManual-IntroductionF50UserManual-LampchangePRODUCTIONADDRESSHabornveien531653GamleFredrikstadNorwayModelcertificationname:GP92014Barconv.
Allrightsreserved.
Allbrandsandtradenamesarethepropertyoftheirrespectiveowners.
Specificationssubjecttochangewithoutpriornotice.
Allvaluesaretypicalandmayvary.
Pleasevisitourwebsiteforlatestspecificationsandproductofferings.
601-0363-01
barco.
com2User'sGuide–GettingtoknowtheprojectorCTseriesUserManual3Contents1Introduction71.
1Thankyou1.
2Training1.
3Symbolsusedinthisdocumentation2Safetyandcompliance92.
1Generalsafetyconsiderations2.
2Information/Warning-PotentialMercuryVapourHealthIssues2.
3FCCcompliance2.
4Disposalinformation2.
4.
1StatementWEEE(WasteElectricalandElectronicEquipment)2.
4.
2Disposalofbatteriesintheproduct2.
4.
3TurkeyRoHScompliance2.
5Service3Whatisinthebox134Installation154.
1Systemconsiderations4.
2Ventilation4.
2.
1Ventilationaccessories4.
3Ceilingandrigmounting4.
4Lockingtheprojector4.
5Projectorangle(tilt)4.
6Selectingalens4.
6.
1Insertingalens4.
6.
2Changing/removingalens4.
6.
3Lensrange4.
7Lenslock4.
8Lensshift4.
9Lensplanarity(Scheimpflugadjustment)4.
10Zoom,focusandiris4.
11Makingtheconnections4.
12Connectingvideoanddatasources4.
13Connectingcontrolinterfaces4.
14Sourceformatintegrity–EDID4.
15Imagesizes4UserManual-Introduction5Overview255.
1Keypadandindicator5.
2Wirelessremotecontrol5.
3Connectors5.
3.
1Signalconnectors5.
3.
2Controlconnectors5.
4Menusystem5.
4.
1Topmenu5.
53Dmainmenu5.
5.
13D>Dualheadsetupsubmenu5.
6Picturemainmenu5.
6.
1Picture>RealColorsubmenu5.
6.
2Picture>Advancedsubmenu5.
7Installationmainmenu5.
7.
1Installation>EDIDsubmenu5.
7.
2Installation>Synchronizationsubmenu5.
8Settingsmainmenu5.
8.
1Settings>PinCodesubmenu5.
8.
2Settings>Networksubmenu5.
8.
3Settings>FactoryResetsubmenu5.
8.
4Settings>Servicesubmenu5.
9Languagesmainmenu5.
10Statusmainmenu5.
10.
1Status>SourceInformationsubmenu5.
10.
2Status>SourceInformation>Advancedsubmenu5.
10.
3Status>SourceSynchronisationsubmenu6Functionality496.
1PoweringOnandOff6.
1.
1Manualpowercontrol6.
1.
2DPMS-powerdown6.
2Imagealignment6.
2.
1Imageorientation6.
3Language6.
4Systemstatus6.
5Lamppower6.
6Sourceselection,sourcescan6.
7Onscreendisplay(OSD)messages6.
7.
1DisablingtheSTATUSindicator6.
7.
2Settingthebackgroundcolor6.
7.
3SettingOSDmenutimeout6.
7.
4Selectingthestartuplogo6.
8PicturebyPicture(PbP)6.
9StandbyECOmodeCTseriesUserManual-Introduction56.
10PINcode6.
11Disablingthewirelessremotecontrol(IR)receivers6.
12Softwareupgrades7Optimisingtheimage557.
1Calibrationdata7.
1.
1UpdatingRealColorcalibrationdata7.
1.
2RealColormodes7.
2Settingawhitepointorcolortemperature7.
2.
1Definingthesystemcolorgamut7.
3Gamma8Technicalspecifications639Lampchange656UserManual-IntroductionCTseriesUserManual-Introduction71Introduction1.
1ThankyouThankyouforpurchasingthisprojector.
WhenreferringtothetermCTseriesinthisdocumentthecontentisapplicableforthefollowingBarcoproducts:CTHD-61B(1920x1080)CTWU-61B(1920x1200)CTWQ-51B(2560x1600)CTPN-41B(2560x1080)TheCTseriesprojectorssetanindustrybenchmarkforprojectorsinitssizeandperformancecategory.
IfrealismandreliabilityarekeycriteriathishighresolutionDLP-technologyprojectorwithhighperformanceopticsandlenses,updatedsignalprocessingandbuilt-inframe-locksynchronisation,makesittheidealprojectorformulti-channelvisualizationandsimulationapplications.
InadditiontotheexcellentimageperformanceitiscapableofshowingActiveStereo3D.
1.
2TrainingTogetthebestperformanceoutoftheprojectoraswellasthesystem,trainingatBarcoishighlyadvised,inadditiontostudyingthisuserguide.
Variouscoursesareavailable.
AttheUniversity,skilledtrainerswillteachyoubasicprojectoruseaswellasmoreadvancedset-upandconfigurationacrossmultipleapplicationareas.
Gotowww.
barco.
comforeasyaccesstomoreinformation.
1.
3SymbolsusedinthisdocumentationWARNING:Usedtopointoutpotentialdangertopeopleorequipmentwhenusingtheproductincertainways.
NOTE:Usedtopointoutessentialhandlingrequirementsfortheprojector.
Ifnotactedon,theymaycauseproductmalfunctioning.
TIP:Presentingadvicewhichbenefitstheprojectorusageorconditionsrelatedtoprojectorperformance.
Thespecificationsandfunctionalityofthisprojectormaychangewithoutpriornotice.
Pictures/drawingsorfeaturesinthisuserguidemaybedifferentfromyourprojectordependingonmodel/version.
8UserManual-IntroductionCTseriesUserManual-Introduction92Safetyandcompliance2.
1GeneralsafetyconsiderationsUseonlythecablesandcordssuppliedwiththeprojectorororiginalreplacementcables.
Usingothercablesorcordsmayleadtomalfunctionandpermanentdamagetotheunit.
Alwaysuse3-prong(grounded)powercordtoensurepropergroundingoftheunit.
Neveruse2-prongpowercords,asthisisdangerousandcouldleadtoelectricalshock.
Forthegroundingofthecoaxconnection,equalgroundpotentialmustbeensured.
Tobeinstalledbytrainedpersonnel.
Neveropentheunit.
Theprojectorcontainsnouserserviceableparts.
Referallrepairstoqualifiedpersonnelonly.
Makesurethatnoobjectsenterintotheventsandopeningsoftheset.
Donotspillanyliquidsontheprojectororintotheventsoropeningsoftheunit.
Alwaysremovelenscapbeforeswitchingontheprojector.
Ifthelenscapisnotre-moved,itmaymeltduetothehighenergylightemittedthroughthelens.
Meltingthelenscapmaypermanentlydamagethesurfaceoftheprojectionlens.
Donotlookintotheprojectionlenswhentheprojectorisswitchedon.
Thestronglightmaypermanentlydamagesight.
Onlyplacetheprojectoronastablesurface,ormountitsecurelyusinganapprovedceiling-mount.
Donotdroptheprojector.
Alwaysoperatetheprojectoraccordingtotherotationguidelines.
Operatingtheunitinotherpositionsmayreducelamplifesignificantly,andmayleadtooverheating,resultinginmalfunctioning.
Alwaysallowampleairflowthroughtheprojector.
Neverblockanyoftheairvents.
Nevercovertheunitinanywaywhilerunning.
Allowforsufficientdistancetowallsandceilingstoavoidoverheating.
Minimumsafetydistancetoanysideoftheunitis50cm/20"inanydirection(15cm/6"toceiling).
Hotairisexhaustedfromtherearvent.
Donotplaceobjectsthataresensitivetoheatnearerthan50cm/20"totheexhaustvent.
Theprojectorisdesignedforindooruseonly.
Neveroperatetheunitoutdoors.
Donotoperatetheprojectoroutsideitstemperatureandhumidityspecifications,asthismayresultinoverheatingandmalfunctioning.
Onlyconnecttheprojectortosignalsourcesandvoltagesasdescribedinthetechnicalspecification.
Connectingtounspecifiedsignalsourcesorvoltagesmayleadtomalfunc-tionandpermanentdamageoftheunit.
Inordertopreventdamagetotheprojectorcausedbyover-voltages(e.
g.
lightning),werecommendconnectiontoaline(mains)circuitwhichhasovervoltageprotection.
Allowlamptocooldownforatleast60minutesbeforechanging.
USEONLYORIGINALLAMPS.
Connectingsourcestoapoweredprojectormayresultinproductfailure.
Itisrecom-mendedthatthepowercableconnector(projector-end)orthemainspowersocketisaccessiblewhilsttheproductisinusetoenablemainspowertobedisconnectedorswitchedoffwhenconnectingsourcedevices.
Thisshouldbeconsideredduringproductinstallation.
10UserManual-Introduction2.
2Information/Warning-PotentialMercuryVapourHealthIssuesThisprojectorusesaverypowerfulUHPlampforilluminationtoproduceanextremelybrightimage.
Thistechnologyissimilartootherhigh-pressuredischargelampsthatareextensivelyusedincars,streetlightsandotherlightingappliancestoday.
Theselamps,likefluorescentlighting,containsmallamountsofmercury.
Theamountofmercurypresentinalampisfarbelowthelimitsofdangersetbytheauthorities.
Itishoweververyimportantthatlampscontainingmercuryaretreatedproperlytominimizepotentialhealthhazards.
TheUHPlamp,likeanyotherhighbrightnessprojectorlamp,isoperatingunderhigh-pres-sure.
Evenifthelampandtheprojectorarecarefullydesignedtominimizetheprobabilityoflamprupture,thelampmaybreakwhileoperatingandsmallamountsofmercuryvapourmaybeemittedfromtheprojector.
Theprobabilityofruptureincreaseswhenthelampreachesitsexpectedlifetime.
Itisthereforehighlyrecommendedthatthelampisreplacedwhenthespecifiedlifetimeisreached.
Asageneralprecaution,securegoodventilationintheroomwhenoperatingtheprojector.
Iflampruptureoccurs,evacuatetheroomandsecuregoodventilation.
Childrenandpregnantwomeninparticularshouldleavetheroom.
Whenreplacingawornlamp,disposeoftheusedlampcarefullybyproperrecycling.
Mercuryisanaturallyoccurring,stablemetallicelementthatmayposeasafetyrisktopeopleundercertainconditions.
AccordingtothePublicHealthStatementforMercurypublishedbytheAgencyforToxicSubstancesandDiseaseRegistry("ATSDR",partoftheUnitedStatesPublicHealthService),thebrain,centralnervoussystemandkidneysaresensitivetotheeffectsofmercury,andpermanentdamagecanoccuratsufficientlyhighlevelsofexposure.
Acuteexposuretohighconcentrationsofmercuryvapourcancauseconditionssuchaslungandairwayirritation,tightnessinthechest,aburningsensationinthelungs,coughing,nausea,vomitinganddiarrhoea.
Childrenandfetusesareparticularlysensitivetotheharmfuleffectsofmetallicmercurytothenervoussystem.
Seekmedicalattentionifanyoftheabovesymptomsareexperiencedorifotherunusualconditionsareexperiencedfollowinglamprupture.
Thisproductcontainschemicals,includinglead,knowntotheStateofCaliforniatocausebirthdefectsorotherreproductiveharm.
Recycleproperly;donotdisposeofinordinarywaste!
2.
3FCCcomplianceFCCregulationsstatethatchangesormodificationsnotexpresslyapprovedbythepartyresponsiblemanufacturercouldvoidyourauthoritytooperatetheequipment.
ThisequipmenthasbeentestedandfoundtocomplywiththelimitsforaClassAdigi-taldevice,pursuanttopart15oftheFCCRules.
Theselimitsaredesignedtoprovidereasonableprotectionagainstharmfulinterferencewhentheequipmentisoperatedinacommercialenvironment.
Thisequipmentgenerates,uses,andcanradiateradiofrequencyenergyand,ifnotinstalledandusedinaccordancewiththeinstructionmanual,maycauseharmfulinterferencetoradiocommunications.
Operationofthisequipmentinaresidentialareaislikelytocauseharmfulinterferenceinwhichcasetheuserwillberequiredtocorrecttheinterferenceathisownexpense.
Thisdevicecomplieswithpart15oftheFCCRules.
Operationissubjecttothefollowingtwoconditions:(1)Thisdevicemaynotcauseharmfulinterference,and(2)Thisdevicemustacceptanyinterferencereceived,includinginterferencethatmaycauseundesiredoperation.
CANADAThisClassAdigitalapparatuscomplieswithCanadianICES-003.
/CetappareilnumériquedelaclasseAestconformeàlanormeNMB-003duCanada.
CTseriesUserManual-Safetyandcompliance112.
4Disposalinformation2.
4.
1StatementWEEE(WasteElectricalandElectronicEquipment)Thissymbolontheproductindicatesthat,undertheEuropeanDirective2012/19/EUgovern-ingwastefromelectricalandelectronicequipment,thisproductmustnotbedisposedofwithothermunicipalwaste.
Pleasedisposeofyourwasteequipmentbyhandingitovertoadesignatedcollectionpointforthewasterecyclingofelectricalandelectronicequipment.
Topreventpossibleharmtotheenvironmentorhumanhealthfromuncontrolledwastedisposal,pleaseseparatetheseitemsfromothertypesofwasteandrecyclethemresponsiblytopro-motethesustainablereuseofmaterialresources.
Formoreinformationaboutrecyclingofthisproduct,pleasecontactyourlocalcityofficeoryourmunicipalwastedisposalservice.
Fordetails,pleasevisittheBarcowebsiteat:http://www.
barco.
com/en/AboutBarco/weee.
2.
4.
2DisposalofbatteriesintheproductThisproductcontainsbatteriescoveredbytheEuropeanDirectivewhichmustbecollectedanddisposedofseparatelyfrommunicipalwaste.
Ifthebatterycontainsmorethanthespecifiedvaluesoflead(Pb),mercury(Hg)orcadmium(Cd),thesechemicalsymbolswillappearbelowthecrossed-outwheeledbinsymbol.
Byparticipatinginseparatecollectionofbatteries,youwillhelptoensureproperdisposalandtopreventpotentialnegativeeffectsontheenvironmentandhumanhealth.
2.
4.
3TurkeyRoHScomplianceTürkiyeCumhuriyeti:AEEEYnetmeliineUygundur.
(RepublicofTurkey:InconformetywiththeWEEERegulation)2.
5ServiceThisproductcontainsnouserserviceableparts.
Iftheproductfailstofunctionasexpected,pleasefirstcheckthatallconnectionsareproperlymade,andthatthepowercordisproperlyconnected.
Pleasecheckthattheprojectoraswellasthevideoandcomputersourcesareallswitchedon.
Cablesandcordsmaybreakovertime.
Trytochangecablesandcords,incasethereisabadorintermittentconnection.
Checkifthecircuitbreakerormainsfuseisintact.
Intheeventofproductfailure,pleasecontactyourreseller.
Youshouldprepareadescrip-tionofthesymptomsoffailureyouexperience.
Pleasealsostateproductnumberandserialnumberasprintedonthelabelonthebottomorsideoftheprojector.
ServicepersonnelmustuseUVradiationeye-andskinprotectionduringservicingPb12UserManual-IntroductionCTseriesUserManual-Safetyandcompliance133WhatisintheboxThefollowingcomponentsarestandarddelivery:ProjectorPowerCable(CountryDependent)RemoteControlUserDocumentationAdditionalaccessoriesavailablefortheprojector:Exhaustairkit(forceilingmount):A:Air-inletfilter(alsosoldseparately)B:Sidecover/Air-inletC:Ceilingmountcover/Air-outlet(alsosoldseparately)D:Exhaustairduct**Flexiblehose(2m)withclampinncludedAcousticsilencerkit(forceilingmount):B:Sidecover/Air-inletC:Ceilingmountcover/AiroutletCheckthatyouhaveallcomponentslistedwhenunpackingtheunit.
Pleasesavepackagingmaterialsforfutureuse,shoulditbenecessarytoshiptheunit.
ACBD14UserManual-IntroductionCTseriesUserManual-What'sinthebox154Installation4.
1SystemconsiderationsPleaserefertoChapter5Overviewforanexplanationonthevariousfeaturesoftheprojector.
Installationshouldonlybeperformedbytrainedandskilledpersonnelinordertoachievethedesiredresults.
Safetyfirst:Projectorsandotherequipmentthatarenotmountedproperlyrepresentapotentialdangertopeopleandmayresultininjuryordeath!
Creatingasuccessfulsysteminstallationrequiresproperskills,competenciesandknowledgeoftheparticularsystemrequirements.
Inadditiontoknowingtheexpectedperformance,ambientconditionsandallthecomponentsthatformthecompletesystem,includingImageGeneration(IG),cabling,controlsystem,screensandprojectors.
Aninstallationoftenconsistsofmultipleprojectors,longcablesandseveralIG's,aswellasintermediatesystemcomponentslikesignalconvertersandlinebuffers.
Makesurethat:IGpropertieslikepixelresolutionandframerefreshmatchthoseoftheprojectorChoiceofsignalinterfaceandcablelengthsmatch.
oHDBaseTand3G-SDIaresocalledlong-haulinterfaces,suitableforbespokeinstallationonthepremisesusingrelativelylongcables.
oDP,HDMI,DVIandVGAareallshort-haulinterfacesusingpre-assembledcableswithlimitedcablelengths.
UsingextendedcablelengthsmayresultinreducedimagequalityaswellaslossofcontrolinformationsuchasEDID(ExtendedDisplayInformationData).
Signalamplifiers,switchesandothercomponentsshouldconveyEDIDandothercontrolinformation.
However,unfortunatelymanytimesEDIDdataislostintranslationunderway,potentiallyresultinginimagesofreducedpixelresolutionandwrongaspectratio.
Asuccessfulinstallationtakesallrelevantparametersintoaccounttoachievegreatimagery!
16UserManual-Introduction4.
2VentilationMinimumsafetydistancetoanysideoftheunitis50cm/20"inanydirection.
Hotairisexhaustedfromtherearvent.
Donotplaceobjectsthataresensitivetoheatcloserthan50cm/20"totheexhaustvent.
Figure4-1.
PositioningtheprojectorWhentheprojectorisceilingmountedusinganexhaustairkit*(accessory)theminimumdistancebetweenprojectorandroofis15cm.
4.
2.
1VentilationaccessoriesAsetofoptionalaccessoriesisavailableforthisprojector,coveringanythingfromcablesandlensestoairflowpartsandlenscontrol.
Forinformationonavailability,specificationsandpricing,pleaserefertoourwebsite:www.
barco.
comCTseriesUserManual-Installation50cm15cm*50cm50cm174.
3CeilingandrigmountingUsethethreemountingholesprovidedinthebottomparttosecurelyfixtheprojectortoaceilingorrigmount.
UseM6screwsthatprotrudemaximum9mmintotheprojectorbody.
Figure4-2.
Ceiling/rigmountingmountingholes4.
4LockingtheprojectorTheprojectorcanbelockedphysicallybyusingasocalledKensingtonlock.
TheKensingtonlockhole,wherethelockitselfisattached,canbefoundonthebackoftheprojector.
Useanapprovedlockingcabletosecuretheprojectortoasolidobject.
4.
5Projectorangle(tilt)Theprojectorshouldbetiltedmaximum+/-20degreesfromlevel(flat/ceiling)position.
Itcanberotated360degreesaroundthelensaxis.
Tiltingathigherdegreesmayreducelamplifeandincreasetheprobabilityofoverheat-ingtheprojector.
Installationoutsidethesespecificationscanvoidtheguarantee.
Figure4-3.
Tiltingangles-20o+20o360o18UserManual-Introduction4.
6SelectingalensTheprojectorisdeliveredwithoutalens,enablingyoutoselectalensaccordingtoyourdesiredimagesizeandprojectiondistance.
Theprojectorusesabayonetmountsystemtopreciselyfixthelensinplace.
Thelensesaremanual,meaningzoom,focusandirisadjust-mentsaredonebyhandmanually.
Lensshiftismotorized(horizontallyandvertically).
Useonlytheoriginalprojectionlensesorlensesthathavebeenapprovedforusewiththeprojector.
Figure4-4.
TheprotectionlidAprotectionlidismountedontheprojectorlensopeningtoprotecttheinterioroftheprojectorfromdustanddamage.
Theprotectionlidmustalwaysbeinplacewheneverthereisnolensmountedontheprojector!
Theprotectionlidmustberemovedbeforeattachingalens!
Theprojectionlensesaresuppliedwithprotectioncapsonboththeentryandexitsides.
Pleasekeepthecapsonuntilmountingthelensontheprojector!
Removelensprotectioncapsbeforemountingthelensandusingtheprojector.
Figure4-5.
ProjectionlensreleasebuttonCTseriesUserManual-InstallationProtectionlidReleasebutton194.
6.
1Insertingalens1.
Removetheprotectionlidontheprojectorbyturningthelidanti-clockwiseuntilitcomesloose2.
Removetheprotectionlidsfromthelens3.
Insertthelens,makingsuretheredlinemarkingonthelenspointsstraightuptowardsthetopofthecabinet.
Ifthelensdoesnotenteronthefirstattempt,retractthelensandtryagainfromaslightlydifferentangle.
Donotuseforce!
4.
Whenthelensentersalltheawayin,firmlytwistthelensclockwiseuntilitclicksintoposition4.
6.
2Changing/removingalens1.
Pressinthelensreleasebutton2.
Twistthelensfirmlyanti-clockwiseuntilitcanbepulledgentlyout3.
Removetheexistinglensandputthe2lensprojectioncapsbackontheremovedlens4.
Replacewithanotherlens,orifnolensistobeinstalled,remounttheprojectorprotec-tionlidNotethatthelenspositioningwhenusinglensshiftmayaffecttheaccessibilityofthelensbutton.
Ifso,repositionthelenstogainaccess.
4.
6.
3LensrangeThetableshowsaselectionoflensesavailable.
Pleaseseewww.
barco.
comformoreinformationaboutlensavailability.
ITEMTYPETHROWRATIO(WQXGA)F#f(mm)RANGE(m)SHIFTEN51Zoom1.
71-2.
37:12.
60-3.
0933.
9-46.
51.
5-10Ver:110%Hor:80%EN52Fixed0.
99:12.
6019.
71.
0-10Ver:100%Hor:70%EN53Fixed0.
79:1@1.
65m2.
6015.
80.
8-3.
3Ver:65%Hor:55%EN54Zoom2.
68-4.
18:12.
60-3.
2652.
6-81.
55-25Ver:110%Hor:80%EN55Zoom0.
86-1.
16:12.
50-2.
7217.
2-23.
10.
8-5.
0Ver:105%Hor:75%EN56Zoom1.
14-1.
74:12.
50-2.
7222.
8-34.
71.
3-7.
0Ver:105%Hor:75%20UserManual-Introduction4.
7LenslockAlens-lockfeatureisavailablewherebythreescrewsonthelensbarrelareusedtoperma-nentlyfixthezoom,focusandirispositions.
Forinformationonlockingtheadjustmentringsinoneposition,pleaserefertosection3.
10Zoom,focusandiris.
Figure4-6.
ZoomandFocusLenslockscrews(oneoneachlensring)4.
8LensshiftMostoftheprojectionlensesareshiftablehorizontally(bothdirections)andvertically(up).
Somelenses,typicallywideanglelenses(on-axistype)onlyhaveaverylittleshiftrange.
Pleaserefertotheindividuallensspecificationsfoundonthewebforactualshiftrange.
Figure4-7.
Horizontal(bothdirections)andvertical(up/down)lensshiftLensshiftismotorizedandthelenscanbeshiftedeitherbyusingthekeypad,thewirelessremotecontrolorthroughthewiredcontrolinterface.
Foranoverviewofthelensshiftadjust-mentrangeforthevariouslenses,pleaserefertosection3.
6.
3Lensrange.
Usingthekeypadontheprojector,pressOKandthenOKagaintocenterlensmanually,orusethearrowkeystoposition(restricteddownwardsmovability).
Usingtheremotecontrol,presstheOKkeytocenterthelensorarrowkeystopositionit(restricteddownwardsmovability).
UsingtheRS-232orLANcontrolinterfaces,pleaserefertotherelevantSIS(SimplifiedInstructionSet)commandsavailablefordownloadonwww.
barco.
comCTseriesUserManual-Installation214.
9Lensplanarity(Scheimpflugadjustment)Thisadjustmentisrarelyneeded,donotapplyitunlessitisrequired.
Certainapplicationsrequirefineadjustmentofthelensplanarityinordertoobtainanimagethatisfocused.
Theprojectorisfittedwiththreeadjustmentscrews(Allenkey3mm/5mm)aroundthebayonetmountthatfacilitatesuchadjustment,asocalledScheimpflugadjust-ment.
Donotattemptadjustingwithouttherequiredtechnicalcompetenceandrefertotheservicemanualfoundonourwebforfurtherinfo.
Figure4-8.
ScheimpflugAdjustmentScrews4.
10Zoom,focusandirisTheselensfunctionsaremanual(notmotorized).
Firstadjustzoomtoachievethedesiredimagesize(ifthelenshasazoom-function).
Thenadjustfocustoachieveasharpimage.
Iftheimageisnotsharpalloverthesur-face,pleasecheckthesurfaceflatnessandwhetherthelensaxisisperpendiculartotheprojectionsurface.
Usetheiristoadjustthecontrastandfocusdepthoftheimage.
Adjustingtheiriswillaffectthebrightness;stoppingtheirisdownincreasescontrastandimagedepth,butreducesbrightness.
Thezoom,focusand,irisringscanbelockedinpositionfortypicalmotionbasedinstal-lationstosecurethatthepicturesettingsarenotchanged.
Tightenthepre-installedM3screwsoneachringtolockthemovement,usinga1.
5mmAllenkey,untiltheringscannotbeturned.
Figure4-9.
PositioningofZoom,FocusandIrisrings(mayvaryonsomelenses)ZoomIrisFocus22UserManual-Introduction4.
11MakingtheconnectionsTheprojectorisequippedwithmultiplesignalandcontrolinterfacestosupportvariousvideoanddatasources(seeconnectorpanelbelow),aswellasdifferentcontrolsystems.
Alwaysmakesurethattheprojectorispoweredoffbeforeconnectinganysignaland/orcontrolcables.
Longcablesmaycausedistortedorevenfailingsignalquality.
Alwaysmakesurebestqualitycablesareused,andtakeintoconsiderationthecablelengthlimitationsapply-ingtothevariousinterfacestandards.
4.
12ConnectingvideoanddatasourcesChoiceofconnectivitydependsontheinstallationrequirementsaswellasthesourcesconnected.
Generally,digitalinterfacesarepreferredoveranalog.
Multiplesignalscanbeconnectedinparalleltoallowforaselectionofsourcestobeviewedinsequence.
Attachtheinterfacesofchoiceandmakesureallconnectorsarefullyinsertedandretained.
4.
13ConnectingcontrolinterfacesPowerofftheprojectorandthesource!
Choiceofcontrolinterfacedependsontheinstallationrequirements.
Attachtheinterfacesofchoiceandmakesureallconnectorsarefullyinsertedandretained.
PleaseseetherelevantSIS(SimplifiedInstructionSet)commandsavailablefordownloadonwww.
barco.
comforeasyaccesstomoreinformation.
Poweruptheprojectorandthesource!
4.
14Sourceformatintegrity–EDIDIfusing3rdpartysystemequipment,suchassignalrepeatersorswitchers,pleasemakesurethatEDID(ExtendedDisplayIdentificationData)informationisnotlostintranslation.
WrongEDIDdatamayresultindistortedimages,wrongaspectratiosorreducedimageresolutions.
CTseriesUserManual-Installation234.
15ImagesizesLenstypesandspecificationsmaychangewithoutpriornotice.
Forcorrectlensinformationpleaserefertowww.
barco.
com1920x1200/1920x1080(WUXGA/1080)UltraWideFixed(EN53)0.
74:1(0.
8-3.
3m)WideAngle(EN52)0.
92:1(1.
0-10m)LongThrowZoom(EN54)2.
68-4.
18:1(5–25m)ProjectiondistanceImagewidthm12.
0011.
0010.
009.
008.
007.
006.
005.
004.
003.
002.
001.
000Screendiagonalm13.
7512.
5011.
2510.
008,757.
506.
255.
003.
752.
501.
2500.
000.
501.
001.
502.
002.
503.
004.
004.
505.
005.
506.
006.
503.
5001020SuperWideZoom(EN55)0.
80-1.
08:1(0.
8-5.
0m)WideZoom(EN56)1.
06-1.
62:1(1.
3-7m)StandardZoom(EN51)1.
60-2.
21:1(1.
5-10m)24UserManual-Introduction2560x1600/2560x1080(WQXGA/Panorama)Lenstypesandspecificationsmaychangewithoutpriornotice.
Forcorrectlensinformationandotherresolutionspleaserefertowww.
barco.
comUltraWideFixed(EN53)0.
79:1(0.
8-3.
3m)WideAngleFixed(EN52)0.
99:1(1.
0-10m)LongThrowZoom(EN54)2.
68-4.
18:1(5-25m)SuperWideZoom(EN55)0.
86-1.
16:1(0.
8-5.
0m)StandardZoom(EN51)1.
71-2.
37:1(1.
5-10m)WideZoom(EN56)1.
14-1.
74:1(1.
3-7m)ProjectiondistanceImagewidthScreendiagonal15.
0013.
7512.
5011.
2510.
008,757.
506.
255.
003.
752.
501.
2500.
000.
501.
001.
502.
003.
004.
004.
505.
005.
506.
006.
507.
007.
503.
502501020mm2.
5012.
0011.
0010.
009.
008.
007.
006.
005.
004.
003.
002.
001.
000CTseriesUserManual-Installation255OverviewFigure5-10.
ProjectorfrontFigure5-11.
ProjectorrearFigure5-12.
ProjectortopRemoteControlReceiverInterchangeableProjectionLensProjectionLensReleaseButtonMainsPowerConnectorHotAirExhaustSignalandControlConnectorPanelRemoteControlReceiverKeypad26CTseriesUserManual-OverviewFigure5-13.
MountingfeaturesFigure5-14.
ProjectorleftandrighthandsideLampDoorAirInletCeiling/RigMountingFeaturesAccessoryMountingFeatures275.
1KeypadandindicatorFigure5-15.
ProjectortopkeypadKEYVALUEPOWERPoweronorpoweroff(standby)MENUActivateordeactivateon-screenmenusystemUP,DOWN,LEFT,RIGHTSelectsourcewhennotinShiftorMenumodeShiftlenswhennotinMenuandafterSHIFT/OKpressedNavigatewheninMenusystemSHIFT/OKShiftlenswhennotinmenusystemShiftoptionwheninmenusystemAUTOAutomaticset-upSTATUSCOLOROn(active)BlueWaitonBlueflashingStandby(off)YellowWaitYellowflashingLampfailureRedOverheatingRedflashingConfigure/upgradeYellowfastflashingErrorRedfastflashingIndicatorlightPoweron/offMenuLeftRightUpDownShift/OKBack28CTseriesUserManual-Overview5.
2WirelessremotecontrolFigure5-16.
RemotecontrolBUTTONFUNCTIONPOWERTurnsprojectorON/OFFINFOShowsStatusmenu;infoonnumbers&versions,lampinfo*ActivatestheprojectorautosettingsSHIFTActivateslensshiftfunction#ReservedforfutureuseOK/ARROWSConfirmstheselection/DirectionalnavigationtoolsBACKReturnstopreviousalternativeMENUActivatestheprojectormenuSOURCETogglesbetweenavailablesources(forward/backwardsarrows)SOURCEPOWERINFOSHIFTMENUBACKiOKBatteriescanbereplacedbyend-user.
Toreplacethe2standardAAA-batteriesforthisremotecontrol,slidethelidatthebackofthecontroldownwards.
Liftitoffandremovethebatteries.
Replacewithnewbatteriesandslidethelidbackinplace.
295.
3ConnectorsFigure5-17.
Connectorpanel(seetechnicaldatafordetails)5.
3.
1SignalconnectorsCONNECTORNAMECONNECTORTYPEFUNCTIONHDBaseTRJ45VideoovertwistedpairDVIDVI-I*)duallinkDigitalvideo(dual-link)HDMIHDMItypeADigitalvideoDP(DisplayPort)DPDigitalvideo(2)VGA9pinminiDSUBAnalogRGBHVvideo3G-SDIBNC75ΩDigitalVideo*)theDVIconnectionisdigital-only,althoughitusestheDVI-Iphysicalconnectorforconvenience5.
3.
2ControlconnectorsCONNECTORNAMECONNECTORTYPEFUNCTIONSYNC1BNCMultipurposebi-directionalsyncronizationportSYNC2BNCMultipurposebi-directionalsyncronizationportSYNC33-pinmini-DINPoweredmultipurposebi-directionalsyncronizationportUSBAUSBAUSBconnectorsforSWupgradeanddiagnosisLANRJ45ControlRS2329PINDSUBControl30CTseriesUserManual-Overview5.
4MenusystemThevariousprojector-settingscanbecontrolledviatheon-screenmenusystem.
Themenusystemisaccessedbythekeypadontheprojectororusingthewirelessremotecontrol.
PresstheMENUkeytoenterorleavethemenusystem.
Navigatetheoptionsusingthearrow-keys.
SelectoptionwiththeOKkey.
Themenu-systemwillbereferencedthroughouttheuserguide.
Pleasefamiliarizeyourselfwiththemenusandtherichfunctionalityprovided.
5.
4.
1Topmenu3D:3Danddualheadsetuppicture:Basicandadvancedpicturecontrols.
installation:Systemcontrolsandinformation.
settings:Settingsthataffecthowtheprojectorbehavesorinteractswiththirdpartydevices,suchasnetworksandcontrolsystemslanguage:Selectsmenulanguage.
status:Systeminformation.
Thetoplevelmenuitem3DisonlyvisibleforActiveStereo3Denabledprojectors.
315.
53DmainmenuThe3Dmenucontainssettingsforturning3Donandoff,inadditiontodefiningvariousaspectsofsetupusingDualHeadandspecifyingthetypesofglassestobeused.
3D:Offersthepossibilitytoswitchthe3Dfunctionoffandtochosebetweenthefollowingalternativesforsetup:off,sidebyside(Dualheadsetupsubmenusource1:Choiceofsource.
AlternativesareSDI1,SDI2,DVI,HDMI,VGA,HDBaseT,DisplayPort1,DisplayPort2.
Forpossiblesetupcombinations,seeFigure5-18.
Dualheadsetuppossibilities.
source2:Choiceofsource.
AlternativesareSDI1,SDI2,DVI,HDMI,VGA,HDBaseT,DisplayPort1,DisplayPort2.
Forpossiblesetupcombinations,seeFigure5-18.
Dualheadsetuppossibilities.
Figure5-18.
DualheadsetuppossibilitiesDP1DP2HDBaseTDVI(SL)HDMIDVI(DL)VGA3GSDI(A)3GSDI(B)DP1DP2HDBaseTDVI(SingleLinkMode)HDMIDVI(DualLinkMode)VGA3GSDI(A)3GSDI(B)NotpossiblePossible335.
6PicturemainmenuThepicturemenucontainsbasicandadvancedsettingsandadjustmentsfordetailedpictureenhancementcontrol.
Alladjustmentsareglobalandarestoredindepentantlyofsource.
Theexceptionis2D/3Dforwhichtheprofilesarestoredindividually.
profile:Aselectionofpredefinedprofileswithdifferentattributes:standard,presentation,bright,video,cinema,DICOM,SRP,custom,advanced(onlyavailableifenabledfromservicemenu).
Iftheprofileismarkedbyanasterisk(*),thisindicatesthattheoriginalsettingshavebeenchanged.
RealColor:Barco'sproprietarycolormanagementsuite.
SeedescriptioninRealColorsubmenu.
gamma:10predefinedgammacurves:Film2.
2:Exponential2.
2curveFilm2.
4:Exponential2.
4curveFilm2.
6:Exponential2.
6curveFilm2.
8:Exponential2.
8curveVideo1:RelaxedS-shapeVideo2:IncreaseS-shapeComputer1:SteepS-shapeComputer2:VerysteepS-shapeDynamic:IncreaseS-shapeDICOM180Lux:Curveshapedependingontypeofcolorwheelused.
WhenenteringDICOMprofiletherearemoreDICOMgammacurves,forinstanceDICOM10LuxandDICOM400Luxlamppower:Adjustmentoflamppowerbetween280-350Wprofilereset:Resetsanyenteredprofiles,eithercurrentorall,todefaultbrightness:Electronicimagebrightness.
Range-50to+50contrast:Electronicimagecontrast.
Range-50to+50saturation:Electronicimagesaturation.
Range-50to+50aspect:Aspectratioofimagescaling.
5options:Fillaspectratio:Fillstheimagingdeviceinhorizontaland/orverticaldirectiontomaintheinputimageaspectratio.
Fillall:Fillstheentireimagingdeviceregardlessoftheinputaspectratioandresolution.
Fill16:9:Fillstheimagingdevicewitha16:9aspectratio(scaled)imageregardlessofinputaspectratioandresolution.
Fill4:3:Fillstheimagingdevicewitha4:3aspectratio(scaled)imageregardlessoftheinputaspectratioandresolution.
One-to-one:Showstheinputimagemappedpixel-by-pixelwithoutscalingontheimagingdevice.
advanced:Advancedfeatures.
SeeChapter5.
6.
2.
reset:Restorepicturesettingstofactorydefault.
sourceinformation:Detailedinformationabouttheacquiredsource.
34CTseriesUserManual-Overview5.
6.
1Picture>RealColorsubmenuBrilliantColor:TexasInstrumentsDLPcolorprocessing.
3settings*:Bright:Maxbrightness,boostedcolorprofileforhighestperceivedbrightness.
Inthismodeallsegmentsandspokesofthecolorwheelareinuse.
Color:Maxbrightness,balancedcolorprofileforbettercolorperformance.
Inthismodeallsegmentsandspokesofthecolorwheelareinuse.
Auto:Onlyavailablein3DOff:Inthismodethespokes(transitionbetweensegments)andallsecondarysegments(cyanandwhite)andoncolorwheelareoff.
Lesscolorandbrightnessboostwillreduceimagenoise.
SRPHalf:SmearReductionProcessing(halfrevolution),wizzim/wizzimbrightonlySRPFull:SmearReductionProcessing(fullrevolution),wizzim/wizzimbrightonlycolorcorrection:Enableordisablecolorcorrection.
desiredvalues:Desiredcoordsmode(RGB,RGBCMY)forRealColorandspecificationofred,greenblue,cyan,magenta,yellowandwhite(ifincoordinatesmode)coordinates(x,y)colorandgain.
Resetalltonative:Resetsalltomeasuredvalues/projectornative)whiteDecideswhichmethodtobeusedforsettingofthewhitepoint;temperatureofx-/y-coordinate.
temperature:Setsthesystemcolortemperature(whitepoint)ontheKelvinscalefrom3200Kto9300Kinstepsof100K.
Allcolortemperaturesaretrackedontheblackbodycurve.
Theexactcoordinatesforthetemperaturewillbeshownincoordinates(x,y)whenadjustingthetemperature.
x-coordinate:SetstheXco-ordinateofthewhitepoint.
y-coordinate:SetstheYco-ordinateofthewhitepoint.
resettoD65:ResetthewhitepointtoD65coordinates.
resettonative:Resetswhitepointtomeasuredvalues.
RealColorcalibration:Selectscolorcalibrationtestimages(off,uncorrectedred/green/blue/fullwhite)andcolorprocessedtestimages(red,green,blue,white,black,cyan,magenta,yellow).
PresentsmeasuredvaluesforRealColor(seebelow).
Calibrationsettingshavetobemadeindividuallyforeachseparateprofile.
*InadvancedprofileadditionalBCmodes:-Color(rgbonly),bright(rgbonly),-SRPHalf(rgbonly),SRPFull(rgbonly)355.
6.
2Picture>Advancedsubmenuhorizontalposition:Shiftstheimagesideways(VGAonly)verticalposition:Shiftstheimageupordown(VGAonly)phase:Adjustforstableimage.
AjitteryimagemayappearwithcertainVGAsources.
YoumayalsopresstheAUTObuttononthekeypadorremotecontroltooptimize.
frequency:Adjustimagewidth.
Anincorrectsettingmayproducevertical,unstablebandsintheimage,andpartsoftheimagemaynotbedisplayedonscreen.
PushtheAUTObuttontofindacorrectsetting,ormanuallyadjustthefrequencyuntiltheverticalbandsdisappear.
Frequencyadjuststhepixelclocksamplingfrequencycolorspace:EnablesselectingbetweenAuto,RGB,YCbCr601,YCbCr709inputlevel:Choicebetween;auto,computer,video.
Dependingonsourceselectbetween0-255(computer),16-235(video).
sourcecorrection:Givesaccesstoindividualbrightnessoffsetsettings(seebelow).
InadditionyoucanstarttheADcalibrationprocesswhichrequiresVGAsourcewhichdisplaysaGrey16image(righthandimagebelow).
36CTseriesUserManual-Overview5.
7Installationmainmenuimageorientation:Rotatetheimageontheimagingdeviceindesktopfront,desktoprear,ceilingfront,ceilingrear.
sourcescan:Searchthroughallinputconnectorsforanactivesignalorstayononeconnector.
IRfrontEnableordisablefrontIR-receiver.
IRrearEnableordisablerearIR-reciever.
OSDenable:SetshowtheOSDmessagesshouldappear.
On:AllOSDmessagesareshown.
Onlywarnings:OnlycriticalOSDmessagesareshown.
Off:NoOSDmessagesareshown.
TheOSDmenuisstillaccessiblebyclickingmenuoneithertheremoteorthekeypad.
testimage:Displaysinternaltestimagesforprojectoralignmentandsetup.
Optiontoshow4:3,16:9,16:10,1.
85:1,2.
35:1,5:4,combined,off4:3:fillstheimagingdevicewithawhiteimage,butmarksoutthe4:3areainthecenteroftheimage.
16:9:fillstheimagingdevicewithawhiteimage,butmarksoutthe16:9areainthecenteroftheimage.
16:10:fillstheimagingdevicewithawhiteimage,butmarksoutthe16:10areainthecenteroftheimage.
1.
85:1:fillstheimagingdevicewithawhiteimage,butmarksoutthe1.
85:1areainthecenteroftheimage.
2.
35:1:fillstheimagingdevicewithawhiteimage,butmarksoutthe2.
35:1areainthecenteroftheimage.
5:4:fillstheimagingdevicewithawhiteimage,butmarksoutthe5:4areainthecenteroftheimage.
Combined:fillstheimagingdevicewithawhiteimageandmarksoutthealloftheaboveaspectratios.
syncterminationVGA:Enablesyncterminationto75Ω/2.
2kΩsyncterminationSYNC1:Enablesyncterminationto75Ω/2.
2kΩsyncterminationSYNC2:Enablesyncterminationto75Ω/2.
2kΩsyncterminationSYNC3:Enablesyncterminationto75Ω/2.
2kΩDisplayPort1eqChoicebetweenNormal,High,Low(enablesreceivingsignalsvialongercables/withhigherbitrate)DisplayPort2eqChoicebetweenNormal,High,Low(enablesreceivingsignalsvialongercables/withhigherbitrate)picturebypictureShowtwosourcessidebysidepicturebypicturesetupChoosethetwosourcestobeshownsidebysideEDID:SubmenuforEDID,seechapter5.
7.
1.
synchronization:Submenuforsynchronizationseechapter5.
7.
2.
375.
7.
1Installation>EDIDsubmenuVGA:DefinethedetailedtimingdescriptorintheEDIDdataforVGAconnector.
Selectbetweenauto,WUXGA,1080@60Hz,SX+,SXGA,1366x768,720@60Hz,720@50Hz,XGA,SVGA,VGA.
DVI:DefinethedetailedtimingdescriptorintheEDIDdataforDVIconnector.
Selectbetweenauto,WQXGA@60Hz,WUXGA@120Hz,WUXGA@60Hz,1080@120Hz,1080@60Hz,SX+,SXGA,1366x768,720@60Hz,720@50Hz,XGA,SVGA,VGA.
Herearetheauto-settingsforvariousprojectors:1080projector:1920x1080@120Hz.
DuallinkWUXGAprojector:1920x1200@120Hz.
DuallinkWQXGAprojector:2560x1600@60Hz.
DuallinkHDMI:DefinethedetailedtimingdescriptorintheEDIDdataforHDMIconnector.
Selectbetweenauto,WUXGA@60Hz,1080@60Hz,SX+,SXGA,1366x768,720@60Hz,720@50Hz,XGA,SVGA,VGA.
Allsettings,exceptauto,usesDVIastype.
Herearetheauto-settingsforvariousresolutions:1080projector:1920x1080@60HzWUXGAprojector:1920x1200@60HzWQXGAprojector:1920x1200@60HzHDBaseT:DefinethedetailedtimingdescriptorintheEDIDdataforHDBaseTconnector.
Selectbetweenauto,WUXGA@60Hz,1080@60Hz,SX+,SXGA,1366x768,720@60Hz,720@50Hz,XGA,SVGA,VGA.
Allsettings,exceptauto,usesHDMIastype.
Herearetheauto-settingsforvariousresolutions:1080projector:1920x1080@60HzWUXGAprojector:1920x1200@60HzWQXGAprojector:1920x1200@60HzDisplayPort1:DefinethedetailedtimingdescriptorintheEDIDdataforDisplayPort1connector.
Selectbetweenauto,WQXGA@120Hz,WQXGA@60Hz,WUXGA@120Hz,WUXGA@60Hz,1080@120Hz,1080@60Hz,SX+,SXGA,1366x768,720@60Hz,720@50Hz,XGA,SVGA,VGA.
Herearetheauto-settingsforvariousresolutions:1080projector:1920x1080@120HzWUXGAprojector:1920x1200@120HzWQXGAprojector:2560x1600@120HzDisplayPort2:DefinethedetailedtimingdescriptorintheEDIDdataforDisplayPort2connector.
Selectbetweenauto,WQXGA@60Hz,WUXGA@120Hz,WUXGA@60Hz,1080@120Hz,1080@60Hz,SX+,SXGA,1366x768,720@60Hz,720@50Hz,XGA,SVGA,VGA.
Herearetheauto-settingsforvariousresolutions:1080projector:1920x1080@120HzWUXGAprojector:1920x1200@120HzWQXGAprojector:2560x1600@60Hz*InadditiontothelistedoptionstherearethefollowingoptionsavailableforPicturebyPicture-usage:960x1080@60Hz/120Hz,960x1200@60Hz/120Hz,1280x1600@60Hz/120Hz-dependingonprojectormodel.
38CTseriesUserManual-Overview5.
7.
2Installation>Synchronizationsubmenu2Dframelock:Selectsthe2Dframelocksyncsignal.
Optionsfor2Dframelock:source,SYNC1,SYNC2,SYNC3.
SYNC1:SelectsusageofSYNC1connectorin2Dmode.
OptionsforSYNC1:input,displaysync,SYNC2,SYNC3SYNC2:SelectsusageofSYNC2connectorin2Dmode.
OptionsforSYNC2:input,displaysync,SYNC1,SYNC3SYNC3:SelectsusageofSYNC3connectorin2Dmode.
OptionsforSYNC3:input,displaysync,SYNC1,SYNC23Dsourcesync:Selectsthe3DsourceLRsyncsignal.
Optionsfor3Dsourcesync:source,SYNC1,SYNC2,SYNC33Ddisplaysync:Selectsthe3DdisplayLRsyncsignal.
Optionsfor3Dsourcesync:source,SYNC1,SYNC2,SYNC3SYNC1:SelectsusageofSYNC1connectorin3DmodeOptionsforSYNC1:input,displaysync,glasssync,SYNC2,SYNC3SYNC2:SelectsusageofSYNC2connectorin3DmodeOptionsforSYNC2:input,displaysync,glasssync,SYNC1,SYNC3.
SYNC3:SelectsusageofSYNC3connectorin3DmodeOptionsforSYNC3:input,displaysync,glasssync,SYNC1,SYNC2Ifyouuseoneofthesyncconnectorsas2Dor3Dsyncinput,thismayblocktheuseofthesameconnectorasoutput.
Forfurtherinfoonthevariouspossibleuserscenarios,pleaserefertoourwebpage.
395.
8SettingsmainmenuPINcode:ProtecttheprojectorfromusagewithaPIN.
IfenabledtheprojectorwillaskforthePINateverystartup.
network:SetIPaddress,SubnetmaskanddefaultgatewayTCP/UDPportnumber.
DHCPissupportedandisenabledbydefault,butcanbedisabled.
factoryreset:Restoreallsettingstothefactorydefinedvalues.
service:Enduserprotectedsettings.
AccessPINcoderequired.
standbyECOmodePowersavingmodesendingtheprojectorintoadeepsleepsettingwheninstandby.
Wakeupcanbeperformedeitherbypressingthepowerbuttonontheprojector/remotecontrolorremotelyviatheRS232connectorusingtheASCIIprotocol/wakeonLANviatheethernet.
IfDPMSisenabledandasourcesignalbecomesactiveagaintheprojectorwillreturntonormaloperation.
WheninstandbyECOmode,thebaudrateoftheRS232communicationisfixedat19200.
DPMS:EnableordisableDPMSpowersaving.
Thisfeatureisusedtoautomaticallypowerdowntheprojectorifnosourceisdetectedforagivenperiodoftime(definedbyDPMStimeout).
IftheprojectorispowereddowninDPMSpowersave,itwillautomaticallypowerbackonifavalidsourceisacquired.
DPMStimeout:SettheperiodoftimebeforetheprojectorautomaticallyentersDPMSmode.
DPMSmustbeenabledforthismenuitemtoactivate.
LEDindicatorsmute:DisableallLEDindicatorsontopoftheprojector.
Acriticalerror(statusLEDflashingRED)willstillbeenabled.
menutimeout:ThetimeintervalbeforetheOSDisautomaticallydisabled.
Optionof"never"isavailableiftheOSDisnevertotimeout.
background:Givesachoicebetweenwhite,grayorblackbackgroundcolor.
splash:Possibilitytochoosebetweenlogoorblackforthestartupsplashscreen.
baudrate:Presentsalternativebauderatesettings:4800,9600,19200,38400,57600,11520040CTseriesUserManual-Overview5.
8.
1Settings>PinCodesubmenuPINcodeenable:ThePINcodeisdisabledbydefault.
Ifyouwanttoenable/disablethePINcodeyouhavetoenterthecurrentPIN(DefaultPIN:1234).
WhencompletedyoucanenableordisabletheuseofPINcode.
IfPINisenteredincorrectly3times,itwillaskforaPUKcode,whichisprovidedinprintedforminthebox.
IfthePUKisenteredincorrectlyitwillrequireaspecialunlockcodeprovidebyaservicepartnertounlocktheprojector.
changePINcode:TochangethePINcodeyoufirsthavetoenterthecurrentPINcode(DefaultPIN:1234).
Thenyouenteranew4digitcodeandconfirmthiscodebyenteringthesamecodeagain.
ClickOKandthenewcodeisset.
415.
8.
2Settings>NetworksubmenuchangeLANsettings:Inthissub-menuyoucanswitchtheDHCPenabledfunctiononoroff.
IfoffyoucansetafixedIP-address.
LANDHCP:DHCPissupportedandisenabledbydefault,butcanbedisabledunderchangeLANsettingsLANIPaddress:InfofieldstatingthecurrentLANIPaddress.
LANsubnetmask:InfofieldstatingthecurrentLANsubnetmask.
LANdefaultgateway:InfofieldstatingthecurrentLANdefaultgateway.
42CTseriesUserManual-Overview5.
8.
3Settings>FactoryResetsubmenupicture:Restorespicturesettingstofactorydefault.
3D:Restores3Dsettingstofactorydefault.
communication:Restorescommunicationsettingstofactorydefault.
RealColorTM:RestoresRealColorTMsettingstofactorydefault.
other:Restoresothersettingsofyourchoicetofactorydefault.
5.
8.
4Settings>Servicesubmenuservice:Restrictedareawithinformationintendedforqualifiedservicepersonnelonlyentercode:Enterthe5-digitaccesscodetogainassesstotheserviceinformation.
435.
9LanguagesmainmenuSelectthedesiredmenulanguage.
Supportedlanguages:English,French,German,Spanish,Norwegian,Swedish,Russian,Korean,Japanese,ChineseTraditional,ChineseSimplified,Portuguese,Italian.
Default:English44CTseriesUserManual-Overview5.
10Statusmainmenusourceinformation:Simpleandadvancedsourceinformation.
synchronisationinformation:Displaysthecurrentsynchronizationinformation.
Includes2Dframelock,3Dsourcesyncand3Ddisplaysync.
partnumber:Projectorpartnumber.
serialnumber:Projectorserialnumber.
manufactured(y):Yearofmanufacturing.
manufactured(w):Weekofmanufacturing.
softwareversion:Softwareversioninstalledintheprojector.
Thisisveryimportantforservicerequests.
colorwheel:Typeofcolorwheelinstalled.
lampremaining:Remaininglamptime.
lamptime:Lamptimeused.
totaloperating:Totaloperatingtimeforprojector.
lamppower:Lamppowerinwatts.
IPaddressLAN:ProjectorLANIPaddressforuseinnetwork/remotecontrol.
455.
10.
1Status>SourceInformationsubmenuadvanced:Accesstosubmenuformoresettingsdependingonsourceused.
See4.
10.
2Status>SourceInformation>Advancedsubmenusource1:Infoonwhichsourceisinuse.
format:Displaysresolutionandfrequencyforthesourceinuse.
source2:Infoonwhichsourceisinuse.
format:Displaysresolutionandfrequencyforthesourceinuse.
brightness:Infoonbrightnesssettings.
contrast:Infooncontrastsettings.
saturation:Infoonsaturationsettings.
gamma:Infoongamma-variantused.
46CTseriesUserManual-Overview5.
10.
2Status>SourceInformation>Advancedsubmenuresolution:Infooncurrentsourceresolution.
totalimagesize:Infooncurrenthorizontalandverticalimagesize.
syncfrequency:Infooncurrenthorizontalandverticalsyncfrequencyfortheprojector.
pixelclock:Weekofmanufacturing.
scan:Projectorserialnumber.
modeid:Infooncurrentmodesetup(VGAsourceonly).
cromasampling:Thecurrentsourcecromasamplingtype.
Typically4:4:4or4:2:2.
bitsperchannel:Thenumberofbitsperchannel.
Forinstance,fora24bitRGBsource,thenumberofbitsperchannelis8.
475.
10.
3Status>SourceSynchronisationsubmenu3D:Indicateswhich3Dmodeisused.
2Dframelock:Indicateswhattheprojectorlockstoin2Dfrequency:Showsthecurrentfrequencyofthelockingsignalstatus:Indicatesthelockingstatusphase:Indicatesphasebetweenthesourceandthelockingsignal3Dsourcesync:IndicateswherethesourceL/Rsyncisconnectedsourcehasin-bandsync:IndicatedifthesourcehasembeddedL/Rsync,onlysupportedonDisplayPortfrequency:Showsthecurrentfrequencyofthesignaldutycycle:Showsthedutycycleofthesignalstatus:Indicatesthesyncstatusphase:IndicatesphasebetweenthesourceandtheL/Rsyncsignal3Ddisplaysync:Indicateswhattheprojectorlockstoin3Dfrequency:Showsthecurrentfrequencyofthelockingsignaldutycycle:Showsthedutycycleofthesignalstatus:Indicatesthelockingstatusphase:Indicatesphasebetweenthesourceandthelockingsignal48CTseriesUserManual-Overview496FunctionalityThevariousfunctionsoftheprojectoraredescribedindetailinthefollowingchapters.
6.
1PoweringOnandOff6.
1.
1ManualpowercontrolSwitchtheprojectorbetweenOnandStandbyusingthePOWERswitchonthekeypadorthewirelessremotecontrol.
ThekeypadSTATUSindicatorisbluewhentheprojectorisupandrunning,flashingyellowwhencoolingdownandyellowwheninstandby.
Nostatuslightindicatesthatthepowerhasbeenswitchedoffcompletelyintheinstallation.
6.
1.
2DPMS-powerdownThisisapowerdownmodewhichneedstobeactivatedintheSETTINGSmenu.
Whenactivateditpowersdownafteraspecifiedperiodoftimeafterasourcehasbeenremoved.
ThetimeoutsettingcanbespecifiedintheDPMSTIMEOUTfunctioninthesamemenu,usingthearrowkeys.
6.
2ImagealignmentTestimagesarebuiltintothesystemforeasieralignmentoftheprojectorToaccessthetestimages,gotothemenuentryINSTALLATION>TESTIMAGE.
Runthroughthevarioustestimagesusingthearrowkeys.
Whenatestimagematchingtheas-pectratioofyourscreenhasbeenfound,youcanmatchthescreenusingthezoom,focus,lensshiftandaligningtheprojectorphysically.
6.
2.
1ImageorientationTheprojectorsupportsthefollowinginstallationorientations(inrelationtothescreen):Desktopfront(default)CeilingfrontDesktoprearCeilingrearTosettheimageorientationgotomenuentryINSTALLATION>IMAGEORIENTATION.
50UserManual-Introduction6.
3LanguageThemenusystemhasatotalof11user-selectablelanguagesavailable.
ThedefaultlanguageisEnglish.
Theavailablelanguagesare:EnglishFrenchGermanSpanishRussianNorwegianSwedishKoreanJapaneseChineseSimplifiedChineseTraditionalPortugueseItalianTochangethelanguageofthemenusystem,justclicktopmenuandselectyourdesiredlanguage.
6.
4SystemstatusSystemstatuscanbereadatanytime.
STATUSiseasilyaccessiblefromthetopmenuorbypushingtheINFObuttonthewirelessremotecontrol.
PartnumberSerialnumberTheyear/weektheprojectorwasmanufacturedCurrentsoftwareversionRuntimeandremainingtimeforlampTotalnumberofoperatinghoursAllnetworkinformationCurrentlyactivesourceFurthersourceinformationisavailablebyselectingSTATUS>SOURCEINFORMATION.
Ifadeeperanalysisisrequiredforthecurrentlyactivesource,selectSTATUS>SOURCEINFORMATION>ADVANCED.
Thismenuprovidesdetailedtiminginformationforthecur-rentlyactivesource.
SettingcustomcolorspaceanddigitallevelTheprojectorwillautomaticallytrytosetthecorrectcolorspaceanddigitaldrivelevelbasedoninformationfromthesource.
Formanualoverrideoftheautomaticallydetectedcolorspaceanddigitallevel,gotoPICTURE>ADVANCEDinthemenu.
SettheCOLORSPACEandINPUTLEVELtooneofthemanualsettings,choosingyourdesiredcolorspaceanddigitaldrivelevel.
CTseriesUserManual-Functionality516.
5LamppowerTheprojectionlampcanberunatdifferentpowerlevels.
Higherlevelsgivehigherbrightnessandshorterlamplifetime.
Lowerlevelssaveenergy,extendlifetimeandreducebrightness.
Inthemenusystem,gotoPICTURE>LAMPPOWERandadjustthesettingaccordingtoneed.
6.
6Sourceselection,sourcescanTheprojectorcanautomaticallyscanthroughalltheinputconnectorsforavalidsignal.
Ifavalidsignalisfound,theimagewillsetupautomatically.
Thisiscalledsourcescan.
Sourcescanisbydefaultdisabled.
Whensourcescanisdisabled,theprojectorwillonlydis-playtheselectedsource.
Usethekeypad,remotecontrolorthecontrolinterfacetochangetheselectedinputsource.
Inthemenusystem,gotoINSTALLATION>SOURCESCAN.
Directsourceselectioncanbedoneusingthekeypadorthewirelessremotecontrol.
Usingthekeypad,pressthearrowkeystoselectdesiredsource(whennotinmenuandnotshiftingthelens)Usingthewirelessremotecontrol,pressthedesireddedicatedsourceselectbuttonUsingtheRS232orLANcontrolinterfaces,pleaseseetherelevantSIS(SimplifiedIn-structionSet)commandsavailabletodownloadonwww.
barco.
com6.
7Onscreendisplay(OSD)messagesWhendetectingsourcesandusingthevariousfeaturesoftheprojector,OSDmessageswillappearonthescreen.
Whichmessageswillbeappearingcanbepartiallycontrolledbytheuser.
TheOSDcanruninthesemodes:On.
Allmessages,warningsandinformationisdisplayed.
Off.
Nomessagesareshown.
Onlywarnings.
Onlycriticalwarningmessagesliketemperatureoverheatingwillbeshown.
GotomenuentryINSTALLATION>OSDENABLEtocontroltheOSDbehaviour.
6.
7.
1DisablingtheSTATUSindicatorIncertaininstallationsitmayrequiredtocompletelydisabletheSTATUSindicatorinthekey-pad.
DisabletheindicatorinthemenuSETTINGS>LEDINDICATORSMUTE.
6.
7.
2SettingthebackgroundcolorThebackgroundcolordisplayedwhentheprojectorissearchingforasourcecanbesettoasetofpredefinedcolors(white/grey/black).
GotomenuentrySETTINGS>BACKGROUNDtosetthedesiredcolor.
6.
7.
3SettingOSDmenutimeoutIftheOSDmenuisopenandnotusedforadefinedperiodoftime,itwillautomaticallybedisabled.
Thistimeoutintervalcanberegulatedfrom5secondsto60seconds,withthedefaulttimesetto30seconds.
ThetimeoutcanalsobesettoNEVERfortheOSDmenutonevertimeout.
GotomenuentrySETTINGS>MENUTIMEOUTtochangethetimeperiod.
6.
7.
4SelectingthestartuplogoWhentheprojectorisstartingup,alogoisdisplayedintheentireimage.
ThelogocanalsobesettoBLACKifitisdesirabletodisablethemanufacturersdefaultlogo.
GotomenuentrySETTINGS>SPLASHtochangethissetting.
52UserManual-Introduction6.
8PicturebyPicture(PbP)Youmaychoosetoviewtwosourcessimultaneouslyasapicturebypicture.
ThePbP-functionallowsviewingoftwoimagessidebysideorontopofeachother.
CertainrestrictionsapplytohowsourcescombinewhenusingPbP.
ToviewPbP:EntertheINSTALLATIONmenuandactivatethePICTUREBYPICTUREfunctionMovedowntoPICTUREBYPICTURESETUPSetupbyselectingthesourcesyouwantunderSOURCE1&SOURCE2ThefollowingspecialoptionsareavailableforPicturebyPicture-usage:960x1080@60Hz/120Hz,960x1200@60Hz/120Hz,1280x1600@60Hz/120Hz,dependingonprojectormodel,see5.
7.
1Installation>EDIDsubmenu6.
9StandbyECOmodePowersavingmodesendingtheprojectorintoadeepsleepsettingwheninstandby.
Wakeupcanbeperformedeitherbypressingthepowerbuttonontheprojector/remotecontrolorremotelyviatheRS232connectorusingtheASCIIprotocol/wakeonLANviatheethernet.
IfDPMSisenabledandasourcesignalbecomesactiveagaintheprojectorwillreturntonormaloperation.
WheninstandbyECOmode,thebaudrateoftheRS232communicationisfixedat19200.
6.
10PINcodeTheprojectorcanbelockedbyaPIN(PersonalIdentificationNumber)codetocontrolaccess.
ThePINcodeis4digits,andifthePINcodeisactivated,youmustenterthecorrectcodetounlocktheprojector.
FactorysetPIN(1234).
Toactivate,deactivateorchangethePINcode,seetheSETTINGS>PINCODEsubmenu.
IfanincorrectPINcodeisentered,youmaytryagaintwotimes.
Ifyoufailthreetimesinarow,enteringaPUK(unlock)codeisneeded.
ThePUKcodeissuppliedwiththeproduct.
IfyoualsofailthreetimeswiththePUKcode,theprojectorlocksuppermanently,andcanonlybeunlockedbyaspecialserviceunlockcode.
Toaccessthiscode,youwillneedtocontactyourdealeroraservicestation.
Theserviceunlockcodewillbegeneratedbasedonasecure,encryptednumberthatisproducedbytheprojectoritself.
Theprojectorwillproduceanewnumbereverytime.
Inordertounlocktheprojectorviaadealer/servicestation,proofofownershipmustbeprovidedbythecustomer.
6.
11Disablingthewirelessremotecontrol(IR)receiversTheprojectorhas2IRreceivers,oneinthefrontandoneattherear.
Thesereceiverscanbeindividuallydisabledifnecessary.
GotomenuentryINSTALLATION>IRFRONT/IRREARtodisablethereceivers.
CTseriesUserManual-Functionality536.
12SoftwareupgradesWhenupgradingthesoftwaretheprojectormustalwaysbeinstandbyposition!
IfyouareorhavebeeninECOmodeyouMUSTusethefollowingprocedurebeforeupgradingyourprojector:1.
Starttheprojector2.
DisabletheOSDmodeintheOSDmenu3.
Poweroff(entersstandbyandnotECOmode)4.
Disconnectandreconnectthepowercable5.
Waitforstandby(yellowlight)6.
ConnectUSBcableandproceedwiththeupradingprocessbelowInordertoupgradeyourprojector,pleasefollowthemethodandsequencedescribedbelow:1.
YouwillneedaUSBmemorysticksetupwithaFAT-filesystemtoperformthisupgrade2.
Accesstheupgradesoftwarefromthefollowingweb-address;www.
barco.
com3.
Downloadandsavethefirmware.
zip-filetoyourPCdesktop4.
Downloadandsavethefirmware_.
tarfiletotherootofamemorystickItisimportantthattheUSBissafelyremovedfromcomputer,usingtheejectfunctiononyourPC.
5.
Settheprojectorinstandbymode6.
Insertthememorystickintheprojectorandwaitafewseconds7.
IftheprojectorisinstandbymodeitwillstartflashingautomaticallyIftheprojectorisinasleepmode,pushtheonbuttontoinitiateflashingRapidblueblinkingindicatesthatupgradeisinitiated8.
RemovetheUSBstickwhenblueblinkingturnstoyellowblink.
Rapidyellowblinkingindicatesthattheupgradeprocessisrunning9.
Donotturnoffprojector/removethepowercablewhiletheupgradeisstillinprogress!
10.
Theprojectormayrestartseveraltimesduringtheupgrade11.
Theupgradehasfinishedsuccessfullywhenyellowrapidblinkhaschangedtostableyellowlight54UserManual-IntroductionCTseriesUserManual-Functionality557OptimisingtheimageTheprojectorhaspowerfulfeaturesforpictureoptimization.
Thischapterdescribesdetailsinusingthesefeatures.
AllcolorcalibrationisdoneusingBarco'sproprietaryRealColorsolu-tion.
7.
1CalibrationdataAllBarcoprojectorsaremeasuredandcalibratedwithhighprecisionequipmentatthefactoryforthebestout-of-boxexperience.
Overthelifetimeofthelampsthecharacteristicsoftheprojectormightchangeslightly.
Thesameapplieswhenreplacinglamps.
7.
1.
1UpdatingRealColorcalibrationdataForaccurateresultswiththeRealColorsystem,accuratemeasurementdataisrequired.
RealColorcalibrationdatacanbefoundunderthemenuentryPICTURE>REALCOLOR>REALCOLORCALIBRATION>MEASUREDVALUESX/Yandrelativeluminancevaluesforred,green,blue,whiteandBrilliantColor1areenteredinthismenu.
TheBrilliantColorshouldallbesetto0.
000fortheVizSim(RGB)colorwheel.
AllvaluescanalsobeupdatedusingthecommunicationsprotocoloverRS-232orLAN.
Beforesettingthesevalues,itisimportanttoselectthedesiredBrilliantColorsetting.
GotomenuentryPICTURE>REALCOLOR>BRILLIANTCOLORtoselectthedesiredBrilliantColorlook.
Measurementsmustbedoneonthebuiltintestpatterns.
ThisisinparticularlyimportantfortheBrilliantColor1testpatternsinceitisimpossibletogeneratethispatterncorrectlyusingacomputersource.
IntheusermenuthesepatternscanbeaccessedthroughPICTURE>CALIBRATION>REALCOLORCALIBRATION>COLORCALIBRATIONTESTIMAGE/COLORPROCESSEDTESTIMAGE.
Usethearrowkeystocyclethroughtheimages.
Performingafactoryresetoftheprojectorwillrestorethemeasuredvaluestothevaluesmeasuredinthefactory.
Whenmeasuringdata,ahighqualitymeasurementinstrumentishighlyrecommendedforaccurateresults.
Spectrometers(likePhotoResearchPR-655)arepreferred.
56UserManual-Introduction7.
1.
2RealColormodesBeforeanycolorcorrectionisappliedtotheimage,RealColormustbeenabled.
GotomenuPICTURE>REALCOLOR>COLORCORRECTIONtoenableRealColor.
RealColorcanoperatein3modes:Colortemperature/whitepointcorrectiononly.
Red,Green,Blue,Whitecorrection.
InthismodeoptimalcolorcoordinatesforCyan,MagentaandYellowwillbecomputedautomatically.
Red,Green,Blue,Cyan,Magenta,Yellow,White.
Inthismodecolorpointsandintensityforeachcolorcanbemanipulatedseparately.
TochangetheRealColormodepleasegothemenuPICTURE>REALCOLOR>DE-SIREDVALUES>DESIREDCOORDSMODE.
CTseriesUserManual-Optimisingtheimage577.
2SettingawhitepointorcolortemperatureAfterenablingRealColorsetthecolortemperatureinthemenuPICTURE>REALCOLOR>TEMPERATURE.
Valuesbetween3200Kand9300Kcanbeselected.
Thesecolortemperaturesaretrackingthe"blackbodycurve"-theblackcurvedlineinthecenterofCIEChartinFigure7-1.
ThedefaultistheD65illuminantat6500K.
Thewhitepointcanalsobesettoacustomvaluedefinedbyanx,ycoordinatenotlinkedtotheblackbody.
GotomenuPICTURE>REALCOLOR>X-COOR-DINATEandPICTURE>REALCOLOR>Y-COORDINATEtochangethewhitepoint.
Figure7-1.
CIEchart7.
2.
1DefiningthesystemcolorgamutAllcolorsvisibletotheeyearedefinedbyCIEChartinFigure7-1.
Theboundaryofthecolorstheprojectorcandisplayiscalledthesystemcolorgamut.
Thewhitetriangleinthefigureisanexampleofasystemcolorgamut.
Bydefaulttheprojectorhasthewidestpossiblesystemgamut.
Thesystemcolorgamutcannotbeexpandedoutsidenativecolorgamut.
Itmaybedesirabletochangethesystemcolorgamutoftheprojectorto:Color-matchmultipleprojectors.
Meetdefinedcolorstandards,likeREC709.
Createaspecial"look"totheimage.
Beforethesystemcolorgamutcanbechanged,thedesiredRealColormodehastobedefined.
TochangetheRealColormodepleasegothemenuPICTURE>REALCOLOR>DESIREDVALUES>DESIREDCOORDSMODE.
RealColorhastobeenabledforthedesiredsystemgamuttobeapplied.
GotomenuPICTURE>REALCOLOR>COLORCORRECTIONtoenableRealColor.
AfterRealColorisenabledandthedesiredcolorcorrectionmodeisselected,pleasegothemenuentryPICTURE>REALCOLOR>DESIREDVALUEStochangethecolorpointstoyourdesiredsystemcolorgamut.
58UserManual-Introduction7.
3GammaTheprojectorfeaturesasetof6builtingammacurves:Film2.
2,Film2.
4,Film2.
6,Film2.
8,Video1,Video2,Computer1,Computer2,DynamicandDICOM180.
Thedifferentgammacurvesaredisplayedbelow.
Thenamesofthecurvesaredescriptivefortheirrecommendeduse.
Usinganyofthecomputercurvesforvideoapplicationswillresultsinsignificantimagenoise.
Figure7-1.
Film2.
2gammaFigure7-2.
Film2.
4gammaFigure7-3.
Film2.
6gammaCTseriesUserManual-Optimisingtheimage59Figure7-4.
Film2.
8gammaFigure7-5.
Video1gammaFigure7-6.
Video2gamma60UserManual-IntroductionFigure7-7.
Computer1gammaFigure7-8.
Computer2gammaFigure7-9.
DynamicgammaCTseriesUserManual-Optimisingtheimage61Figure7-10.
DICOM180Lux*(exampleHBcolorwheel:othershapeswithotheralternatives)*SeveralDICOMsettings(10,60,180,250,400Lux-ThehigherLuxnumber(ambientlight),thesteeperthecurve.
62UserManual-IntroductionCTseriesUserManual-Optimisingtheimage638TechnicalspecificationsPleaseseewww.
barco.
comformoretechnicalinformation.
64UserManual-IntroductionCTseriesUserManual-Technicalspecifications659LampchangeTheindicatoronthekeypadwillturnREDwhenlamplifeisexpired.
Changethelampwhenlifetimeexpires.
Alwaysreplacelampwiththesametypeandrating.
USEORIGINALLAMPSONLY.
Thelampholderemploysanelectroniclamptimerthatistrackingthelifetimeofthelamp.
Alwaysdisconnectthepowercordandwaituntiltheprojectorhascooleddown(60minutes)beforeopeningthelampcover.
Becarefulnottotouchtheprotectiveglasswhenreplacingthelamp,thismaycausetheprotectiveglasstooverheatandbreakwhileinuse.
Beextremelycarefulwhenremovingthelampmodule.
Intheunlikelyeventthatthebulbruptures,smallglassfragmentsmaybegenerated.
Thelampmoduleisdesignedtocontainthesefragments,butusecautionwhenremovingthelampmodule.
Removetheusedlamp:1.
Unscrewthelampdoorscrew2.
Openthelampdoor3.
Unscrewthethreescrewsthatholdthelampinplace4.
PullthelampoutusingthehandleReplacewithanewlampinreverseorder:1.
Insertanewlamp.
Observetheguidepinsandmakesurethelampisfullyinserted2.
Fastenthethreescrewssecurely3.
Closethelampdoor4.
TightenthelampdoorscrewfirmlyIntheunlikelyeventofalamprapture,alimitedamountofmercuryvapourmaybeemittedintotheroom.
Toavoidinhalingthismercuryvapour(whichistoxic,andcanbeharmfulforlungsandnervoussystem)theroomshouldbethoroughlyventilatedforaperiodofatleast30minutes.
Therearenoknownhealthhazardsfromexposuretolampsthatareintactandwhichareusedwithinanenclosedfixture.
Noadverseeffectsareexpectedfromoccasionalexposuretobrokenlamps.
Asamatterofgoodpractise,avoidprolongedorfrequentexposuretolampsunlessthereisadequateventilation.
Themajorhazardfrombrokenlampsisthepossibilityofsustainingglasscuts.
66UserManual-IntroductionF50UserManual-LampchangePRODUCTIONADDRESSHabornveien531653GamleFredrikstadNorwayModelcertificationname:GP92014Barconv.
Allrightsreserved.
Allbrandsandtradenamesarethepropertyoftheirrespectiveowners.
Specificationssubjecttochangewithoutpriornotice.
Allvaluesaretypicalandmayvary.
Pleasevisitourwebsiteforlatestspecificationsandproductofferings.
601-0363-01
- disposedwww.13aaa.com相关文档
- stimuliwww.13aaa.com
- 2.45www.13aaa.com
- worldwidewww.13aaa.com
- 负面www.13aaa.com
- wwwwww.13aaa.com
- Basedwww.13aaa.com
2022年最新PHP短网址生成系统/短链接生成系统/URL缩短器系统源码
全新PHP短网址系统URL缩短器平台,它使您可以轻松地缩短链接,根据受众群体的位置或平台来定位受众,并为缩短的链接提供分析见解。系统使用了Laravel框架编写,前后台双语言使用,可以设置多域名,还可以开设套餐等诸多功能,值得使用。链接: https://pan.baidu.com/s/1ti6XqJ22tp1ULTJw7kYHog?pwd=sarg 提取码: sarg文件解压密码 www.wn7...
BuyVM商家4个机房的官方测试IP地址和测速文件
BuyVM 商家算是有一些年头,从早年提供低价便宜VPS主机深受广大网友抢购且也遭到吐槽的是因为审核账户太过于严格。毕竟我们国内的个人注册账户喜欢账户资料乱写,毕竟我们看英文信息有些还是比较难以识别的,于是就注册信息的时候随便打一些字符,这些是不能通过的。前几天,我们可以看到BUYVM商家有新增加迈阿密机房,而且商家有提供大硬盘且不限制流量的VPS主机,深受有一些网友的喜欢。目前,BUYVM商家有...
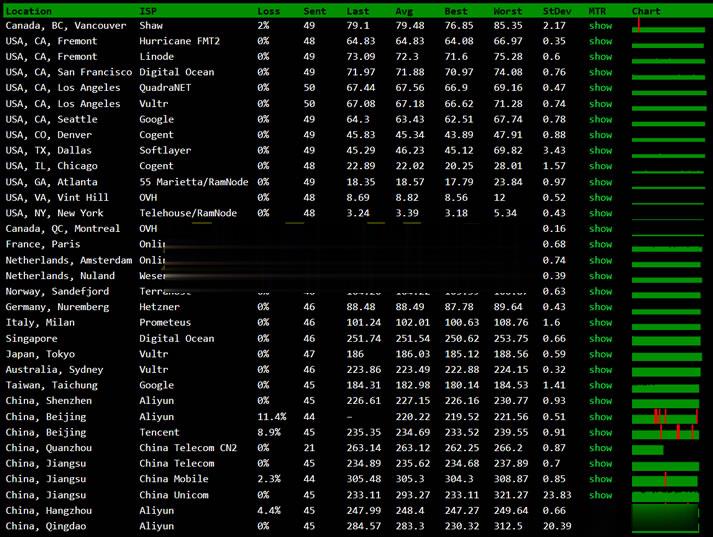
宝塔面板批量设置站点404页面
今天遇到一个网友,他在一个服务器中搭建有十几个网站,但是他之前都是采集站点数据很大,但是现在他删除数据之后希望设置可能有索引的文章给予404跳转页面。虽然他程序有默认的404页面,但是达不到他引流的目的,他希望设置统一的404页面。实际上设置还是很简单的,我们找到他是Nginx还是Apache,直接在引擎配置文件中设置即可。这里有看到他采用的是宝塔面板,直接在他的Nginx中设置。这里我们找到当前...
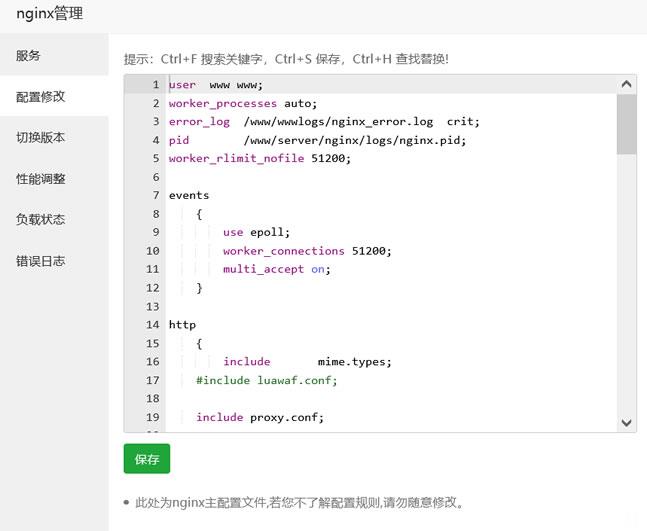
www.13aaa.com为你推荐
-
.cn域名cn域名有什么用啊?sonicchat深圳哪里有卖汽车模型?硬盘工作原理硬盘的读写原理qq530.com求教:如何下载http://www.qq530.com/ 上的音乐www.kaspersky.com.cn卡巴斯基中国总部设立在?www4399com4399网站是什么机器蜘蛛《不思议迷宫》四个机器蜘蛛怎么得 获得攻略方法介绍汴京清谈汴京繁华 简介50字?盗车飞侠侠盗飞车罪恶都市全部秘籍ps手柄版的邯郸纠风网邯郸市信访局地址