lamp下载centos上如何安装LAMP服务?
vivo的手机有什么下载的东西
vivo为一个专注于智能手机领域的手机品牌,vivo和追求乐趣、充满活力、年轻时尚的群体一起打造拥有卓越外观、专业级音质、极致影像、愉悦体验的智能产品,并将敢于追求极致、持续创造惊喜作为vivo的坚定追求。vivo品牌的国际化之路全面开启,除中国大陆市场外,vivo进驻的海外市场包含印度、泰国、缅甸、马来西亚、印度尼西亚、越南和菲律宾。
vivo正式成为NBA中国官方合作伙伴[1]。
vivo高层在媒体沟通会上透露,将在国内外成立研发中心[2],国内部分有深圳、东莞、南京、杭州和北京,而在国外将在美国硅谷与圣地亚哥设研发中心[2]。
vivo将由原来的音乐和拍照的单点技术突破很可能将变成从智能手机的整体技术创新全面推进
lanmp一键安装包是什么?
LNMP是一个基于CentOS/Debian编写的Nginx、PHP、MySQL、phpMyAdmin、elerator一键安装包。可以在VPS、独立主机上轻松的安装LNMP生产环境。
新手对于LNMP的安装及维护总是存在或多或少的问题,比较常用的安装包可以选择LNMP一键安装包,可以自由在LNMP一键安装包的官方网站上下载。
安装包(Install pack),即软件安装包,是可自行解压缩文件的集合,其中包括软件安装的所有文件。
运行这个安装包(可执行文件),可以将此软件的所有文件释放到硬盘上,完成修改注册表、修改系统设置、创建快捷方式等工作。
安装包文件多为exe格式。
Lamp有什么用,怎么安装?
下载apache 2.0.45以及该文件的md5校验码至/usr/local/src md5校验: md5sum -b httpd-2.0.45.tar.gz 校对该值是否与httpd-2.0.45.tar.gz.md5的内容一致。开始编译安装: 这里使用DSO方式编译apache,这样可以很方便的升级PHP以及其他模块,不用每次都重新编译apache。
apache安装到/usr/local/apache tar -xzvf httpd-2.0.45.tar.gz cd httpd-2.0.45 ./configure --prefix=/usr/local/httpd --enable-deflate --enable-so --enable-rewrite --enable-spellingdir=/usr/lib make make install
lanmp一键安装包是什么?
lanmp表示的是Linux,apache,nginx,mysql,php的简称,目前支持三种环境安装,即是lamp,lnmp,lnamp,也是linux服务器WEB环境一键安装包,可去wdlinux官网下载。centos上如何安装LAMP服务?
打开Terminate
输入sudo root并输入密码
输入su让当前用户以root权限进入
输入cd /etc/yum.repos.d
输入mv /etc/yum.repos.d/CentOS-Base.repo /etc/yum.repos.d/CentOS-Base.repo.backup
来备份/etc/yum.repos.d/CentOS-Base.repo
输入wget/.help/CentOS6-Base-163.repo下载163源
输入mv /etc/yum.repos.d/CentOS6-Base-163.repo /etc/yum.repos.d/CentOS-Base.repo
输入yum makecache完成更新
安装并配置MySQL
1.1 执行yum命令安装MySQL
NOTE: RUNNING ALL PARTS OF THIS SCRIPT IS RECOMMENDED FOR ALL MySQLSERVERS IN PRODUCTION USE! PLEASE READ EACH STEP CAREFULLY! In order to log into MySQL to secure it, we'll need the current password for the root user. If you've just installed MySQL, and you haven't set the root password yet, the password will be blank, so you should just press enter here. Enter current password for root (enter for none): <-- 输入系统root密码 OK, essfully used password, moving on... Setting the root password ensures that nobody can log into the MySQL root user without the proper authorisation. Set root password? [Y/n] <-- ENTER New password: <-- 你的MySQL root密码 Re-enter new password: <-- 你的MySQL root密码 Password updated essfully! Reloading privilege tables.. ... ess! By default, a MySQL installation has an anonymous user, allowing anyone to log into MySQL without having to have a user ount created for
go a bit smoother. You should remove them before moving into a production environment. Remove anonymous users? [Y/n] <-- ENTER ... ess! Normally, root should only be allowed to connect from 'localhost'. This ensures that someone cannot guess at the root password from work. Disallow root login remotely? [Y/n] <-- ENTER ... ess! By default, es with a database named 'test' that anyone can
before moving into a production environment. Remove test database and ess to it? [Y/n] <-- ENTER - Dropping test database... ... ess! - Removing privileges on test database... ... ess! Reloading the privilege tables will ensure that all changes made so far will take effect immediately. Reload privilege tables now? [Y/n] <-- ENTER ... ess! Cleaning up... All done! If you'pleted all of the above steps, your MySQL installation should now be secure. Thanks for using MySQL! |
二、 安装Apache
2.1 使用yum命令安装Apache
chkconfig --levels 235 "> /etc/init.d/"> yum –y install php |
3.2 重启Apache服务器
yum search php |
选择需要的模块进行安装
|
展开全文
Hostio€5/月KVM-2GB/25GB/5TB/荷兰机房Hostio是一家成立于2006年的国外主机商,提供基于KVM架构的VPS主机,AMD EPYC CPU,NVMe硬盘,1-10Gbps带宽,最低月付5欧元起。商家采用自己的网络AS208258,宿主机采用2 x AMD Epyc 7452 32C/64T 2.3Ghz CPU,16*32GB内存,4个Samsung PM983 NVMe SSD,提供IPv4+IPv6。下面列出几款主机配置信息。... 
器安装环境和运维管理工具推荐今天看到一个网友从原来虚拟主机准备转移至服务器管理自己的业务。这里问到虚拟主机和服务器到底有什么不同,需要用到哪些工具软件。那准备在下班之间稍微摸鱼一下整理我们服务器安装环境和运维管理中常见需要用到的软件工具推荐。第一、系统镜像软件一般来说,我们云服务器或者独立服务器都是有自带镜像的。我们只需要选择镜像安装就可以,比如有 Windows和Linux。但是有些时候我们可能需要自定义镜像的高级玩法,这... 
阿里云年中活动最后一周 - ECS共享型N4 2G1M年付59元以前我们在参与到云服务商促销活动的时候周期基本是一周时间,而如今我们会看到无论是云服务商还是电商活动基本上周期都要有超过一个月,所以我们有一些网友习惯在活动结束之前看看商家是不是有最后的促销活动吸引力的,比如有看到阿里云年中活动最后一周,如果我们有需要云服务器的可以看看。在前面的文章中(阿里云新人福利选择共享性N4云服务器年79.86元且送2月数据库),(LAOZUO.ORG)有提到阿里云今年的云... 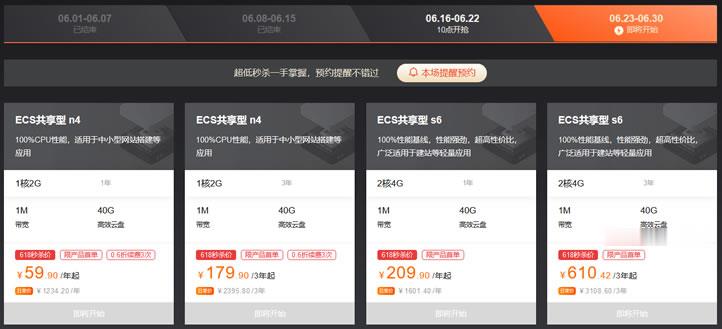
lamp下载为你推荐
|