AMDcentos6.0
centos6.0 时间:2021-03-27 阅读:()
CitrixXenServer6.
5ServicePack1VirtualMachineUser'sGuidePublishedWednesday,19October20161.
0EditionCitrixXenServer6.
5ServicePack1VirtualMachineUser'sGuideCopyright2016CitrixSystems.
Inc.
AllRightsReserved.
Version:6.
5ServicePack1Citrix,Inc.
851WestCypressCreekRoadFortLauderdale,FL33309UnitedStatesofAmericaDisclaimersThisdocumentisfurnished"ASIS.
"Citrix,Inc.
disclaimsallwarrantiesregardingthecontentsofthisdocument,including,butnotlimitedto,impliedwarrantiesofmerchantabilityandfitnessforanyparticularpurpose.
Thisdocumentmaycontaintechnicalorotherinaccuraciesortypographicalerrors.
Citrix,Inc.
reservestherighttorevisetheinformationinthisdocumentatanytimewithoutnotice.
ThisdocumentandthesoftwaredescribedinthisdocumentconstituteconfidentialinformationofCitrix,Inc.
anditslicensors,andarefurnishedunderalicensefromCitrix,Inc.
CitrixSystems,Inc.
,theCitrixlogo,CitrixXenServerandCitrixXenCenter,aretrademarksofCitrixSystems,Inc.
and/oroneormoreofitssubsidiaries,andmayberegisteredintheUnitedStatesPatentandTrademarkOfficeandinothercountries.
Allothertrademarksandregisteredtrademarksarepropertyoftheirrespectiveowners.
TrademarksCitrixXenServerXenCenteriiiContents1.
AboutthisDocument11.
1.
Overview11.
2.
XenServerDocumentation12.
VirtualMachines22.
1.
TypesofVirtualMachines22.
2.
CreatingVMs22.
2.
1.
UsingVMTemplates22.
3.
OtherMethodsofVMCreation32.
3.
1.
PhysicaltoVirtualConversion(P2V)32.
3.
2.
CloninganExistingVM32.
3.
3.
ImportinganExportedVM32.
4.
XenServerTools43.
SupportedGuestsandAllocatingResources53.
1.
SupportedGuests,VirtualMemory,andDiskSizeLimits53.
2.
Long-termGuestSupport83.
3.
XenServerProductFamilyVirtualDeviceSupport83.
3.
1.
VMBlockDevices84.
CreatingWindowsVMs94.
1.
BasicProcedureforCreatingaWindowsVM94.
2.
AvailableWindowsTemplates94.
2.
1.
AttachinganISOImageLibrary104.
3.
UsingXenCentertoCreateaVM104.
4.
UsingtheCLItoCreateaWindowsVM125.
CreatingLinuxVMs135.
1.
CreatingaLinuxVMbyInstallingfromanInternetRepository155.
2.
CreatingaLinuxVMbyInstallingfromaPhysicalCD/DVD155.
3.
CreatingaLinuxVMbyInstallingFromanISOImage165.
3.
1.
NetworkInstallationNotes17iv5.
4.
AdvancedOperatingSystemBootParameters175.
5.
InstallingtheLinuxGuestAgent185.
6.
AdditionalInstallationNotesforLinuxDistributions195.
6.
1.
AdditionalDebianNotes205.
6.
1.
1.
AptRepositories205.
7.
PreparingtoCloneaLinuxVM205.
7.
1.
MachineName205.
7.
2.
IPaddress215.
7.
3.
MACaddress216.
VMMigrationwithXenMotionandStorageXenMotion226.
1.
XenMotionandStorageXenMotion226.
1.
1.
XenMotion226.
1.
2.
StorageXenMotion226.
1.
3.
CompatibilityRequirements226.
1.
4.
LimitationsandCaveats236.
2.
MigratingaVMusingXenCenter236.
3.
LiveVDIMigration246.
3.
1.
LimitationsandCaveats246.
3.
2.
ToMoveVirtualDisks247.
UpdatingVMs257.
1.
UpdatingWindowsOperatingSystems257.
2.
UpdatingXenServerToolsforWindowsVMs257.
3.
UpdatingLinuxKernelsandGuestUtilities267.
4.
UpgradingtoUbuntu14.
04,RHEL7andCentOS7Guests268.
ContainerManagement278.
1.
WhatisDocker278.
2.
ContainerManagementSupplementalPack278.
3.
ConfiguringCoreOSGuests288.
4.
HowtoManageOtherLinuxGuests288.
5.
NetworkRequirementsandSecurity29v8.
5.
1.
NetworkPartitioningandFirewalls298.
5.
2.
Authentication299.
vApps319.
1.
ManagingvAppsinXenCenter319.
2.
CreatingvApps319.
3.
DeletingvApps329.
4.
StartandshutdownvAppsusingXenCenter329.
5.
ImportingandExportingvApps3310.
AdvancedNotesforVirtualMachines3410.
1.
VMBootBehavior3410.
1.
1.
Persist(XenDesktop-PrivateDesktopMode)3410.
1.
2.
Reset(XenDesktop-SharedDesktopMode)3410.
2.
MakingtheISOLibraryAvailabletoXenServerHosts3410.
3.
XenServerTools3510.
4.
WindowsVolumeShadowCopyService(VSS)provider3610.
5.
ConnectingtoaWindowsVMUsingRemoteDesktop3610.
6.
TimeHandlinginWindowsVMs3710.
7.
TimeHandlinginPVLinuxVMs3710.
8.
InstallingHVMVMsfromResellerOptionKit(BIOS-locked)Media3910.
9.
PreparingforCloningaWindowsVMUsingVSS4010.
10.
AssigningaGPUtoaWindowsVM(forUsewithXenDesktop)4011.
ImportingtheDemoLinuxVirtualAppliance4311.
1.
UsefulTests4312.
ImportingandExportingVMs4512.
1.
SupportedFormats4512.
1.
1.
OpenVirtualizationFormat(OVFandOVA)4612.
1.
1.
1.
SelectingOVForOVAFormat4712.
1.
2.
DiskImageFormats(VHDandVMDK)4712.
1.
3.
XVAFormat4712.
1.
4.
XVAVersion1Format48vi12.
2.
OperatingSystemFixup4812.
3.
TheTransferVM4912.
4.
ImportingVMs4912.
4.
1.
ImportingVMsfromOVF/OVA5012.
4.
2.
ImportingDiskImages5212.
4.
3.
ImportingVMsfromXVA5312.
5.
ExportingVMs5412.
5.
1.
ExportingVMsasOVF/OVA5412.
5.
1.
1.
ExportingVMsasXVA56A.
WindowsVMReleaseNotes58A.
1.
ReleaseNotes58A.
1.
1.
GeneralWindowsIssues58A.
1.
2.
WindowsServer200358A.
1.
3.
Windows758A.
1.
4.
WindowsVista58B.
LinuxVMReleaseNotes59B.
1.
ReleaseNotes59B.
1.
1.
RedHatEnterpriseLinux4.
5to4.
859B.
1.
1.
1.
PreparingaRHEL4.
5to4.
8guestforcloning60B.
1.
1.
2.
RHELGraphicalInstallSupport60B.
1.
2.
RedHatEnterpriseLinux560B.
1.
2.
1.
PreparingaRHEL5.
xguestforcloning61B.
1.
3.
RedHatEnterpriseLinux661B.
1.
4.
RedHatEnterpriseLinux761B.
1.
5.
CentOS461B.
1.
6.
CentOS561B.
1.
7.
CentOS661B.
1.
8.
CentOS762B.
1.
9.
OracleLinux562B.
1.
10.
OracleLinux662B.
1.
11.
OracleLinux762viiB.
1.
12.
ScientificLinux562B.
1.
13.
ScientificLinux662B.
1.
14.
ScientificLinux762B.
1.
15.
SUSEEnterpriseLinux10SP162B.
1.
16.
SUSEEnterpriseLinux10SP362B.
1.
17.
SUSEEnterpriseLinux1162B.
1.
18.
SUSEEnterpriseLinux11SP263B.
1.
19.
PreparingaSLESguestforcloning63B.
1.
20.
Ubuntu10.
0463B.
1.
21.
Ubuntu14.
0463C.
CreatingISOImages64D.
EnablingVNCforLinuxVMs65D.
1.
EnablingaGraphicalConsoleonDebianSqueezeVMs65D.
2.
EnablingaGraphicalConsoleonRedHat,CentOS,orOracleLinuxVMs66D.
2.
1.
DeterminingtheLocationofyourVNCConfigurationFile66D.
2.
2.
ConfiguringGDMtouseVNC66D.
2.
3.
FirewallSettings67D.
2.
4.
VNCScreenResolution67D.
2.
5.
EnablingVNCforRHEL,CentOS,orOEL6.
xVMs68D.
3.
SettingupSLES-basedVMsforVNC70D.
3.
1.
CheckingforaVNCServer70D.
3.
2.
EnablingRemoteAdministration70D.
3.
3.
ModifyingthexinetdConfiguration70D.
3.
4.
FirewallSettings71D.
3.
5.
VNCScreenResolution72D.
4.
CheckingRunlevels72E.
TroubleshootingVMProblems73E.
1.
VMCrashes73E.
1.
1.
ControllingLinuxVMCrashdumpBehavior73E.
1.
2.
ControllingWindowsVMCrashdumpBehaviour74viiiE.
2.
TroubleshootingBootProblemsonLinuxVMs741Chapter1.
AboutthisDocument1.
1.
OverviewThisisaguidetousingVirtualMachines(VMs)withXenServer,theplatformvirtualizationsolutionfromCitrix.
Itdescribeshowtocreate,configure,andmanageVMsrunningonXenServerhosts.
Thissectionsummarizestherestoftheguidesothatyoucanfindtheinformationyouneed.
Thefollowingtopicsarecovered:GeneralinformationaboutpreparingandcreatingVMsCreatingWindowsVMsCreatingLinuxVMsUpdatingVMsMigratingVMsUsingContainerManagementCreatingandusingISOimagesofvendormediaforinstallingVMsSettingupanetworkrepositoryofvendormediaforinstallingVMsTroubleshootingVMs1.
2.
XenServerDocumentationXenServerdocumentationshippedwiththisreleaseincludes:ReleaseNotescoverknownissuesthataffectthisrelease.
XenServerQuickStartGuideprovidesanintroductionfornewuserstotheXenServerenvironmentandcomponents.
ThisguidestepsthroughtheinstallationandconfigurationessentialstogetXenServerandtheXenCentermanagementconsoleupandrunningquickly.
Afterinstallation,itdemonstrateshowtocreateaWindowsVM,VMtemplateandpoolofXenServerhosts.
Itintroducesbasicadministrativetasksandadvancedfeatures,suchassharedstorage,VMsnapshotsandXenMotionlivemigration.
XenServerInstallationGuidestepsthroughtheinstallation,configurationandinitialoperationofXenServerandtheXenCentermanagementconsole.
XenServerVirtualMachineUser'sGuidedescribeshowtoinstallWindowsandLinuxVMswithinaXenServerenvironment.
ThisguideexplainshowtocreatenewVMsfrominstallationmedia,fromVMtemplatesincludedintheXenServerpackageandfromexistingphysicalmachines(P2V).
Itexplainshowtoimportdiskimagesandhowtoimportandexportappliances.
XenServerAdministrator'sGuidegivesanin-depthdescriptionofthetasksinvolvedinconfiguringaXenServerdeployment,includingsettingupstorage,networkingandpools.
ItdescribeshowtoadministerXenServerusingthexeCommandLineInterface.
vSwitchControllerUser'sGuideisacomprehensiveuserguidetothevSwitchControllerforXenServer.
SupplementalPacksandtheDDKintroducestheXenServerDriverDevelopmentKit,whichcanbeusedtomodifyandextendthefunctionalityofXenServer.
XenServerSoftwareDevelopmentKitGuidepresentsanoverviewoftheXenServerSDK.
ItincludescodesamplesthatdemonstratehowtowriteapplicationsthatinterfacewithXenServerhosts.
XenAPISpecificationisareferenceguideforprogrammerstotheXenServerAPI.
Foradditionalresources,visittheCitrixKnowledgeCenter.
2Chapter2.
VirtualMachinesThischapterprovidesanoverviewofhowtocreateVirtualMachines(VMs)usingtemplates.
Italsoexplainsotherpreparationmethods,includingphysicaltovirtualconversion(P2V),cloningtemplates,andimportingpreviously-exportedVMs.
WhatisaVirtualMachineAVirtualMachine(VM)isasoftwarecomputerthat,likeaphysicalcomputer,runsanoperatingsystemandapplications.
TheVMiscomprisedofasetofspecificationandconfigurationfilesandisbackedbythephysicalresourcesofahost.
EveryVMhasvirtualdevicesthatprovidethesamefunctionalityasphysicalhardware,andcanhaveadditionalbenefitsintermsofportability,manageability,andsecurity.
Inaddition,youcantailorthebootbehaviorofeachVMtoyourspecificrequirements-formoreinformationrefertoSection10.
1,"VMBootBehavior".
XenServersupportsguestswithanycombinationofIPv4orIPv6configuredaddresses.
2.
1.
TypesofVirtualMachinesInXenServerVMscanoperateinoneoftwomodes:Paravirtualized(PV)-thevirtualmachinekernelusesspecificcodewhichisawareitisrunningonahypervisorformanagingdevicesandmemory.
Fullyvirtualized(HVM)-specificprocessorfeaturesareusedto'trap'privilegedinstructionswhichthevirtualmachinecarriesout,suchthatanunmodifiedoperatingsystemcanbeused.
Fornetworkandstorageaccess,emulateddevicesarepresentedtothevirtualmachine,oralternativelyPVdriverscanbeusedforperformanceandreliabilityreasons.
InpreviousXenServerreleasesallsupportedLinuxdistributionshaveoperatedinPVmode,andWindowsreleasesinHVMmode.
InXenServer6.
5however,thefollowingnewlysupportedLinuxdistributionswilloperateinHVMmode:RHEL7CentOS7OracleLinux7Ubuntu14.
04ThisisbecausetheseVMscantakeadvantageofthex86virtualcontainertechnologiesinnewerprocessorsforimprovedperformance.
NetworkandstorageaccessfromtheseguestswillstilloperateinPVmode,usingdriversbuilt-intothekernels.
2.
2.
CreatingVMs2.
2.
1.
UsingVMTemplatesVMsarepreparedfromtemplates.
Atemplateisa"goldimage"thatcontainsallthevariousconfigurationsettingstoinstantiateaspecificVM.
XenServershipswithabasesetoftemplates,whichare"raw"VMs,onwhichyoucaninstallanoperatingsystem.
Differentoperatingsystemsrequiredifferentsettingsinordertorunattheirbest.
XenServertemplatesaretunedtomaximizeoperatingsystemperformance.
TherearetwobasicmethodsbywhichyoucancreateVMsfromtemplates:Usingacompletepre-configuredtemplate,forexampletheDemoLinuxVirtualAppliance.
InstallinganoperatingsystemfromaCD,ISOimageornetworkrepositoryontotheappropriateprovidedtemplate.
3Chapter4,CreatingWindowsVMsdescribeshowtoinstallWindowsoperatingsystemsontoVMs.
Chapter5,CreatingLinuxVMsdescribeshowtoinstallLinuxoperatingsystemsontoVMs.
2.
3.
OtherMethodsofVMCreationInadditiontocreatingVMsfromtheprovidedtemplates,thereare3othermethodsthatyoucanusetocreateVMs.
1.
PhysicaltoVirtualConversion(P2V)2.
CloninganexistingVM3.
ImportinganexportedVM2.
3.
1.
PhysicaltoVirtualConversion(P2V)PhysicaltoVirtualConversion(P2V)istheprocessbywhichanexistingWindowsoperatingsystemonaphysicalserver—itsfilesystem,configuration,andsoon—isconvertedtoavirtualizedinstanceoftheoperatingsystem.
Thisisthenistransferred,instantiated,andstartedasaVMontheXenServerhost.
2.
3.
2.
CloninganExistingVMYoucanmakeacopyofanexistingVMbycloningfromatemplate.
TemplatesareordinaryVMswhichareintendedtobeusedasmastercopiestoinstantiateVMsfrom.
AVMcanbecustomizedandconvertedintoatemplate;besuretofollowtheappropriatepreparationprocedurefortheVM(seeSection10.
9,"PreparingforCloningaWindowsVMUsingVSS"forWindowsandSection5.
7,"PreparingtoCloneaLinuxVM"forLinux).
Note:TemplatescannotbeusedasnormalVMs.
XenServerhastwomechanismsforcloningVMs:1.
Afullcopy2.
Copy-on-Write(CoW)ThefasterCopy-on-Write(CoW)modeonlywritesmodifiedblockstodisk.
CoWisdesignedtosavediskspaceandallowfastclones,butwillslightlyslowdownnormaldiskperformance.
Atemplatecanbefast-clonedmultipletimeswithoutslowdown.
Note:IfatemplateisclonedintoaVMandthecloneconvertedbackintoatemplate,diskperformancecanlinearlydecreasedependingonthenumberoftimesthishashappened.
Inthisevent,thevm-copyCLIcommandcanbeusedtoperformafullcopyofthedisksandrestoreexpectedlevelsofdiskperformance.
NotesforResourcePoolsIfyoucreateatemplateonaserverwhereallVMvirtualdisksareonsharedStorageRepositories(SR),thetemplatecloningoperationwillbeforwardedtoanyserverinthepoolthatcanaccessthesharedSRs.
However,ifyoucreatethetemplatefromaVMvirtualdiskthatonlyhasalocalSR,thenthetemplatecloneoperationcanonlyexecuteontheserverthatcanaccessthatSR.
2.
3.
3.
ImportinganExportedVMYoucancreateaVMbyimportinganexistingexportedVM.
Likecloning,exportingandimportingaVMisfastwaytocreateadditionalVMsofacertainconfigurationsothatyoucanincreasethespeedofyourdeployment.
Youmight,forexample,haveaspecial-purposeserverconfigurationthatyouusemanytimes.
Onceyouhavesetupa4VMthewayyouwantit,youcanexportit,andimportitlatertocreateanothercopyofyourspecially-configuredVM.
YoucanalsouseexportandimporttomoveaVMtoaXenServerhostthatisinanotherresourcepool.
FordetailsandproceduresonimportingandexportingVMs,seeChapter12,ImportingandExportingVMs.
2.
4.
XenServerToolsXenServerToolsmustbeinstalledforeachVirtualMachine(WindowsandLinux)inorderfortheVMtohaveafullysupportedconfiguration,andtobeabletousetheXenServermanagementtools(thexeCLIorXenCenter).
AWindowsVMwillfunctionwithoutthem,butperformancewillbesignificantlyhamperedunlessthetoolsareinstalled.
Withoutthetoolsbeinginstalled,youcannot:CleanlyshutdownaVMCleanlyrebootaVMSuspendaVMMigratearunningVM(XenMotion)UsethecheckpointandrollbackfeatureDynamicallyadjustthenumberofvCPUsassignedtoarunningLinuxVM-WindowsVMsrequirearebootforthistotakeeffectForfurtherinformationaboutXenServerToolsseeSection10.
3,"XenServerTools"Warning:RunningaVMwithoutinstallingtheXenServerToolsisnotasupportedconfiguration.
ForWindowsVMs,installingorupgradingtheXenServerToolscancausethefriendlynameandidentifierofsomenetworkadapterstochange.
AnysoftwarewhichisconfiguredtouseaparticularadaptermayhavetobereconfiguredfollowingToolsinstallationorupgrade.
Inordertomaintainasupportedconfiguration,customersshouldensurethattheXenServerToolsinusebytheirVMs,matchesthelatestavailableversionfortheXenServerhost.
Forexample,someHotfixesincludeanupdatedXenServerToolsISOwhichwillupdatetheversioninstalledonthehost.
5Chapter3.
SupportedGuestsandAllocatingResourcesThischapterdescribeshowtoallocateresourcestoyourVMs,andthesupportedguestoperatingsystems.
Itlistsvirtualmemoryandvirtualdisksizeminimums,anddescribesthedifferencesinvirtualdevicesupportforthemembersoftheXenServerproductfamily.
3.
1.
SupportedGuests,VirtualMemory,andDiskSizeLimitsWheninstallingVMs,followthememoryanddiskspaceguidelinesoftheoperatingsystemandanyrelevantapplications,whenallocatingresourcessuchasmemoryanddiskspace.
Important:Individualversionsoftheoperatingsystemsmayalsoimposetheirownmaximumlimitsontheamountofmemorysupported(forexample,forlicensingreasons).
Warning:Whenconfiguringguestmemory,donottoexceedthemaximumamountofphysicalmemoryaddressablebyyouroperatingsystem.
Settingamemorymaximumthatisgreaterthantheoperatingsystemsupportedlimitmayleadtostabilityproblemswithinyourguest.
OperatingSystemMinimumRAMMaximumRAMMinimumDiskSpaceWindows7,Windows7SP1,Windows8,Windows8.
1(32-bit)1GB4GB24GB(40GBormorerecommended)Windows7,Windows7SP1,Windows8,Windows8.
1(64-bit)2GB192GB24GB(40GBormorerecommended)WindowsServer2008SP2,WindowsServer2008R2,WindowsServer2008R2SP1,WindowsServer2012,WindowsServer2012R2(64-bit)512MB192GB24GB(40GBormorerecommended)WindowsServer2003SP2,WindowsServer2008SP2(32-bit)512MB64GB24GB(40GBormorerecommended)WindowsServer2003SP2(64-bit)256MB192GB8GB(16GBormorerecommended)WindowsVistaSP2(32-bit)1GB4GB24GB(40GBormorerecommended)WindowsXPSP3(32-bit)256MB4GB8GB(16GBormorerecommended)CentOS4.
5-4.
8(32-bit)256MB16GB8GBCentOS5.
0-5.
11(32-bit)512MB16GB8GBCentOS5.
0-5.
7(64-bit)512MB16GB8GBCentOS5.
8-5.
11(64-bit)512MB128GB8GBCentOS6.
0,6.
1(32-bit)512MB8GB8GB6OperatingSystemMinimumRAMMaximumRAMMinimumDiskSpaceCentOS6.
0,6.
1(64-bit)512MB32GB8GBCentOS6.
2-6.
7(32-bit)512MB16GB8GBCentOS6.
2-6.
7(64-bit)512MB128GB8GBCentOS7.
0,7.
1(64-bit)1GB192GB10GBRedHatEnterpriseLinux4.
5-4.
8(32-bit)256MB16GB8GBRedHatEnterpriseLinux5.
0-5.
11(32-bit)512MB16GB8GBRedHatEnterpriseLinux5.
0-5.
7(64-bit)512MB16GB8GBRedHatEnterpriseLinux5.
8-5.
11(64-bit)512MB128GB8GBRedHatEnterpriseLinux6.
0,6.
1(32-bit)512MB8GB8GBRedHatEnterpriseLinux6.
0,6.
1(64-bit)512MB32GB8GBRedHatEnterpriseLinux6.
2-6.
7(32-bit)512MB16GB8GBRedHatEnterpriseLinux6.
2-6.
7(64-bit)512MB128GB8GBRedHatEnterpriseLinux7.
0,7.
1(64-bit)1GB192GB10GBSUSELinuxEnterpriseServer10SP1,SLES10SP2,SLES10SP3,SLES10SP4(32-bit)512MB16GB8GBSUSELinuxEnterpriseServer10SP1,SLES10SP2,SLES10SP3,SLES10SP4(64-bit)512MB128GB8GBSUSELinuxEnterpriseServer11,SLES11SP1,SLES11SP2(32-bit)512MB64GB8GBSUSELinuxEnterpriseServer11SP3(32-bit)512MB16GB8GBSUSELinuxEnterpriseServer11,SLES11SP1,SLES11SP2,SLES11SP3(64-bit)512MB128GB8GBSUSELinuxEnterpriseServer12(64-bit)*512MB128GB8GBSUSELinuxEnterpriseDesktop11SP3(64-bit)512MB128GB8GBOracleLinux5.
0-5.
7,5.
10,5.
11(32-bit)512MB64GB8GB7OperatingSystemMinimumRAMMaximumRAMMinimumDiskSpaceOracleLinux5.
0-5.
11(64-bit)512MB128GB8GBOracleLinux5.
8,5.
9(32-bit)512MB16GB8GBOracleLinux6.
0,6.
1,6.
5,6.
6,6.
7(32-bit)512MB8GB8GBOracleLinux6.
0,6.
1(64-bit)512MB32GB8GBOracleLinux6.
2-6.
4(32-bit)512MB16GB8GBOracleLinux6.
2-6.
7(64-bit)512MB128GB8GBOracleLinux7.
0,7.
1(64-bit)1GB192GB10GBScientificLinux5.
11(32-bit)512MB16GB8GBScientificLinux5.
11(64-bit)512MB128GB8GBScientificLinux6.
6(32-bit)512MB16GB8GBScientificLinux6.
6(64-bit)512MB128GB8GBScientificLinux7.
0,7.
1(64-bit)1GB192GB10GBDebianSqueeze6.
0(32-/64-bit)128MB32GB8GBDebianWheezy7(32-bit)512MB32GB8GBDebianWheezy7(64-bit)512MB128GB8GBUbuntu10.
04(32-bit)128MB32GB8GBUbuntu10.
04(64-bit)128MB32GB8GBUbuntu12.
04(32-bit)128MB32GB8GBUbuntu12.
04(64-bit)128MB128GB8GBUbuntu14.
04(32-bit)512MB64GB8GBUbuntu14.
04(64-bit)512MB192GB8GBCoreOS633.
1.
0512MB192GB5GB*CustomersshouldnotethattheBtrfsfilesystem,thedefaultinSLES12,isnotsupportedbyXenServer.
CustomersshouldinsteadselectasupportedfilesystemsuchasEXT3orEXT4forthe/bootpartition.
Important:RHEL,OL,andCentOS5.
0guestoperatingsystemswiththeoriginalkernelwillfailtobootonXenServer6.
5ServicePack1.
BeforeattemptingtoupgradeaXenServerhosttothe6.
5ServicePack1,customersshouldupdatethekerneltoversion5.
4(2.
6.
18-164.
el5xen)orlater.
CustomersrunningthesegueststhathavealreadyupgradedtheirXenServerhostto6.
5ServicePack1shouldrefertotheCitrixKnowledgeBasearticle,CTX134845forinformationonupgradingthekernel.
Note:8Some32-bitWindowsoperatingsystemscansupportmorethan4GBofRAMthroughtheuseofaspecialmode:physicaladdressextension(PAE)mode.
IfyouwanttoreconfigureaVMwithgreaterthan4GBofRAM,youmustusethexeCLI,notXenCenter,astheCLIdoesnotimposeanyupperboundsformemory-static-max.
3.
2.
Long-termGuestSupportXenServerincludesalong-termguestsupport(LTS)policyforLinuxVMs.
TheLTSpolicyenablesallcustomerstoconsumeminorversionupdatesbyeither,installationfromnewguestmedia,orasanupgradefromanexistingsupportedguest.
Toensurelong-termguestsupport,customersshouldinstallXenServer6.
5ServicePack1andstaycurrentonallsubsequenthotfixes.
3.
3.
XenServerProductFamilyVirtualDeviceSupportThecurrentversionoftheXenServerproductfamilyhasthefollowinggenerallimitationsonvirtualdevicesforVMs.
Specificguestoperatingsystemsmayhavelowerlimitsforcertainfeatures.
Theindividualguestinstallationsectionnotesthelimitations.
FordetailedinformationonConfigurationLimits,refertoXenServer6.
5ServicePack1ConfigurationLimits.
Factorssuchashardwareandenvironmentcanaffectthelimitationslistedbelow.
MoreinformationaboutsupportedhardwarecanbefoundontheXenServerHardwareCompatibilityList.
VirtualdeviceLinuxVMsWindowsVMsNumberofvirtualCPUs32*16Numberofvirtualdisks16(includingvirtualCD-ROM)16(includingvirtualCD-ROM)NumberofvirtualCD-ROMdrives11NumberofvirtualNICs77*Amaximumof16vCPUsaresupportedbyXenCenter.
For64-bitHVMLinuxGuests(thatis,Ubuntu14.
04,RHEL,CentOS,OracleLinux,andScientificLinux7and7.
1)amaximumof16vCPUsaresupported.
Forallvariantsof32-bitUbuntu,themaximumnumberofvCPUsis8.
ThemaximumnumberofVDIssupportedisdependentontheguestoperatingsystem.
ConsultyourguestOSdocumentationtoensureyoudonotexceedthesupportedlimits.
exceptforSLES10SP1andRHEL4.
x,whichsupport3.
RHEL5.
0/5.
1/5.
2support3,butcansupport7whenthekernelispatchedwiththeXenServerTools.
ThesameappliesforOracleandCentOS5.
0/5.
1/5.
2.
3.
3.
1.
VMBlockDevicesInthepara-virtualized(PV)Linuxcase,blockdevicesarepassedthroughasPVdevices.
XenServerdoesnotattempttoemulateSCSIorIDE,butinsteadprovidesamoresuitableinterfaceinthevirtualenvironmentintheformofxvd*devices.
Itisalsosometimespossible(dependingontheOS)togetansd*deviceusingthesamemechanism,wherethePVdriverinsidetheVMtakesovertheSCSIdevicenamespace.
Thisisnotdesirablesoitisbesttousexvd*wherepossibleforPVguests(thisisthedefaultforDebianandRHEL).
ForWindowsorotherfullyvirtualizedguests,XenServeremulatesanIDEbusintheformofanhd*device.
WhenusingWindows,installingtheXenServerToolsinstallsaspecialPVdriverthatworksinasimilarwaytoLinux,exceptinafullyvirtualizedenvironment.
9Chapter4.
CreatingWindowsVMsWarning:RunningaVMwithoutinstallingtheXenServerToolsisnotasupportedconfiguration.
Formoreinformation,seeSection2.
4,"XenServerTools".
InstallingWindowsVMsonaXenServerhostrequireshardwarevirtualizationsupport(IntelVTorAMD-V).
4.
1.
BasicProcedureforCreatingaWindowsVMTheprocessofinstallingaWindowsontoaVMcanbebrokendownintothreesteps:selectingtheappropriateWindowstemplateinstallingtheWindowsoperatingsysteminstallingtheparavirtualizeddevicedriversknownastheXenServerTools4.
2.
AvailableWindowsTemplatesWindowsoperatingsystemsareinstalledontoVMsbycloninganappropriatetemplateusingeitherXenCenterorthexeCLI,andtheninstallingtheoperatingsystem.
Thetemplatesforindividualguestshavepredefinedplatformflagssetwhichdefinetheconfigurationofthevirtualhardware.
Forexample,allWindowsVMsareinstalledwiththeACPIHardwareAbstractionLayer(HAL)modeenabled.
IfyousubsequentlychangeoneoftheseVMstohavemultiplevirtualCPUs,WindowsautomaticallyswitchestheHALtomulti-processormode.
TheavailableWindowstemplatesarelistedbelow:TemplateNameDescriptionCitrixXenApponWindowsServer2003(32-bit)UsedtoinstallWindowsServer2003SP2(32-bit).
TheServer,Enterprise,DataCentre,andSBSeditionsaresupported.
ThistemplateisspeciallytunedtooptimizeXenAppperformance.
CitrixXenApponWindowsServer2003(64-bit)UsedtoinstallWindowsServer2003SP2(64-bit).
TheServer,Enterprise,DataCentre,andSBSeditionsaresupported.
ThistemplateisspeciallytunedtooptimizeXenAppperformance.
CitrixXenApponWindowsServer2008(32-bit)UsedtoinstallWindowsServer2008SP2(32-bit).
Alleditionsaresupported.
ThistemplateisspeciallytunedtooptimizeXenAppperformance.
CitrixXenApponWindowsServer2008(64-bit)UsedtoinstallWindowsServer2008SP2(64-bit).
Alleditionsaresupported.
ThistemplateisspeciallytunedtooptimizeXenAppperformance.
CitrixXenApponWindowsServer2008R2(64-bit)UsedtoinstallWindowsServer2008R2andWindowsServer2008R2SP1(64-bit).
Alleditionsaresupported.
ThistemplateisspeciallytunedtooptimizeXenAppperformance.
Windows7(32-bit)UsedtoinstallWindows7andWindows7SP1(32-bit).
Windows7(64-bit)UsedtoinstallWindows7andWindows7SP1(64-bit).
Windows8(32-bit)UsedtoinstallWindows8andWindows8.
1(32-bit).
Windows8(64-bit)UsedtoinstallWindows8andWindows8.
1(64-bit).
10TemplateNameDescriptionWindowsServer2003(32-bit)UsedtoinstallWindowsServer2003SP2(32-bit).
TheServer,Enterprise,DataCentre,andSBSeditionsaresupported.
WindowsServer2003(64-bit)UsedtoinstallWindowsServer2003SP2(64-bit).
TheServer,Enterprise,DataCentre,andSBSeditionsaresupported.
WindowsServer2008(32-bit)UsedtoinstallWindowsServer2008SP2(32-bit).
Alleditionsaresupported.
WindowsServer2008(64-bit)UsedtoinstallWindowsServer2008SP2(64-bit).
Alleditionsaresupported.
WindowsServer2008R2(64-bit)UsedtoinstallWindowsServer2008R2andWindowsServer2008R2SP1(64-bit).
Alleditionsaresupported.
WindowsServer2012(64-bit)UsedtoinstallWindowsServer2012(64-bit).
WindowsServer2012R2(64-bit)UsedtoinstallWindowsServer2012R2(64-bit).
WindowsVista(32-bit)UsedtoinstallWindowsVistaSP2(32-bit).
TheEnterpriseeditionissupported.
Warning:Experimentalguestoperatingsystemshavereceivedlimitedtesting,maynotbepresentinfutureproductreleasesandmustnotbeenabledonproductionsystems.
Citrixmaynotrespondtosupportrequestsregardingexperimentalfeatures.
4.
2.
1.
AttachinganISOImageLibraryTheWindowsoperatingsystemcanbeinstalledeitherfromaninstallCDinaphysicalCD-ROMdriveontheXenServerhost,orfromanISOimage.
SeeAppendixC,CreatingISOImagesforinformationonhowtomakeanISOimagefromaWindowsinstallCDandmakeitavailableforuse.
4.
3.
UsingXenCentertoCreateaVMTocreateaWindows7(32-bit)VM:Note:ThefollowingprocedureprovidesanexampleofcreatingWindows7(32-bit)VM.
Thedefaultvaluesmayvarydependingontheoperatingsystemthatyouchoose.
1.
OntheXenCentertoolbar,clicktheNewVMbuttontoopentheNewVMwizard.
TheNewVMwizardallowsyoutoconfigurethenewVM,adjustingvariousparametersforCPU,storageandnetworkingresources.
2.
SelectaVMtemplateandclickNext.
EachtemplatecontainsthesetupinformationneededtocreateanewVMwithaspecificguestoperatingsystem(OS),andwithoptimumstorage.
ThislistreflectsthetemplatesthatXenServercurrentlysupports.
Note:IftheOSthatyouintendtoinstallonyournewVMiscompatibleonlywiththeoriginalhardware(forexample,anOSinstallationCDthatwaspackagedwithaspecificcomputer),checktheCopyhostBIOSstringstoVMbox.
11TocopyBIOSstringsusingtheCLI,seeSection10.
8,"InstallingHVMVMsfromResellerOptionKit(BIOS-locked)Media"3.
EnteranameandanoptionaldescriptionforthenewVM.
4.
ChoosethesourceoftheOSmediatoinstallonthenewVM.
InstallingfromaCD/DVDisthesimplestoptionforgettingstarted.
Todoso,choosethedefaultinstallationsourceoption(DVDdrive),insertthediskintotheDVDdriveoftheXenServerhost,andchooseNexttoproceed.
XenServeralsoallowsyoutopullOSinstallationmediafromarangeofsources,includingapre-existingISOlibrary.
AnISOimageisafilethatcontainsalltheinformationthatanopticaldisc(CD,DVD,andsoon)wouldcontain.
Inthiscase,anISOimagewouldcontainthesameOSdataasaWindowsinstallationCD.
Toattachapre-existingISOlibrary,clickNewISOlibraryandindicatethelocationandtypeofISOlibrary.
YoucanthenchoosethespecificoperatingsystemISOmediafromthedrop-downlist.
5.
TheVMwillrunontheinstalledhost.
ChooseNexttoproceed.
6.
ForaWindows7VM,thedefaultis1virtualCPUand2048MBofRAM.
Youmayalsochoosetomodifythedefaults.
SelectNexttocontinue.
7.
AllocateandconfigurestorageforthenewVM.
ClickNexttoselectthedefaultallocation(24GB)andconfiguration,oryoumaywishto:a.
Changethename,descriptionorsizeofyourvirtualdiskbyclickingProperties.
b.
AddanewvirtualdiskbyselectingAdd.
8.
ConfigurenetworkingonthenewVM.
ClickNexttoselectthedefaultnetworkinterfacecard(NIC)andconfigurations,includinganautomatically-createduniqueMACaddressforeachNIC,oryoumaywishto:a.
Changethephysicalnetwork,MACaddressorquality-of-service(QoS)priorityofthevirtualdiskbyclickingProperties.
b.
AddanewvirtualNICbyselectingAdd.
9.
Reviewsettings,andthenclickFinishtocreatethenewVMandreturntotheSearchtab.
AniconforyournewVMappearsunderthehostintheResourcespane.
OntheResourcespane,selecttheVM,andthenclicktheConsoletabtoseetheVMconsole.
10.
FollowtheOSinstallationscreensandmakeyourselections.
11.
OncetheOSinstallationcompletesandtheVMreboots,installtheXenServerTools.
XenServerToolsprovidehigh-speedI/Oforenhanceddiskandnetworkperformance.
XenServerToolsmustbeinstalledoneachVMinorderfortheVMtohaveafully-supportedconfiguration.
AVMwillfunctionwithoutthem,butperformancewillbesignificantlyhampered.
XenServerToolsalsoenablecertainfunctionsandfeatures,includingcleanlyshuttingdown,rebooting,suspendingandlivemigratingVMs.
Warning:YoumustinstallXenServerToolsforeachVM.
RunningVMswithoutXenServerToolsisnotsupported.
FormoreinformationonXenServerToolsseeSection10.
3,"XenServerTools".
Note:ToinstallXenServerToolsonaWindowsVM,theVMmustberunningtheMicrosoft.
NETFrameworkVersion4.
0orlater.
IfaVMisrunningWindows2003,youneedtoinstallthe12WindowsImagingComponent(seeyourvendordocumentationfordetails)beforeinstallingXenServerTools.
ToinstallXenServerTools:a.
OntheResourcespane,selecttheXenServerhostandthentheSearchtab.
TheXenServerToolsnotinstalledbluestatustextappearsnexttothenewVM.
b.
ClickthetexttoopentheXenServerToolssetupwizardontheVMconsole.
c.
ClicktheInstallXenServerToolsbutton,andthenRunXensetup.
exe.
d.
Whenprompted,clickYestoallowtheprogramtomakechangestothecomputer.
e.
AccepttheLicenseAgreement,andclickNexttocontinue.
f.
ChooseadestinationfolderandclickInstall.
g.
SelectRebootnow,andthenFinishtocompletetheinstallation.
4.
4.
UsingtheCLItoCreateaWindowsVMThissectiondescribestheproceduretocreateaWindowsVMfromanISOrepositoryusingthexeCLI.
InstallingaWindowsVMfromanISORepositoryUsingtheCLI1.
CreateaVMfromatemplate:xevm-installnew-name-label=template=ThisreturnstheUUIDofthenewVM.
2.
CreateanISOStorageRepository:xe-mount-iso-sr3.
ListalloftheavailableISOs:xecd-list4.
InsertthespecifiedISOintothevirtualCDdriveofthespecifiedVM:xevm-cd-addvm=cd-name=device=35.
StarttheVMandinstalltheoperatingsystem:xevm-startvm=Atthispoint,theVMconsolewillnowbevisibleinXenCenter.
FormoreinformationonusingtheCLI,seeAppendixA,CommandLineInterface,intheXenServerAdministrator'sGuide.
13Chapter5.
CreatingLinuxVMsThischapterdiscusseshowtocreateLinuxVMs,eitherbyinstallingthemorcloningthem.
Thischapteralsocontainsvendor-specificinstallationinstructions.
WhenyouwanttocreateanewVM,youmustcreatetheVMusingatemplatefortheoperatingsystemyouwanttorunontheVM.
YoucanuseatemplateCitrixprovidesforyouroperatingsystem,oronethatyoucreatedpreviously.
YoucancreatetheVMfromeitherXenCenterortheCLI.
ThischapterwillfocusonusingtheCLI.
Note:CustomerswhowishtocreateVMofanewerminorupdateofaRedHatEnterpriseLinux(RHELrelease,thaniscurrentlysupportedforinstallationbyXenServer,shouldinstallfromthelatestsupportedmediaandthenuseyumupdatetobringtheVMuptodate.
ThisalsoappliestoRHELderivativessuchasCentOSandOracleLinux.
Forexample,RHEL5.
10issupportedforreleasewithXenServer6.
5;customerswhowishtouseRHELv5.
11,shouldfirstinstallRHELv5.
10,andthenuseyumupdatetoupdatetoRHEL5.
11.
WerecommendthatyouinstalltheXenServerToolsafterinstallingtheoperatingsystem.
Forsomeoperatingsystems,theXenServerToolsincludesaXenServerspecifickernel,whichreplacesthekernelprovidedbythevendor.
Otheroperatingsystems,suchasRHEL5.
xrequireyoutoinstallaspecificversionofavendorprovidedkernel.
TheoverviewforcreatingaLinuxVMisasfollowing:1.
CreatetheVMforyourtargetoperatingsystemusingXenCenterortheCLI.
2.
Installtheoperatingsystemusingvendorinstallationmedia.
3.
InstalltheXenServerTools.
4.
ConfigurethecorrecttimeandtimezoneontheVMandVNCasyouwouldinanormalnon-virtualenvironment.
XenServersupportstheinstallationofmanyLinuxdistributionsasVMs.
Therearethreeinstallationmechanisms:1.
Installingfromaninternetrepository2.
InstallingfromaphysicalCD3.
InstallingfromanISOlibraryWarning:TheOtherinstallmediatemplateisforadvanceduserswhowanttoattempttoinstallVMsrunningunsupportedoperatingsystems.
XenServerhasbeentestedrunningonlythesupporteddistributionsandspecificversionscoveredbythestandardsuppliedtemplates,andanyVMsinstalledusingtheOtherinstallmediatemplatearenotsupported.
VMscreatedusingtheOtherinstallmediatemplatewillbecreatedasHVMguests,whichmaymeanthatsomeLinuxVMswillusesloweremulateddevicesratherthanthehigherperformancePVdrivers.
ForinformationregardingspecificLinuxdistributions,seeSection5.
6,"AdditionalInstallationNotesforLinuxDistributions".
14ThesupportedLinuxdistributionsare:DistributionVendorInstallfromCDVendorInstallfromnetworkrepositoryNotesDebianSqueeze6.
0(32-/64-bit)XXDebianWheezy7(32-/64-bit)XXRedHatEnterpriseLinux4.
5-4.
8(32-bit)XXRequiresinstallingXenServerToolsafterinstallingRHELtoapplytheCitrixRHEL4.
8kernel.
RedHatEnterpriseLinux5.
0-5.
11(32-/64-bit)XXSupportedprovidedyouusethe5.
4orlaterkernel.
RedHatEnterpriseLinux6.
0-6.
6(32-/64-bit)XXRedHatEnterpriseLinux7.
0-7.
1(64-bit)XXCentOS4.
5-4.
8(32-bit)XXCentOS5.
0-5.
11(32-/64-bit)XXCentOS6.
0-6.
6(32-/64-bit)XXCentOS7.
0-7.
1(64-bit)XXOracleLinux5.
0-5.
11(32-/64-bit)XXOracleLinux6.
0-6.
6(32-/64-bit)XXOracleLinux7.
0-7.
1(64-bit)XXScientificLinux5.
11(32-/64-bit)XXSupportedprovidedyouusethe5.
4orlaterkernel.
ScientificLinux6.
6(32-/64-bit)XXScientificLinux7.
0-7.
1(64-bit)XXSUSELinuxEnterpriseServer10SP1,SP2,SP4(32-/64-bit)XXSUSELinuxEnterpriseServer10SP3(32-bit)SupportedonlyifupgradingfromSLES10SP2SUSELinuxEnterpriseServer10SP3(64-bit)XXSUSELinuxEnterpriseServer11,SP1,SP2,SP3(32-/64-bit)XXSUSELinuxEnterpriseDesktop11SP3(64-bit)XX15DistributionVendorInstallfromCDVendorInstallfromnetworkrepositoryNotesUbuntu10.
04(32-/64-bit)XUbuntu12.
04(32-/64-bit)XXUbuntu14.
04(32-/64-bit)XXCoreOS633.
1.
0XXDistributionsnotpresentintheabovelistarenotsupported.
However,distributionsthatusethesameinstallationmechanismasRedHatEnterpriseLinux(forexample,FedoraCore)mightbesuccessfullyinstalledusingthesametemplate.
Note:Running32-bitPVLinuxVMsonahostthathasmorethan128GBofmemoryisnotsupported.
5.
1.
CreatingaLinuxVMbyInstallingfromanInternetRepositoryThissectionshowsthexeCLIprocedureforcreatingaLinuxVM,usingaDebianSqueezeexample,byinstallingtheOSfromaninternetrepository.
Example:InstallingaDebianSqueezeVMfromanetworkrepository1.
CreateaVMfromtheDebianSqueezetemplate.
TheUUIDoftheVMisreturned:xevm-installtemplate=new-name-label=2.
Specifytheinstallationrepository—thisshouldbeaDebianmirrorwithatleastthepackagesrequiredtoinstallthebasesystemandtheadditionalpackagesyouplantoselectduringtheDebianinstaller:xevm-param-setuuid=other-config:install-repository=Anexampleofavalidrepositorypathishttp://ftp.
.
debian.
org/debianwhereisyourcountrycode(seetheDebianmirrorlistforalistofthese).
FormultipleinstallationsCitrixrecommendsusingalocalmirrororaptproxytoavoidgeneratingexcessivenetworktrafficorloadonthecentralrepositories.
Note:TheDebianinstallersupportsonlyHTTPandFTPaptrepos,NFSisNOTsupported.
3.
FindtheUUIDofthenetworkthatyouwanttoconnectto.
Forexample,ifitistheoneattachedtoxenbr0:xenetwork-listbridge=xenbr0--minimal4.
CreateaVIFtoconnectthenewVMtothisnetwork:xevif-createvm-uuid=network-uuid=mac=randomdevice=05.
StarttheVM;itbootsstraightintotheDebianinstaller:xevm-startuuid=6.
FollowtheDebianInstallerproceduretoinstalltheVMintheconfigurationyourequire.
7.
Seebelowforinstructionsonhowtoinstalltheguestutilitiesandhowtoconfiguregraphicaldisplay.
5.
2.
CreatingaLinuxVMbyInstallingfromaPhysicalCD/DVDThissectionshowstheCLIprocedureforcreatingaLinuxVM,usingaDebianSqueezeexample,byinstallingtheOSfromaphysicalCD/DVD.
16Example:InstallingaDebianSqueezeVMfromCD/DVD(usingtheCLI)1.
CreateaVMfromtheDebianSqueezetemplate.
TheUUIDoftheVMisreturned:xevm-installtemplate=new-name-label=2.
GettheUUIDoftherootdiskofthenewVM:xevbd-listvm-uuid=userdevice=0params=uuid--minimal3.
UsingtheUUIDreturned,settherootdisktonotbeboo-table:xevbd-param-setuuid=bootable=false4.
GetthenameofthephysicalCDdriveontheXenServerhost:xecd-listTheresultofthiscommandshouldgiveyousomethinglikeSCSI0:0:0:0forthename-labelfield.
5.
AddavirtualCD-ROMtothenewVMusingtheXenServerhostCDdrivename-labelparameterasthecd-nameparameter:xevm-cd-addvm=cd-name=""device=36.
GettheUUIDoftheVBDcorrespondingtothenewvirtualCDdrive:xevbd-listvm-uuid=type=CDparams=uuid--minimal7.
MaketheVBDofthevirtualCDboot-able:xevbd-param-setuuid=bootable=true8.
SettheinstallrepositoryoftheVMtobetheCDdrive:xevm-param-setuuid=other-config:install-repository=cdrom9.
InserttheDebianSqueezeinstallationCDintotheCDdriveontheXenServerhost.
10.
OpenaconsoletotheVMwithXenCenteroranSSHterminalandfollowthestepstoperformtheOSinstallation.
11.
StarttheVM;itbootsstraightintotheDebianinstaller:xevm-startuuid=12.
Seethesectionsthatfollowforinstructionsonhowtoinstalltheguestutilitiesandhowtoconfiguregraphicaldisplay.
5.
3.
CreatingaLinuxVMbyInstallingFromanISOImageThissectionshowstheCLIprocedureforcreatingaLinuxVM,byinstallingtheOSfromnetwork-accessibleISO.
Example:InstallingaLinuxVMfromaNetwork-AccessibleISOImage1.
Runthecommandxevm-installtemplate=new-name-label=\sr-uuid=ThiscommandreturnstheUUIDofthenewVM.
2.
FindtheUUIDofthenetworkthatyouwanttoconnectto.
Forexample,ifitistheoneattachedtoxenbr0:xenetwork-listbridge=xenbr0--minimal3.
CreateaVIFtoconnectthenewVMtothisnetwork:xevif-createvm-uuid=network-uuid=mac=randomdevice=0174.
Settheinstall-repositorykeyoftheother-configparametertothepathofyournetworkrepository.
Forexample,tousehttp://mirror.
centos.
org/centos/6/os/x86_64astheURLofthevendormedia:xevm-param-setuuid=\other-config:install-repository=http://mirror.
centos.
org/centos/6/os/x86_645.
StarttheVMxevm-startuuid=6.
ConnecttotheVMconsoleusingXenCenterorVNCandperformtheOSinstallation.
5.
3.
1.
NetworkInstallationNotesTheXenServerguestinstallerallowsyoutoinstallanoperatingsystemfromanetwork-accessibleISOimageontoaVM.
ToprepareforinstallingfromanISO,makeanexplodednetworkrepositoryofyourvendormedia(notISOimages)andexportitoverNFS,HTTPorFTPsothatitisaccessibletotheXenServerhostadministrationinterface.
ThenetworkrepositorymustbeaccessiblefromthecontroldomainoftheXenServerhost,normallyusingthemanagementinterface.
TheURLmustpointtothebaseoftheCD/DVDimageonthenetworkserver,andbeoftheform:HTTPhttp:///FTPftp:///NFSnfs:///NFSnfs::/Seeyourvendorinstallationinstructionsforinformationabouthowtoprepareforanetwork-basedinstallation,suchaswheretounpacktheISO.
Note:NotethatwhenusingtheNFSinstallationmethodfromXenCenter,thenfs://styleofpathshouldalwaysbeused.
WhencreatingVMsfromtemplates,theXenCenterNewVMwizardpromptsyoufortherepositoryURL.
WhenusingtheCLI,installthetemplateasnormalusingvm-installandthensettheother-config:install-repositoryparametertothevalueoftheURL.
WhentheVMissubsequentlystarted,itwillbeginthenetworkinstallationprocess.
Warning:WheninstallinganewLinux-basedVM,itisimportanttofullyfinishtheinstallationandrebootitbeforeperforminganyotheroperationsonit.
ThisisanalogoustonotinterruptingaWindowsinstallation—whichwouldleaveyouwithanon-functionalVM.
5.
4.
AdvancedOperatingSystemBootParametersWhencreatinganewVM,youcanspecifyadvancedoperatingsystembootparametersusingXenCenterorthexeCLI.
Specifyingadvancedparametersmaybeparticularlyhelpfulifyouare,forexample,configuringautomatedinstallationsofparavirtualizedguests.
Forexample,youmightuseaDebianpreseedorRHELkickstartfileasfollows.
18ToinstallDebianusingapreseedfile:1.
Createapreseedfile.
Forinformationoncreatingpreseedfiles,seetheDebiandocumentationfordetails.
2.
Setthekernelcommand-linecorrectlyfortheVMbeforestartingit.
ThiscanbedoneusingtheNewVMwizardinXenCenterorbyexecutinganxeCLIcommandlikethefollowing:xevm-param-setuuid=PV-args=ToinstallRHELUsingaKickstartFile:Note:ARedHatKickstartfileisanautomatedinstallationmethod,similartoananswerfile,youcanusetoprovideresponsestotheRHELinstallationprompts.
Tocreatethisfile,installRHELmanually.
Thekickstartfileislocatedin/root/anaconda-ks.
cfg.
1.
InXenCenter,choosetheappropriateRHELtemplate2.
Specifythekickstartfiletouseasakernelcommand-lineargumentintheXenCenterNewVMWizard,exactlyasitwouldbespecifiedinthePXEconfigfile,forexample:ks=http://server/pathksdevice=eth03.
Onthecommandline,usevm-param-settosetthePV-argsparametertomakeuseofaKickstartfilexevm-param-setuuid=PV-args="ks=http://server/pathksdevice=eth0"4.
SettherepositorylocationsoXenServerknowswheretogetthekernelandinitrdfromfortheinstallerboot:xevm-param-setuuid=other-config:install-repository=Note:ToinstallusingakickstartfilewithouttheNewVMwizard,youcanaddtheappropriateargumenttotheAdvancedOSbootparameterstextbox.
5.
5.
InstallingtheLinuxGuestAgentAlthoughallthesupportedLinuxdistributionsarenativelyparavirtualized(andthereforedonotneedspecialdriversforfullperformance),XenServerincludesaguestagentwhichprovidesadditionalinformationabouttheVMtothehost.
YoumustinstalltheLinuxguestagentoneachLinuxVMtoperformthefollowingoperations:EnableDynamicMemoryControl(DMC)DynamicallyadjustthenumberofVBDsandVIFsallocatedtoLinuxVMsItisimportanttoinstallthisagentandkeepitup-to-date(seeChapter7,UpdatingVMs)asyouupgradeyourXenServerhost.
Toinstalltheguestagent:1.
Thefilesrequiredarepresentonthebuilt-inxs-tools.
isoCDimage,oralternativelycanbeinstalledbyusingtheVM>InstallXenServerToolsoptioninXenCenter.
2.
Mounttheimageontotheguestbyrunningthecommand:mount-oro,exec/dev/disk/by-label/XenServer\\x20Tools/mntNote:Ifmountingtheimagefails,youcanlocatetheimagebyrunningthefollowing:19blkid-tLABEL="XenServerTools"3.
Executetheinstallationscriptastherootuser:/mnt/Linux/install.
sh4.
Unmounttheimagefromtheguestbyrunningthecommand:umount/mnt5.
Ifthekernelhasbeenupgraded,ortheVMwasupgradedfromapreviousversion,reboottheVMnow.
Note:CD-ROMdrivesandISOsattachedtoLinuxVirtualMachinesappearasdevices,suchas/dev/xvdd(or/dev/sddinUbuntu10.
10andlater)insteadofas/dev/cdromasyoumightexpect.
ThisisbecausetheyarenottrueCD-ROMdevices,butnormaldevices.
WhentheCDisejectedbyeitherXenCenterortheCLI,ithot-unplugsthedevicefromtheVMandthedevicedisappears.
ThisisdifferentfromWindowsVirtualMachines,wheretheCDremainsintheVMinanemptystate.
5.
6.
AdditionalInstallationNotesforLinuxDistributionsThisfollowingtablelistsadditional,vendor-specific,configurationinformationthatyoushouldbeawareofbeforecreatingthespecifiedLinuxVMs.
Important:Fordetailedreleasenotesonalldistributions,seeAppendixB,LinuxVMReleaseNotes.
LinuxDistributionInstallationNotesCentOS4.
5-4.
8(32-bit)ForaCentOS4.
xVM,youmustinstalltheXenServerTools,whichincludestheCentOS4.
8kernelandfixesissuesintheCentOSkernelthatpreventXenServerfromrunningcorrectly.
CentOS5.
0-5.
11(32-/64-bit)ForaCentOS5.
xVM,youmustensurethattheoperatingsystemisusingtheCentOS5.
4kernelorlater,whichisavailablefromthedistributionvendor.
EnterpriseLinuxkernelversionspriorto5.
4containissuesthatpreventXenServerVMsfromrunningproperly.
Upgradethekernelusingthevendor'snormalkernelupgradeprocedure.
RedHatEnterpriseLinux4.
5-4.
8(32-bit)ForaRHEL4.
xVM,youmustinstalltheXenServerTools,whichincludestheRHEL4.
8kernelandfixesissuesintheRHELkernelthatpreventXenServerfromrunningcorrectly.
RedHatEnterpriseLinux5.
0-5.
11(32-/64-bit)ForaRHEL5.
xVM,youmustensurethattheoperatingsystemisusingtheRHEL5.
4kernel(2.
6.
18-164.
el5)orlater,whichisavailablefromthedistributionvendor.
EnterpriseLinuxkernelversionspriorto5.
4containissuesthatpreventXenServerVMsfromrunningproperly.
Upgradethekernelusingthevendor'snormalkernelupgradeprocedure.
20LinuxDistributionInstallationNotesOracleLinux5.
0-5.
11(32-/64-bit)ForanOEL5.
xVM,youmustensurethattheoperatingsystemisusingtheOEL5.
4kernelorlater,whichisavailablefromthedistributionvendor.
EnterpriseLinuxkernelversionspriorto5.
4containissuesthatpreventXenServerVMsfromrunningproperly.
Upgradethekernelusingthevendor'snormalkernelupgradeprocedure.
ForOEL5.
664-bit,theUnbreakableEnterpriseKernel(UEK)doesnotsupporttheXenplatform.
IfyouattempttouseUEKwiththisoperatingsystem,thekernelfailstobootproperly.
Debian6.
0(Squeeze)(32-/64-bit)WhenaprivatemirrorisspecifiedinXenCenterthisisonlyusedtoretrievetheinstallerkernel.
Oncetheinstallerisrunningyouwillagainneedtoentertheaddressofthemirrortobeusedforpackageretrieval.
Debian7(Wheezy)(32-/64-bit)WhenaprivatemirrorisspecifiedinXenCenterthisisonlyusedtoretrievetheinstallerkernel.
Oncetheinstallerisrunningyouwillagainneedtoentertheaddressofthemirrortobeusedforpackageretrieval.
Ubuntu10.
04(32-/64-bit)ForUbuntu10.
04VMswithmultiplevCPUs,Citrixstronglyrecommendsthatyouupdatetheguestkernelto"2.
6.
32-32#64".
Fordetailsonthisissue,seetheKnowledgeBasearticleCTX129472Ubuntu10.
04KernelBugAffectsSMPOperation.
5.
6.
1.
AdditionalDebianNotes5.
6.
1.
1.
AptRepositoriesForinfrequentorone-offinstallations,itisreasonabletodirectlyuseaDebianmirror.
However,ifyouintendtodoseveralVMinstallations,werecommendthatyouuseacachingproxyorlocalmirror.
Apt-cacherisanimplementationofproxyserverthatwillkeepalocalcacheofpackages.
debmirrorisatoolthatwillcreateapartialorfullmirrorofaDebianrepository.
EitherofthesetoolscanbeinstalledintoaVM.
5.
7.
PreparingtoCloneaLinuxVMTypically,whencloningaVMoracomputer,unlessyou"generalize"theclonedimage,attributesuniquetothatmachine,suchastheIPaddress,SID,orMACaddress,willbeduplicatedinyourenvironments.
Asaresult,XenServerautomaticallychangessomevirtualhardwareparameterswhenyoucloneaLinuxVM.
IfyoucopytheVMusingXenCenter,XenCenterautomaticallychangestheMACaddressandIPaddressforyou.
Iftheseinterfacesareconfigureddynamicallyinyourenvironment,youmightnotneedtomakeanymodificationstotheclonedVM.
However,iftheinterfacesarestaticallyconfigured,youmightneedtomodifytheirnetworkconfigurations.
TheVMmayneedtobecustomizedtobemadeawareofthesechanges.
ForinstructionsforspecificsupportedLinuxdistributions,seeSectionB.
1,"ReleaseNotes".
5.
7.
1.
MachineNameAclonedVMisanothercomputer,andlikeanynewcomputerinanetwork,itmusthaveauniquenamewithinthenetworkdomainitispartof.
215.
7.
2.
IPaddressAclonedVMmusthaveauniqueIPaddresswithinthenetworkdomainitispartof.
Generally,thisisnotaproblemifDHCPisusedtoassignaddresses;whentheVMboots,theDHCPserverwillassignitanIPaddress.
IftheclonedVMhadastaticIPaddress,theclonemustbegivenanunusedIPaddressbeforebeingbooted.
5.
7.
3.
MACaddressTherearetwosituationswhenCitrixrecommendsdisablingMACaddressrulesbeforecloning:1.
InsomeLinuxdistributions,theMACaddressforthevirtualnetworkinterfaceofaclonedVMisrecordedinthenetworkconfigurationfiles.
However,whenyoucloneaVM,XenCenterassignsthenewclonedVMadifferentMACaddress.
Asaresult,whenthenewVMisstartedforthefirsttime,thenetworkdoesrecognizethenewVManddoesnotcomeupautomatically.
2.
SomeLinuxdistributionsuseudevrulestoremembertheMACaddressofeachnetworkinterface,andpersistanameforthatinterface.
ThisisintendedsothatthesamephysicalNICalwaysmapstothesameethinterface,whichisparticularlyusefulwithremovableNICs(likelaptops).
However,thisbehaviorisproblematicinthecontextofVMs.
Forexample,ifyouconfiguretwovirtualNICswhenyouinstallaVM,andthenshutitdownandremovethefirstNIC,onrebootXenCentershowsjustoneNIC,butcallsiteth0.
MeanwhiletheVMisdeliberatelyforcingthistobeeth1.
Theresultisthatnetworkingdoesnotwork.
IftheVMusespersistentnames,Citrixrecommendsdisablingtheserulesbeforecloning.
Ifforsomereasonyoudonotwanttoturnpersistentnamesoff,youmustreconfigurenetworkinginsidetheVM(intheusualway).
However,theinformationshowninXenCenterwillnotmatchtheaddressesactuallyinyournetwork.
22Chapter6.
VMMigrationwithXenMotionandStorageXenMotionThischapterdiscussesmigratingrunningVMsusingXenMotionandStorageXenMotionandhowtomoveaVMsVirtualDiskImage(VDI)withoutanyVMdowntime.
6.
1.
XenMotionandStorageXenMotionThefollowingsectionsdescribethecompatibilityrequirementsandlimitationsofXenMotionandStorageXenMotion.
6.
1.
1.
XenMotionXenMotionisavailableinallversionsofXenServerandallowsyoutomovearunningVMfromonehosttoanotherhost,whentheVMsdisksarelocatedonstoragesharedbybothhosts.
ThisallowsforpoolmaintenancefeaturessuchasHighAvailability(HA),andRollingPoolUpgrade(RPU)toautomaticallymoveVMs.
Thesefeaturesallowforworkloadlevelling,infrastructureresilience,andtheupgradeofserversoftware,withoutanyVMdowntime.
Note:Storagecanonlybesharedbetweenhostsinthesamepool.
AsaresultVMscanonlybemigratedtohostsinthesamepool.
vGPUandGPUPass-throughisnotcompatiblewithXenMotion,StorageXenMotionorVMSuspend.
However,VMsusingGPUPass-throughorvGPUcanstillbestartedanyhostthathastheappropriateresources6.
1.
2.
StorageXenMotionStorageXenMotionmustnotbeusedinXenDesktopdeployments.
StorageXenMotionadditionallyallowsVMstobemovedfromonehosttoanother,wheretheVMsarenotlocatedonstoragesharedbetweenthetwohosts.
Asaresult,VMsstoredonlocalstoragecanbemigratedwithoutdowntimeandVMscanbemovedfromonepooltoanother.
Thisenablessystemadministratorsto:rebalanceVMsbetweenXenServerpools(forexamplefromadevelopmentenvironmenttoaproductionenvironment).
upgradeandupdatestandaloneXenServerhostswithoutanyVMdowntime.
upgradeXenServerhosthardware.
Note:MovingaVMfromonehosttoanotherpreservestheVMstate.
ThestateinformationincludesinformationthatdefinesandidentifiestheVMaswellasthehistoricalperformancemetrics,suchasCPUandnetworkusage.
6.
1.
3.
CompatibilityRequirementsWhenmigratingaVMwithXenMotionorStorageXenMotion,thenewVMhostmustmeetthefollowingcompatibilityrequirementsinorderforthemigrationtoproceed:XenServerToolsmustbeinstalledoneachWindowsVMthatyouwishtomigrate.
ThetargethostmusthavethesameoramorerecentversionofXenServerinstalledasthesourcehost.
23ForStorageXenMotion,iftheCPUsonthesourcehostandtargethostaredifferent,thetargethostmustprovideatleasttheentirefeaturesetasthesourcehost'sCPU.
Consequently,itisunlikelytobepossibletomoveaVMbetween,forexample,AMDandIntelprocessors.
ForStorageXenMotion,VMswithmorethanonesnapshotcannotbemigrated.
ForStorageXenMotion,VMswithmorethansixattachedVDIscannotbemigrated.
ThetargethostmusthavesufficientsparememorycapacityorbeabletofreesufficientcapacityusingDynamicMemoryControl.
Ifthereisnotenoughmemory,themigrationwillfailtocomplete.
ForStorageXenMotion,thetargetstoragemusthaveenoughfreediskspace(fortheVManditssnapshot)availablefortheincomingVMs.
Ifthereisnotenoughspace,themigrationwillfailtocomplete.
6.
1.
4.
LimitationsandCaveatsXenMotionandStorageXenMotionaresubjecttothefollowinglimitationsandcaveats:VMswithVDIslocatedonIntegratedStorageLink(iSL)SRscannotbemigrated.
VMsusingPCIpass-throughcannotbemigrated.
VMperformancewillbereducedduringmigration.
ForStorageXenMotion,poolsprotectedbyHighAvailability(HA)shouldhaveHAdisabledbeforeattemptingVMmigration.
TimetocompletionofVMmigrationwilldependonthememoryfootprintoftheVM,anditsactivity,inaddition,VMsbeingmigratedwithStorageXenMotionwillbeaffectedbythesizeoftheVDIanditsstorageactivity.
IPv6LinuxVMsrequireaLinuxKernelgreaterthan3.
0.
6.
2.
MigratingaVMusingXenCenter1.
IntheResourcespane,selecttheVManddooneofthefollowing:Right-clickandontheshortcutmenu,pointtoMigratetoServerandthenselectMigrateVMwizard.
OntheVMmenu,pointtoMigratetoServerandthenselectMigrateVMwizard.
InFolderView,dragtheVMontothedestinationserver.
Note:YoumustbeinFolderViewtobeabletomigrateaVMbydragginganddroppingitintheResourcespane.
2.
FromtheDestinationdrop-downlist,selectastandaloneserverorapool.
3.
FromtheHomeServerdrop-downlist,selectaservertoassignasthehomeserverfortheVMandclickNext.
4.
IntheStoragetab,specifythestoragerepositorywhereyouwouldliketoplacethemigratedVM'svirtualdisks,andthenclickNext.
ThePlaceallmigratedvirtualdisksonthesameSRradiobuttonisselectedbydefaultanddisplaysthedefaultsharedSRonthedestinationpool.
ClickPlacemigratedvirtualdisksontospecifiedSRstospecifyanSRfromtheStorageRepositorydrop-downlist.
ThisoptionallowsyoutoselectdifferentSRforeachvirtualdiskonthemigratedVM.
5.
FromtheStoragenetworkdrop-downlist,selectanetworkonthedestinationpoolthatwillbeusedforthelivemigrationoftheVM'svirtualdisksandclickNext.
Note:Duetoperformancereasons,itisrecommendedthatyoudonotuseyourmanagementnetworkforlivemigration.
6.
ReviewtheconfigurationsettingsandclickFinishtostartmigratingtheVM.
246.
3.
LiveVDIMigrationLiveVDImigrationallowstheadministratortorelocatetheVMsVirtualDiskImage(VDI)withoutshuttingdowntheVM.
Thisenablesadministrativeoperationssuchas:MovingaVMfromcheaplocalstoragetofast,resilient,array-backedstorage.
MovingaVMfromadevelopmenttoproductionenvironment.
MovingbetweentiersofstoragewhenaVMislimitedbystoragecapacity.
Performingstoragearrayupgrades.
6.
3.
1.
LimitationsandCaveatsLiveVDIMigrationissubjecttothefollowinglimitationsandcaveatsTheremustbesufficientdiskspaceavailableonthetargetrepository.
VDIslocatedonIntegratedStorageLink(iSL)SRscannotbemigrated.
VDIswithmorethanonesnapshotcannotbemigrated.
IPv6LinuxVMsrequireaLinuxKernelgreaterthan3.
0.
6.
3.
2.
ToMoveVirtualDisks1.
IntheResourcespane,selecttheSRwheretheVirtualDiskiscurrentlystoredandthenclicktheStoragetab.
2.
IntheVirtualDiskslist,selecttheVirtualDiskthatyouwouldliketomove,andthenclickMove.
3.
IntheMoveVirtualDiskdialogbox,selectthetargetSRthatyouwouldliketomovetheVDIto.
Note:MakesurethattheSRhassufficientspaceforanothervirtualdisk:theavailablespaceisshowninthelistofavailableSRs.
4.
ClickMovetomovethevirtualdisk.
25Chapter7.
UpdatingVMsThischapterdiscussesupdatingWindowsVMswithupdatedoperatingsystems,updatingXenServerTools,andupdatingVMswithnewLinuxkernelrevisions.
UpgradestoVMsaretypicallyrequiredwhenmovingtoanewversionofXenServer.
ThefollowingarecurrentissuesinvolvingupgradingVMsrunningonXenServertothisversion:XenMotionofWindowsVMsisnotsupporteduntiltheXenServerToolsareupgraded.
Suspend/ResumeofWindowsVMsisnotsupporteduntiltheXenServerToolsareupgraded.
Theuseofcertainanti-virusandfirewallapplicationscancrashtheWindowsVMunlesstheXenServerToolsareupgraded.
7.
1.
UpdatingWindowsOperatingSystemsWarning:BeforeupdatingWindowsoperatingsystemsyoumustuninstalltheXenServerTools.
Iftheyarepresentduringtheattempttoupdate,theupdatewillfail.
WindowsinstallationdiskstypicallyprovideanupgradeoptionifyoubootthemonaserverwhichhasanearlierversionofWindowsalreadyinstalled.
YoucanupdatetheoperatingsystemofWindowsVMsinasimilarway.
TouninstalltheXenServerTools1.
FromtheStartbutton,selectControlPanel.
2.
InWindows2003,selectAddorRemovePrograms.
InWindowsVista,7,8,8.
1,2008,2008R2,2012,and2012R2selectPrograms,andthenselectProgramsandFeatures.
3.
Selectallofthefollowingitems(thoselistedwilldependonyouroperatingsystem):a.
CitrixToolsforVirtualMachinesb.
CitrixXenServerToolsInstallerc.
CitrixXenServerWindowsGuestAgentd.
CitrixXenServerXenWindowsx64PVDriverse.
CitrixXenServerXenWindowsx86PVDriversf.
CitrixXenServerWSSProvider4.
InWindows2003,clicktheRemovebutton.
InWindows7andVista,fromthetoolbarabovethelistofprograms,selectUninstall.
ThisremovestheXenServerTools.
Whentheoperationcompletesamessageisdisplayed.
ClickOKtoclosethemessagebox.
Oncetheoperatingsystemupdateiscomplete,reinstalltheXenServerToolsjustasyouwouldafterinstallingafreshWindowsVM.
SeeSection10.
3,"XenServerTools"fordetails.
7.
2.
UpdatingXenServerToolsforWindowsVMsTheXenServerToolsareavailableinXenCenteronthebuilt-inxs-tools.
iso.
OntheVMmenu,selectInstallXenServerTools;thisattachestheCDimagecontainingtheXenServerToolstotheVM.
IfAutoplayisenabled26fortheVMCDdrive,installationwillbestartedautomaticallyafterafewmoments.
IfAutoplayisnotenabled,double-clickontheCDdrive,andselectinstallwizard.
msitobegintheXenServerToolsinstallation.
Followtheon-screenpromptstoinstallthenewdrivers,whichwillautomaticallydeactivateandupgradetheolddrivers.
7.
3.
UpdatingLinuxKernelsandGuestUtilitiesTheLinuxguestutilitiescanbeupdatedbyre-runningtheLinux/install.
shscriptfromthebuilt-inxs-tools.
isoCDimage(seeSection5.
5,"InstallingtheLinuxGuestAgent").
Foryum-enableddistributionsCentOS4and5,RHEL5.
4andhigher),xe-guest-utilitiesinstallsayumconfigurationfiletoenablesubsequentupdatestobedoneusingyuminthestandardmanner.
ForDebian,/etc/apt/sources.
listispopulatedtoenableupdatesusingaptbydefault.
Whenupgrading,Citrixrecommendsthatyoualwaysre-runLinux/install.
sh.
ThisscriptautomaticallydeterminesifyourVMneedsanyupdatesandinstallsifnecessary.
7.
4.
UpgradingtoUbuntu14.
04,RHEL7andCentOS7GuestsCustomerswhowishtoupgradeexistingLinuxgueststoversionswhichnowoperateinHVMmode(thatis,RHEL7,CentOS7,andUbuntu14.
04)shouldperformanin-guestupgrade.
Atthispoint,theupgradedGuestwillonlyruninPVmode-whichisnotsupportedandhasknownissues.
CustomersshouldrunthefollowingscripttoconvertthenewlyupgradedguesttothesupportedHVMmode.
Todothis:OntheXenServerhost,openalocalshell,logonasroot,andenterthefollowingcommand:/opt/xensource/bin/pv2hvmor/opt/xensource/bin/pv2hvmRestarttheVMtocompletetheprocess.
27Chapter8.
ContainerManagementXenServer6.
5ServicePack1includestwonewfeaturestoenhancedeploymentsofDockerContainersonXenServerSupportforCoreOS607.
0.
0LinuxVMsandconfiguringitsCloudConfigDrivesContainerManagementforCoreOS607.
0.
0,Ubuntu14.
04andRHEL/CentOS/OEL7.
0CoreOSisaminimalistLinuxdistributionwhichhasbecomepopularforhostingDockerapplications.
TheCoreOSCloudConfigDriveallowsthecustomizationofvariousoperatingsystemconfigurationoptions.
WhenContainerManagementisenabledonaVM,XenServerbecomesawareofanyDockercontainersrunningintheVM.
Note:ForinformationonhowtoinstallCoreOSguests,configureCloud-Configparameters,andmanageDockercontainers,refertotheXenCenteronlineHelp.
PressF1orclickHelp.
TheContainerManagementSupplementalParkenablesXenServertoquerytheVMs,interactwithCloudConfigDrives,discoverapplicationcontainers,anddisplaythesewithinXenCenter'sInfrastructureview.
XenCenteralsoenablesinteractionwiththecontainerstoallowforstart,stopandpauseoperations,andothermonitoringcapabilities.
RefertoSection8.
2,"ContainerManagementSupplementalPack"formoreinformation.
8.
1.
WhatisDockerDockerisanopenplatformfordevelopersandsystemadministratorstobuild,ship,andrundistributedapplications.
ADockercontainercomprisesjusttheapplicationanditsdependencies.
Itrunsasanisolatedprocessinuserspaceonthehostoperatingsystem,sharingthekernelandbasefilesystemwithothercontainers.
Formoreinformation,referto:https://www.
docker.
com/whatisdockerNote:TheXenServerContainerManagementfeaturecomplements,butnotdoesreplacetheDockerecosystem.
IndividualDockerEngineinstancesintheVMscanbemanagedbyoneofthemanyDockermanagementtoolsavailable.
8.
2.
ContainerManagementSupplementalPackTheContainerManagementSupplementalPackprovides:MonitoringandVisibility:allowsyoutoseewhichVMsareinuseforDockerhosting,andwhichcontainersontheVMarerunning.
Diagnostics:easyaccessisprovidedtobasiccontainerinformationsuchasforwardednetworkports,andoriginatingDockerimagename.
Thiscanhelpaccelerateinvestigationsintoproblemswhereeithertheinfrastructureandapplicationslayersmaybeimpacted.
Performance:givesinsightintowhichcontainersarerunningonthatVM,whatprocessesandapplicationsarerunninginthecontainer,andhowmuchCPMresourceeachconsumes.
ControlApplications:useXenCentertostart,stopandpauseapplicationcontainersenablingrapidterminationofproblematicapplications.
Note:XenServer6.
5ServicePack1introducessupportforinstallingSupplementalPacksthroughXenCenter.
ForinformationonhowtoinstallasupplementalpackusingXenCenterrefer28totheXenCenteronlineHelp.
IfyouwouldprefertoinstallusingthexeCLI,refertotheXenServerSupplementalPacksandtheDDKguide.
8.
3.
ConfiguringCoreOSGuestsWhenyoucreateaCoreOSVM,theXenCenterNewVMwizardpromptsyoutospecifycloud-configparametersforyourVM.
TheconfigdriveprovidesuserdatafortheVMinstance.
YoushouldcreateaconfigdriveifyouareplanningtouseXenServertomanagecontainersrunninginsidetheVM.
Warning:ContainersmayfailtorunifyoudonotcreateaconfigdrivefortheVM.
Bydefault,XenCenterincludesapredefinedsetofparametersontheCloud-ConfigParameterspage.
Youcanmodifytheseparametersbasedonyourrequirements.
RefertoCoreOSdocumentationfordetailedinformationaboutsupportedconfigurationparameters.
ForadditionaldetailsonhowtoinstallCoreOSguests,configureCloud-Configparameters,andmanageDockercontainers,refertotheXenCenteronlineHelp.
PressF1orclickHelp.
8.
4.
HowtoManageOtherLinuxGuestsCoreOSVMsthatarecreatedwiththedefaultCloudConfigDriveconfigurationareautomaticallypreparedforContainerManagementandthecapabilityonlyneedstobeenabled.
OtherLinuxguestscanbepreparedmanually.
ThisissupportedforUbuntu14.
04andRHEL/CentOS/OEL7only.
TomanuallyprepareaLinuxguest:1.
EnsurethattheXenServerToolsareinstalledinsidetheVM,andthattheVMnetworkisconfiguredasdescribedinSection8.
5,"NetworkRequirementsandSecurity".
2.
InstallDocker,ncatandSSHDinsidetheVM.
ForUbuntu14.
04:apt-getinstalldocker.
ionmapopenssh-serverForRHEL/CentOS/OEL7:yuminstalldockernmapopenssh-server3.
Enableautostartfordocker.
service:systemctlenabledocker.
service4.
Startdocker.
servicesystemctlstartdocker.
serviceAnon-rootusershouldbeusedforcontainermanagement;addtheusertothe'docker'grouptoprovideaccesstoDocker.
5.
PreparetheVMforcontainermanagement;runthefolllowingcommand:xscontainer-prepare-vm–v-uWhereistheVMtobeprepared,andistheusernameontheVMthattheContainerManagementwilluseformanagementaccessThepreparationscriptwillguideyouthroughtheprocessandautomaticallyenablecontainermanagementforthisVM.
298.
5.
NetworkRequirementsandSecurityImportant:Inorderforcontainermanagementtowork,itmaybenecessarytorelaxsecurityrequirementsregardingnetworkisolation.
Formaximumsecurityofvirtualizationenvironments,CitrixgenerallyrecommendsthatadministratorspartitionthenetworkbyisolatingXenServer'smanagementnetwork(withXenServerControlDomain,dom0)fromtheVMs.
Enablingcontainermanagementrequiresaroutebetweenthesetwonetworks,whichincreasestheriskofmaliciousVMsattackingthemanagementnetwork(thatis,dom0).
InordertomitigatetheriskofallowingtrafficbetweenVMandthemanagementnetwork,weadvisetheconfigurationoffirewallrulestoonlyallowtrustedsourcestoinitiateaconnectionbetweenthetwonetworks.
Ifthisrecommendednetworkconfigurationdoesnotmatchyourriskprofile,orifyoulackthenecessarynetworkorfirewallexpertisetosecurethisroutesufficientlyforyourspecificuse-case,Citrixrecommendsyoudonotusethisfeatureinproduction.
8.
5.
1.
NetworkPartitioningandFirewallsAswithotherVMs,containermanagedVMsshouldnotbeconnecteddirectlytoXenServer'smanagementnetworkinordertoprovidenecessaryisolation.
InorderforContainerManagementtowork,managedVMshavetobereachablefromtheXenServer'ControlDomain(dom0).
ThenetworkingtopologyandfirewallsmustallowoutboundSSH(DestinationTCPport22)connectionsfromdom0(theXenServerManagementnetwork)toContainerManagedVMs(theVMnetwork).
InordertomitigatetheriskofallowingtrafficbetweenVMandthemanagementnetwork,alltrafficshouldpassanexternalstate-fullfirewall.
Thisfirewallmustbemanuallyset-upandconfiguredbyanexpertaccordingtoyourspecificbusinessandsecurityrequirementOnepossibleconfigurationisasfollows:Tosecureconnectionsbetweenthenetworks:PreventallconnectionsbetweentheXenServermanagementnetwork(thatisincludingdom0)andtheVMnetwork(thatisincludingcontainermanagedVMs)eitherway.
AddexceptionsforenablingContainerManagement:Allowdom0tohaveoutboundSSH(TCPport22)connections(bothNEWandESTABLISHED)toContainerManagedVMs.
AllowContainerManagedVMstoreplyto(ESTABLISHED)SSHconnectionsinitiatedbydom0.
8.
5.
2.
AuthenticationXenServer'sContainerManagementusesapool-specific4096-bitprivate/publicRSA-key-pairtoauthenticateonContainerManagedVMs.
TheprivatekeyisstoredintheXenServerControlDomain(dom0).
Therespectivepublic-keyisregisteredinContainerManagedVMsduringthepreparation,eitherusingtheCloudConfigDriveor~user/.
ssh/authorized_keysfile.
Asusualwithallprivate/publickey-pairs,theprivatekeymustbekeptsecurely,asitallowsforpassword-lessaccesstoallContainerManagedVMs.
ThisincludesbothcurrentlymanagedVMsandVMsmanagedinthepast.
XenServer'sContainerManagementwillattempttoreachContainerManagedVMsthroughanyoftheIPaddressesadvertisedbytheXenServerToolsrunninginsidetheVM.
Afteraninitialconnection,XenServerstoresthepublickeyofcontainermanagedVMsandvalidatesthatthekeymatchesonanysubsequentconnection.
30IfthenetworktopologycannotensurethatonlytheContainerManagedVMcanbecontactedthroughitsadvertisedIP(usingIPSourceGuardorsimilarmeans),CitrixrecommendsthatadministratorsconfirmtheSSHhostkey,thattheContainerManagementobtainedwhenmakingthefirstconnectiontotheVM.
Thekeycanbeaccessedusingthefollowingcommand:xevm-parm-get-uuid=param-name=other-config/param-key=xscontainer-sshhostkeyWhereistheUUIDoftheVM.
31Chapter9.
vAppsAvAppisalogicalgroupofoneormorerelatedVirtualMachines(VMs)whichcanbestartedupasasingleentity.
WhenavAppisstarted,theVMscontainedwithinthevAppwillstartinauserpredefinedorder,toallowVMswhichdependupononeanothertobeautomaticallysequenced.
ThismeansthatanadministratornolongerhastomanuallysequencethestartupofdependantVMsshouldawholeservicerequirerestarting(forinstanceinthecaseofasoftwareupdate).
TheVMswithinthevAppdonothavetoresideononehostandwillbedistributedwithinapoolusingthenormalrules.
ThevAppfunctionalityisparticularlyusefulintheDisasterRecoverysituationwhereanAdministratormaychoosetogroupallVMswhichresideonthesameStorageRepository,orwhichrelatetothesameServiceLevelAgreement(SLA).
Note:vAppscanbecreatedandmodifiedusingbothXenCenterandthexeCLI.
ForinformationonworkingwithvAppsusingtheCLI,seetheXenServerAdministrator'sGuide.
9.
1.
ManagingvAppsinXenCenterXenCenter'sManagevAppsdialogboxallowsyoutocreate,deleteandmodifyvApps,startandshutdownvApps,andimportandexportvAppswithintheselectedpool.
WhenyouselectavAppinthelist,theVMsitcontainsarelistedinthedetailspaneontheright.
TochangethenameordescriptionofavApp,addorremoveVMsfromthevApp,andchangethestartupsequenceoftheVMsinthevApp,usetheManagevAppsdialogbox.
ModifyingvApps1.
Selectthepooland,onthePoolmenu,clickManagevApps.
Alternatively,right-clickintheResourcespaneandclickManagevAppsontheshortcutmenu.
2.
SelectthevAppandclickPropertiestoopenitsPropertiesdialogbox.
3.
ClicktheGeneraltabtochangethevAppnameordescription.
4.
ClicktheVirtualMachinestabtoaddorremoveVMsfromthevApp.
5.
ClicktheVMStartupSequencetabtochangethestartorderanddelayintervalvaluesforindividualVMsinthevApp.
6.
ClickOKtosaveyourchangesandclosethePropertiesdialogbox.
SeetheXenCenteronlinehelpforfurtherdetails.
PressF1orclickHelptodisplaytheHelp.
9.
2.
CreatingvAppsTogroupVMstogetherinavAppfollowtheprocedure:CreatingavAppusingXenCenter1.
Selectthepooland,onthePoolmenu,clickManagevApps.
ThisdisplaystheManagevAppswindow.
2.
EnteranameforthevApp,andoptionallyadescription,andthenclickNext.
Youcanchooseanynameyoulike,butadescriptivenameisusuallybest.
AlthoughitisadvisabletoavoidhavingmultiplevAppswiththesamename,itisnotarequirement,andXenCenterdoesnotenforceanyuniquenessconstraintsonvAppnames.
Itisnotnecessarytousequotationmarksfornamesthatincludespaces.
323.
ChoosewhichVMstoincludeinthenewvApp,andthenclickNext.
YoucanusethesearchboxtolistonlyVMswithnamesthatincludethespecifiedstring.
4.
SpecifythestartupsequencefortheVMsinthevApp,andthenclickNext.
ValueDescriptionStartOrderSpecifiestheorderinwhichindividualVMswillbestartedupwithinthevApp,allowingcertainVMstoberestartedbeforeothers.
VMswithastartordervalueof0(zero)willbestartedfirst,thenVMswithastartordervalueof1,thenVMswithastartordervalueof2,andsoon.
AttempttostartnextVMafterThisisadelayintervalthatspecifieshowlongtowaitafterstartingtheVMbeforeattemptingtostartthenextgroupofVMsinthestartupsequence,thatis,VMswithalowerstartorder.
5.
Onthefinalpageofthewizard,youcanreviewthevAppconfiguration.
ClickPrevioustogobackandmodifyanysettings,orFinishtocreatethenewvAppandclosethewizard.
Note:AvAppcanspanacrossmultipleserversinasinglepool,butcannotspanacrossseveralpools.
9.
3.
DeletingvAppsTodeleteavAppfollowtheprocedure:DeletingvAppsusingXenCenter:1.
Selectthepooland,onthePoolmenu,clickManagevApps.
2.
SelectthevAppyouwanttodeletefromthelist,thenclickDelete.
Note:TheVMsinthevAppwillnotbedeleted.
9.
4.
StartandshutdownvAppsusingXenCenterTostartorshutdownavApp,usetheManagevAppsdialogbox,accessedfromthePoolmenu.
WhenyoustartavApp,alltheVMswithinitarestartedupautomaticallyinsequence.
ThestartorderanddelayintervalvaluesspecifiedforeachindividualVMcontrolthestartupsequence;thesevaluescanbesetwhenyoufirstcreatethevAppandchangedatanytimefromthevAppPropertiesdialogboxorfromtheindividualVMPropertiesdialogbox.
TostartavApp1.
OpentheManagevAppsdialogbox:selectthepoolwheretheVMsinthevApparelocatedand,onthePoolmenu,clickManagevApps.
Alternatively,right-clickintheResourcespaneandclickManagevAppsontheshortcutmenu.
2.
SelectthevAppandclickStarttostartalloftheVMsitcontains.
ToshutdownavApp1.
OpentheManagevAppsdialogbox:selectthepoolwheretheVMsinthevApparelocatedand,onthePoolmenu,clickManagevApps.
Alternatively,right-clickintheResourcespaneandclickManagevAppsontheshortcutmenu.
2.
SelectthevAppandclickShutDowntoshutdownalloftheVMsinthevApp.
33AsoftshutdownwillbeattemptedonallVMs;ifthisisnotpossible,thenaforcedshutdownwillbeperformed.
Note:AsoftshutdownperformsagracefulshutdownoftheVM,andallrunningprocessesarehaltedindividually.
Aforcedshutdownperformsahardshutdownandistheequivalentofunpluggingaphysicalserver.
ItmaynotalwaysshutdownallrunningprocessesandyourisklosingdataifyoushutdownaVMinthisway.
Aforcedshutdownshouldonlybeusedwhenasoftshutdownisnotpossible.
9.
5.
ImportingandExportingvAppsvAppscanbeimportedandexportedasOVF/OVApackages.
SeeChapter12,ImportingandExportingVMsformoredetails.
ToexportavApp1.
OpentheManagevAppsdialogbox:onthePoolmenu,clickManagevApps.
2.
SelectthevAppyouwanttoexportinthelistandclickExport.
3.
FollowtheproceduredescribedinSection12.
5.
1,"ExportingVMsasOVF/OVA".
ExportingavAppmaytakesometime.
ToimportavApp1.
OpentheManagevAppsdialogbox:onthePoolmenu,clickManagevApps.
2.
ClickImporttoopentheImportwizard.
3.
FollowtheproceduredescribedinSection12.
4.
1,"ImportingVMsfromOVF/OVA".
Whentheimportiscomplete,thenewvAppappearsinthelistofvAppsintheManagevAppsdialogbox.
34Chapter10.
AdvancedNotesforVirtualMachinesThischapterprovidessomeadvancednotesforVirtualMachines.
10.
1.
VMBootBehaviorTherearetwooptionsforthebehaviorofaVirtualMachine'sVDIwhentheVMisbooted:Note:TheVMmustbeshutdownbeforeyoucanmakeanychangestoitsbootbehaviorsetting.
10.
1.
1.
Persist(XenDesktop-PrivateDesktopMode)ThisisthedefaultbehaviouronVMboot;theVDIisleftinthestateitwasatthelastshutdown.
Selectthisoptionifyouplantoallowuserstomakepermanentchangestotheirdesktops.
Todothis,shutdowntheVM,andthenenterthefollowingcommand:xevdi-param-setuuid=on-boot=persist10.
1.
2.
Reset(XenDesktop-SharedDesktopMode)OnVMboot,theVDIisrevertedtothestateitwasinatthepreviousboot.
AnychangesmadewhiletheVMisrunningwillbelostwhentheVMisnextbooted.
Selectthisoptionifyouplantodeliverstandardizeddesktopsthatuserscannotpermanentlychange.
Todothis,shutdowntheVM,andthenenterthefollowingcommand:xevdi-param-setuuid=on-boot=resetWarning:Aftermakingthechangetoon-boot=reset,anydatasavedtotheVDIwillbediscardedafterthenextshutdown/startorreboot10.
2.
MakingtheISOLibraryAvailabletoXenServerHostsTomakeanISOlibraryavailabletoXenServerhosts,createanexternalNFSorSMB/CIFSsharedirectory.
TheNFSorSMB/CIFSservermustallowrootaccesstotheshare.
ForNFSshares,thisisaccomplishedbysettingtheno_root_squashflagwhenyoucreatetheshareentryin/etc/exportsontheNFSserver.
TheneitheruseXenCentertoattachtheISOlibrary,orconnecttothehostconsoleandrunthecommand:xe-mount-iso-srhost:/volumeForadvanceduse,additionalargumentstothemountcommandmaybepassed.
IfmakingaWindowsSMB/CIFSshareavailabletotheXenServerhost,eitheruseXenCentertomakeitavailable,orconnecttothehostconsoleandrunthefollowingcommand:xe-mount-iso-srunc_path-tsmbfs-ousername=myname/myworkgroupTheunc_pathargumentshouldhaveback-slashesreplacedbyforward-slashes.
-tcifscanbeusedforCIFSinsteadofSMB.
Forexample:xe-mount-iso-sr//server1/myisos-tcifs-ousername=johndoe/mydomainxe-mount-iso-sr//server2/iso_share-tsmbfs-ousername=alice35Aftermountingtheshare,anyavailableISOswillbeavailablefromtheInstallfromISOLibraryorDVDdrivedrop-downlistinXenCenter,orasCDimagesfromtheCLIcommands.
TheISOshouldbeattachedtoanappropriateWindowstemplate.
10.
3.
XenServerToolsTheCitrixparavirtualizednetworkandSCSIdrivers(XenServerTools)providehighperformanceI/Oserviceswithouttheoverheadoftraditionaldeviceemulation.
Thesedriversreplacetheemulateddevicesandprovidehigh-speedtransportbetweenWindowsandtheXenServerproductfamilysoftware.
DuringtheinstallationofaWindowsoperatingsystem,XenServerusestraditionaldeviceemulationtopresentastandardIDEcontrollerandastandardnetworkcardtotheVM.
ThisallowsWindowstocompleteitsinstallationusingbuilt-indrivers,butwithreducedperformanceduetotheoverheadinherentinemulationofthecontrollerdrivers.
IfyouareworkingwithaVMthatdoesnothaveXenServerToolsinstalled,aToolsnotinstalledmessageinredtextwillbevisibleontheGeneraltabinthepropertiespane.
AmessagewillalsobedisplayedhereifXenServerhasbeenupdatedandtheVMhasanolderversionofXenServerToolsfromanearlierrelease.
Inthiscase,themessagedisplayedisToolsoutofdate(versionx.
yinstalled).
ForaWindowsVM,youcandouble-clickonthistexttoswitchtotheVMconsole,loadtheToolsISO,andlaunchtheToolsinstallationwizard;forLinuxVMs,youcandouble-clickonthistexttoswitchtotheVMconsoleandloadtheToolsISO(however,youmustmounttheISOandmanuallyruntheinstallation).
AfterWindowsisinstalled,installtheXenServerTools.
TheseareonanISOavailabletothevirtualCD-ROMdriveoftheVirtualMachine.
Note:WhileaWindowsVMfunctionswithoutthem,performanceissignificantlyhamperedunlessthesedriversareinstalled.
RunningWindowsVMswithoutthesedriversisnotsupported.
Somefeatures,suchasliverelocationacrossphysicalhosts,willonlyworkwiththePVdriversinstalledandactive.
Warning:Inordertomaintainasupportedconfiguration,customersshouldensurethattheXenServerToolsinusebytheirVMs,matchesthelatestavailableversionfortheXenServerhost.
Forexample,someHotfixesincludeanupdatedXenServerToolsISOwhichwillupdatetheversioninstalledonthehost.
AttachtheWindowsPVdriversISOtotheVMbyusingtheInstallToolsmenuinXenCenter,orbydirectlyattachingthebuilt-inxs-tools.
isoISOimageontheVMusingtheCLI.
OncetheISOisattached,double-clickontheinstallwizard.
msiinstallerexecutableandfollowtheon-screenprompts.
Note:TosilentlyinstalltheXenServerToolsandtopreventthesystemfromrebootinguse:Msiexec.
exeInstallwizard.
msi/quiet/norestartAninteractive,butnon-silentinstallationcanbeobtainedbyrunning:Msiexec.
exeInstallwizard.
msi/passiveForinteractive,silentandpassiveinstallations,includingthosewiththe/norestartflag,followingthenextsystemrestart(whichmaybemanuallyinitiatedifthe/norestartflagisprovided)theremaybeseveralautomatedrebootsbeforetheXenServerToolsarefullyinstalled.
TheWindowsPVdriversareinstalledbydefaultintheC:\ProgramFiles\Citrix\XenToolsdirectoryontheVM.
36Note:InordertoinstallXenServerToolsonaWindowsVM,theVMmustberunningtheMicrosoft.
NETFrameworkVersion4.
0orlater.
IfaVMisrunningWindows2003,youneedtoinstalltheWindowsImagingComponent(seeyourvendordocumentationfordetails)beforeinstallingXenServerTools.
Warning:InstallingorupgradingtheXenServerToolscancausethefriendlynameandidentifierofsomenetworkadapterstochange.
AnysoftwarewhichisconfiguredtouseaparticularadaptermayhavetobereconfiguredfollowingXenServerToolsinstallationorupgrade.
10.
4.
WindowsVolumeShadowCopyService(VSS)providerTheWindowstoolsalsoincludeaXenServerVSSproviderthatisusedtoquiescetheguestfilesysteminpreparationforaVMsnapshot.
TheVSSproviderisinstalledaspartofthePVdriverinstallation,butisnotenabledbydefault.
ToenabletheWindowsXenServerVSSprovider1.
InstalltheWindowsPVdrivers.
2.
Navigatetothedirectorywherethedriversareinstalled(bydefaultc:\ProgramFiles\Citrix\XenTools,orthevalueofHKEY_LOCAL_MACHINE\Software\Citrix\XenTools\Install_dirintheWindowsRegistry).
3.
Double-clicktheinstall-XenProvider.
cmdcommandtoactivatetheVSSprovider.
Note:TheVSSproviderisautomaticallyuninstalledwhenthePVdriversareuninstalled,andneedtobeactivatedagainuponre-installation.
TheycanbeuninstalledseparatelyfromthePVdriversbyusinguninstall-XenProvider.
cmdinthesamedirectory.
10.
5.
ConnectingtoaWindowsVMUsingRemoteDesktopTherearetwowaysofviewingaWindowsVMconsole,bothofwhichsupportfullkeyboardandmouseinteractivity.
1.
UsingXenCenter.
ThisprovidesastandardgraphicalconsoleandusesXenServer'sin-builtVNCtechnologytoprovideremoteaccesstoyourvirtualmachineconsole.
2.
ConnectingusingWindowsRemoteDesktop.
ThisusestheRemoteDesktopProtocoltechnologyInXenCenterontheConsoletab,thereisaSwitchtoRemoteDesktopbutton.
ThisbuttondisablesthestandardgraphicalconsolewithinXenCenter,andswitchestousingRemoteDesktop.
IfyoudonothaveRemoteDesktopenabledintheVM,thisbuttonwillbedisabled.
Toenableit,youwillneedtoinstalltheXenServerTools(PVdrivers)andfollowtheprocedurebelowtoenableitineachVMthatyouwanttoconnectusingRemoteDesktop:ToEnableRemoteDesktoponaWindowsVM1.
OpenSystembyclickingtheStartbutton,right-clickonComputer,andthenselectProperties2.
ClickRemotesettings.
Ifyou'repromptedforanadministratorpassword,typethepasswordyoucreatedduringtheVMsetup.
3.
IntheRemoteDesktoparea,clickthecheckboxlabeledAllowconnectionsfromcomputersrunninganyversionofRemoteDesktop(Windows7)orEnableRemoteDesktoponthiscomputer(Windows2003Server).
374.
Ifyouwanttoselectanynon-administratorusersthatcanconnecttothisWindowsVM,clicktheSelectRemoteUsersbuttonandprovidetheusernames.
UserswithAdministratorprivilegesontheWindowsdomaincanconnectbydefault.
YouwillnowbeabletoconnecttothisVMusingRemoteDesktop.
Formoreinformation,seetheMicrosoftKnowledgeBasearticle,ConnecttoanothercomputerusingRemoteDesktopConnection.
Note:YoucannotconnecttoaVMthatisasleeporhibernating,somakesurethesettingsforsleepandhibernationontheremotecomputeraresettoNever.
10.
6.
TimeHandlinginWindowsVMsForWindowsguests,timeisinitiallydrivenfromthecontroldomainclock,andisupdatedduringVMlifecycleoperationssuchassuspend,rebootandsoon.
CitrixrecommendsrunningareliableNTPserviceinthecontroldomainandallWindowsVMs.
IfyoumanuallysetaVMtobe2hoursaheadofthecontroldomain(forexample,usingatime-zoneoffsetwithintheVM),thenitwillpersist.
Ifyousubsequentlychangethecontroldomaintime(eithermanuallyor,ifitisautomaticallycorrected,byNTP),theVMwillshiftaccordinglybutmaintainthe2houroffset.
Changingthecontroldomaintime-zonedoesnotaffectVMtime-zonesoroffset.
ItisonlythehardwareclocksettingwhichisusedbyXenServertosynchronizetheguests.
Whenperformingsuspend/resumeoperationsorliverelocationusingXenMotion,itisimportanttohaveup-to-dateXenServerToolsinstalled,astheynotifytheWindowskernelthatatimesynchronizationisrequiredafterresuming(potentiallyonadifferentphysicalhost).
Note:CustomerswhoarerunningWindowsVMsinXenDesktopenvironmentMUSTensurethatthehostclockhasthesamesourceastheirActiveDirectory(AD)domain.
FailuretosynchronizetheclockscancausetheVMstodisplayanincorrecttimeandcausetheWindowsPVdriverstocrash.
10.
7.
TimeHandlinginPVLinuxVMsTherearetwowallclocksettingsforLinuxdistributions–dependentandindependent.
Dependentwallclock:ClocksinPVLinuxVMsaresynchronizedtotheclockrunningonthecontroldomain,andcannotbeindependentlyaltered.
Thisisaconvenientmode,asonlythecontroldomainneedstoberunningtheNetworkTimeProtocol(NTP)servicetokeepaccuratetimeacrossallVMs.
Independentwallclock:ClocksinPVLinuxVMsarenotsynchronizedtotheclockrunningonthecontroldomainandcanbealtered.
ThecontroldomaintimeisusedtosettheinitialtimewhentheVMboots.
38ThefollowingtablelistswallclocksettingsforLinuxVMs:GuestOSDependentwallclockIndependentwallclockCentOS4.
xDefaultOptionalCentOS5.
x(32-/64-bit)DefaultOptionalCentOS6.
x(32-/64-bit)NotsupportedDefaultCentOS7.
x(64-bit)NotsupportedDefaultRedHatEnterpriseLinux4.
x(32-bit)DefaultOptionalRedHatEnterpriseLinux5.
x(32-/64-bit)DefaultOptionalRedHatEnterpriseLinux6.
x(32-/64-bit)NotsupportedDefaultRedHatEnterpriseLinux7.
x(64-bit)NotsupportedDefaultOracleLinux5.
x(32-/64-bit)DefaultOptionalOracleLinux6.
x(32-/64-bit)NotsupportedDefaultOracleLinux7.
x(64-bit)NotsupportedDefaultScientificLinux5.
x(32-/64-bit)DefaultOptionalScientificLinux6.
x(32-/64-bit)NotsupportedDefaultScientificLinux7.
x(64-bit)NotsupportedDefaultSLES10.
x(32-/64-bit)DefaultOptionalSLES11.
x(32-/64-bit)DefaultOptionalSLES12(64-bit)DefaultOptionalSLED11.
x(64-bit)DefaultOptionalDebian6(32-/64-bit)NotsupportedDefaultDebian7(32-/64-bit)NotsupportedDefaultUbuntu10.
04(32-/64-bit)NotsupportedDefaultUbuntu12.
04(32-/64-bit)NotsupportedDefaultUbuntu14.
04(32-/64-bit)NotsupportedDefaultCoreOS633.
1.
0NotsupportedDefaultImportant:ForLinuxgueststhatsupportdependentwallclock,CitrixrecommendsenablingindependentwallclocksettingandusingNTPinsidetheVM.
ForLinuxgueststhatuseanindependentwallclock,CitrixhighlyrecommendsrunningareliableNTPserviceontheLinuxVMsandtheXenServerhost.
Refertothefollowingsectiontosettheindependentwallclocktime.
39TosetindividualLinuxVMstomaintainindependenttimes1.
FromarootpromptontheVM,runthecommand:echo1>/proc/sys/xen/independent_wallclock2.
Thiscanbepersistedacrossrebootsbychangingthe/etc/sysctl.
confconfigurationfileandadding:#Setindependentwallclocktimexen.
independent_wallclock=13.
Asathirdalternative,independent_wallclock=1mayalsobepassedasabootparametertotheVM.
Note:WheninstallinganewLinuxVM,makesurethatyouchangethetime-zonefromthedefaultUTCtoyourlocalvalue(seeSectionB.
1,"ReleaseNotes"forspecificdistributioninstructions).
10.
8.
InstallingHVMVMsfromResellerOptionKit(BIOS-locked)MediaHVMVMscanbe:BIOS-generic:theVMhasgenericXenServerBIOSstrings;BIOS-customized:theVMhasacopyoftheBIOSstringsofaparticularserverinthepool;withoutBIOSstrings:immediatelyafteritscreation.
IfaVMdoesnothaveBIOSstringssetwhenitisstarted,thestandardXenServerBIOSstringswillbeinsertedintoit,andtheVMwillbecomeBIOS-generic.
ToallowinstallationofResellerOptionKit(BIOS-locked)OEMversionsofWindows,ontoaVMrunningonaXenServerhost,theBIOSstringsoftheVMwillneedtobecopiedfromthehostwithwhichtheROKmediawassupplied.
InordertoinstalltheBIOS-lockedmediathatcamewithyourhost,youwillneedtofollowthestepsbelow:UsingXenCenterClicktheCopyhostBIOSstringstoVMcheckboxintheNewVMWizard.
UsingtheCLI1.
Runthevm-installcopy-bios-strings-fromcommandandspecifythehost-uuidasthehostfromwhichthestringsshouldbecopied(thatis,thehostthatthemediawassuppliedwith):xevm-installcopy-bios-strings-from=\template=sr-name-label=\new-name-label=ThisreturnstheUUIDofthenewlycreatedVM.
Forexample:xevm-installcopy-bios-strings-from=46dd2d13-5aee-40b8-ae2c-95786ef4\template="win7sp1"sr-name-label=Local\storage\new-name-label=newcentos7cd98710-bf56-2045-48b7-e4ae219799db2.
IftherelevantBIOSstringsfromthehosthavebeensuccessfullycopiedintotheVM,thecommandvm-is-bios-customizedwillconfirmthis:xevm-is-bios-customizeduuid=Forexample:40xevm-is-bios-customized\uuid=7cd98710-bf56-2045-48b7-e4ae219799dbThisVMisBIOS-customized.
Note:WhenyoustarttheVM,itwillbestartedonthephysicalhostfromwhichyoucopiedtheBIOSstrings.
Warning:ItisyourresponsibilitytocomplywithanyEULAsgoverningtheuseofanyBIOS-lockedoperatingsystemsthatyouinstall.
10.
9.
PreparingforCloningaWindowsVMUsingVSSTheonlysupportedwaytocloneawindowsVMisbyusingtheWindowsutilitysyspreptopreparetheVM.
sysprepmodifiesthelocalcomputerSIDtomakeituniquetoeachcomputer.
ThesysprepbinariesareontheWindowsproductCDsinthe\support\tools\deploy.
cabfile.
ThestepsthatyouneedtotaketocloneWindowsVMsare:CloningWindowsVMs1.
Create,install,andconfiguretheWindowsVMasdesired.
2.
ApplyallrelevantServicePacksandupdates.
3.
InstalltheXenServerTools.
4.
Installanyapplicationsandperformanyotherconfiguration.
5.
Copythecontentsof\support\tools\deploy.
cabfromtheWindowsproductCDtoanew\sysprepfolderintheVM.
6.
Runsysprep.
ThiswillshutdowntheVMwhenitcompletes.
7.
UsingXenCenterconverttheVMintoatemplate.
8.
ClonethenewlycreatedtemplateintonewVMsasrequired.
9.
WhentheclonedVMstarts,itwillgetanewSIDandname,runamini-setuptopromptforconfigurationvaluesasnecessary,andfinallyrestart,beforebeingavailableforuse.
Note:Theoriginal,sys-preppedVM(the"source"VM)shouldnotberestartedagainafterthesysprepstage,andshouldbeconvertedtoatemplateimmediatelyafterwardstopreventthis.
IfthesourceVMisrestarted,sysprepmustberunonitagainbeforeitcanbesafelyusedtomakeadditionalclones.
Formoreinformationonusingsysprep,visitthefollowingMicrosoftwebsites:Windows7-TheWindowsAutomatedInstallationKit(AIK)forWindows7WindowsServer2003-WhatIsSysprep10.
10.
AssigningaGPUtoaWindowsVM(forUsewithXenDesktop)XenServerallowsyoutoassignaphysicalGPUinaXenServerhostmachinetoaWindowsVMrunningonthesamehost.
ThisGPUPass-Throughfeatureisintendedforgraphicspowerusers,suchasCADdesigners,whorequirehighperformancegraphicscapabilities.
ItissupportedonlyforusewithXenDesktop.
41WhileXenServersupportsonlyoneGPUforeachVM,itautomaticallydetectsandgroupstogetheridenticalphysicalGPUsacrosshostsinthesamepool.
OnceassignedtoagroupofGPUs,aVMmaybestartedonanyhostinthepoolthathasanavailableGPUinthegroup.
OnceattachedtoaGPU,aVMhascertainfeaturesthatarenolongeravailable,includingXenMotionlivemigration,VMsnapshotswithmemory,andsuspend/resume.
AssigningaGPUtoaVMinapooldoesnotinterferewiththeoperationofotherVMsinthepool.
However,VMswithGPUsattachedareconsiderednon-agile.
IfVMswithGPUsattachedaremembersofapoolwithHAenabled,thoseVMsareoverlookedbybothfeaturesandcannotbemigratedautomatically.
GPUPass-ThroughisavailabletoWindowsVMsonly.
ItcanbeenabledusingXenCenterorthexeCLI.
RequirementsGPUPass-ThroughissupportedforspecificmachinesandGPUs.
Inallcases,theIOMMUchipsetfeature(knownasVT-dforIntelmodels)mustbeavailableandenabledontheXenServerhost.
BeforeenablingtheGPUPass-Throughfeature,visitwww.
citrix.
com/ready/hcltocheckthehardwarecompatibilitylist.
Foranyfurtherquestionsregardingthehardwarecompatibilitylist,e-mailxenserver.
hcl@citrix.
com.
BeforeAssigningaGPUtoaVMBeforeyouassignaGPUtoaVM,youneedtoputtheappropriatephysicalGPU(s)inyourXenServerhostandthenrestartthemachine.
Uponrestart,XenServerautomaticallydetectsanyphysicalGPU(s).
ToviewallphysicalGPU(s)acrosshostsinthepool,usethexepgpu-listcommand.
EnsurethattheIOMMUchipsetfeatureisenabledonthehost.
Todoso,enterthefollowing:xehost-param-getuuid=param-name=chipset-infoparam-key=iommuIfthevalueprintedisfalse,IOMMUisnotenabled,andGPUPass-ThroughisnotavailableusingthespecifiedXenServerhost.
ToassignaGPUtoaWindowsVMusingXenCenter:1.
ShutdowntheVMthatyouwishtoassignaGPU.
2.
OpentheVMproperties:right-clicktheVMandselectProperties.
3.
AssignaGPUtotheVM:SelectGPUfromthelistofVMproperties,andthenselectaGPUtype.
ClickOK.
4.
StarttheVM.
ToassignaGPUtoaWindowsVMusingxeCLI:1.
ShutdowntheVMthatyouwishtoassignaGPUgroupbyusingthexevm-shutdowncommand.
2.
FindtheUUIDoftheGPUgroupbyenteringthefollowing:xegpu-group-listThiscommandprintsallGPUgroupsinthepool.
NotetheUUIDoftheappropriateGPUgroup.
3.
AttachtheVMtoaGPUgroupbyenteringthefollowing:xevpgu-creategpu-group-uuid=vm-uuid=ToensurethattheGPUgrouphasbeenattached,runthexevgpu-listcommand.
4.
StarttheVMbyusingthexevm-startcommand.
5.
OncetheVMstarts,installthegraphicscarddriversontheVM.
Installingthedriversisessential,astheVMhasdirectaccesstothehardwareonthehost.
Driversareprovidedbyyourhardwarevendor.
Note:42IfyoutrytostartaVMwithGPUPass-ThroughonaXenServerhostwithoutanavailableGPUintheappropriateGPUgroup,XenServerprintsanerrormessage.
TodetachaWindowsVMfromaGPUusingXenCenter:1.
ShutdowntheVM.
2.
OpentheVMproperties:right-clicktheVMandselectProperties.
3.
DetachtheGPUfromtheVM:SelectGPUfromthelistofVMproperties,andthenselectNoneastheGPUtype.
ClickOK.
4.
StarttheVM.
TodetachaWindowsVMfromaGPUusingthexeCLI:1.
ShutdowntheVMbyusingthexevm-shutdowncommand.
2.
FindtheUUIDofthevGPUattachedtotheVMbyenteringthefollowing:xevgpu-listvm-uuid=3.
DetachtheGPUfromtheVMbyenteringthefollowing:xevgpu-destroyuuid=4.
StarttheVMbyusingthexevm-startcommand.
43Chapter11.
ImportingtheDemoLinuxVirtualApplianceCitrixprovidesafullyfunctionalinstallationofaDemoLinuxVirtualAppliance,basedonaCentOS5.
5distribution.
Thisisavailablefordownload,inasinglexvafilefromMyCitrix.
ThexvafilecanbequicklyimportedintoXenCentertocreateafullyworkingLinuxVirtualMachine.
Noadditionalconfigurationstepsarerequired.
TheDemoLinuxVirtualApplianceallowsaquickandsimpleVMdeploymentandcanbeusedtotestXenServerproductfeaturessuchasXenMotion,DynamicMemoryControlandHighAvailability.
XenServerToolsarepreinstalledintheDemoLinuxVirtualApplianceanditalsoincludespre-configurednetworkingconnectivityaswellasaWebServerfortestpurposes.
Warning:TheDemoLinuxVirtualApplianceshouldNOTbeusedforrunningproductionworkloads.
ToImporttheDemoLinuxVirtualApplianceUsingXenCenter1.
DownloadtheDemoLinuxVirtualAppliancefromtheXenServerareaofMyCitrix.
CustomerswillrequireaMyCitrixaccounttoaccessthispage.
Ifyoudonothaveanaccount,youcanregisterontheMyCitrixhomepage2.
IntheResourcespane,selectahostoraPool,thenright-clickandselectImport.
TheImportWizardisdisplayed.
3.
ClickBrowseandnavigatetothelocationofthedownloadedDemoLinuxVirtualAppliancexvafileonyourcomputer.
4.
ClickNext.
5.
SelectthetargetXenServerhostorpool,thenclickNext.
6.
Selectastoragerepositoryonwhichtocreatethevirtualappliance'sdisk,thenclickNext.
7.
ClickFinishtoimportthevirtualappliance.
Note:WhenyoufirststarttheVM,youwillbepromptedtoenterarootpassword.
TheIPaddressoftheVMwillthenbedisplayed.
Ensureyourecordthis,asitwillbeusefulfortestpurposes.
11.
1.
UsefulTestsThissectionlistssomeusefulteststocarryouttoensurethatyourDemoLinuxVirtualApplianceiscorrectlyconfigured.
1.
Testthatyouhaveexternalnetworkingconnectivity.
LogintotheVMfromtheXenCenterconsole.
RunthiscommenttosendpingpacketstoGoogleandback:ping-c10google.
comOtherinstallednetworkingtoolsinclude:ifconfignetstattracepath2.
UsingtheIPaddressdisplayedonVMboot,testthatyoucanpingtheVMfromanexternalcomputer.
3.
Testthatthewebserverisconfigured.
44Inawebbrowser,entertheVMIPaddress.
The"DemonstrationLinuxVirtualMachine"pageshoulddisplay.
ThispageshowssimpleinformationabouttheVMmounteddisks,theirsize,locationandusage.
Youcanalsousethewebpagetomountadisk.
MountingadiskusingtheDemonstrationLinuxVirtualMachineWebPage1.
InXenCenter,addavirtualdisktoyourVM.
SelecttheVMintheResourcespane,clickontheStoragetab,andthenclickAdd.
2.
Enterthenameofthenewvirtualdiskand,optionally,adescription.
3.
Enterthesizeofthenewvirtualdisk.
Youshouldmakesurethatthestoragerepository(SR)onwhichthevirtualdiskwillbestoredhassufficientspaceforthenewvirtualdisk.
4.
SelecttheSRwherethenewvirtualdiskwillbestored.
5.
ClickCreatetoaddthenewvirtualdiskandclosethedialogbox.
6.
ClicktheConsoletab,anduseryournormaltoolstopartitionandformatthediskasrequired.
7.
RefreshtheDemonstrationLinuxVirtualMachineWebPage,thenewdiskisdisplayed.
8.
ClickMount.
Thismountsthedisk,andfilesysteminformationisdisplayed.
Formoreinformationonaddingvirtualdisks,seetheXenCenterhelp.
45Chapter12.
ImportingandExportingVMsXenServerallowsyoutoimportVMsfromandexportthemtoanumberofdifferentformats.
UsingtheXenCenterImportwizard,youcanimportVMsfromdiskimages(VHDandVMDK),OpenVirtualizationFormat(OVFandOVA)andXenServerXVAformat.
YoucanevenimportVMsthathavebeencreatedonothervirtualizationplatforms,suchasthoseofferedbyVMwareandMicrosoft.
Note:WhenimportingVMsthathavebeencreatedusingothervirtualizationplatforms,itisnecessarytoconfigureor"fixup"theguestoperatingsystemtoensurethatitbootsonXenServer.
TheOperatingSystemFixupfeatureinXenCenteraimstoprovidethisbasiclevelofinteroperability.
Formoreinformation,seeSection12.
2,"OperatingSystemFixup".
UsingtheXenCenterExportwizard,youcanexportVMstoOpenVirtualizationFormat(OVFandOVA)andXenServerXVAformat.
WhenimportingandexportingVMs,atemporaryVM—theTransferVM—isusedtoperformtheimport/exportofOVF/OVApackagesanddiskimages.
YouneedtoconfigurenetworkingsettingsfortheTransferVMintheXenCenterImportandExportwizards.
Formoreinformation,seeSection12.
3,"TheTransferVM".
YoucanalsousethexeCLItoimportVMsfromandexportthemtoXenServerXVAformat.
12.
1.
SupportedFormatsFormatDescriptionOpenVirtualizationFormat(OVFandOVA)OVFisanopenstandardforpackaginganddistributingavirtualapplianceconsistingofoneormoreVM(s).
Diskimageformats(VHDandVMDK)VirtualHardDisk(VHD)andVirtualMachineDisk(VMDK)formatdiskimagefilescanbeimportedusingtheImportwizard.
Importingadiskimagemaybeappropriatewhenthereisavirtualdiskimageavailable,withnoOVFmetadataassociated.
XenServerXVAformatXVAisaformatspecifictoXen-basedhypervisorsforpackaginganindividualVMasasinglefilearchive,includingadescriptoranddiskimages.
Itsfileextensionis.
xva.
XenServerXVAVersion1formatXVAVersion1istheoriginalformatspecifictoXen-basedhypervisorsforpackaginganindividualVMasasinglefilearchive,includingadescriptoranddiskimages.
Itsfileextensionisova.
xml.
WhichFormattoUseConsiderusingOVF/OVAformatto:ShareXenServervAppsandVMswithothervirtualizationplatformsthatsupportOVFSavemorethanoneVMSecureavApporVMfromcorruptionandtamperingIncludealicenseagreementSimplifyvAppdistributionbystoringanOVFpackageinanOVAfile46ConsiderusingXVAformatto:ShareVMswithversionsofXenServerearlierthan6.
0ImportandexportVMsfromascriptwithaCLI12.
1.
1.
OpenVirtualizationFormat(OVFandOVA)OVFisanopenstandard,specifiedbytheDistributedManagementTaskForce,forpackaginganddistributingavirtualapplianceconsistingofoneormoreVM(s).
ForfurtherdetailsaboutOVFandOVAformats,seethefollowing:KnowledgeBaseArticleCTX121652:OverviewoftheOpenVirtualizationFormatOpenVirtualizationFormatSpecificationNote:InordertoimportorexportOVForOVApackages,youmustbeloggedinasrootorhavethePoolAdministratorRoleBasedAccessControl(RBAC)roleassociatedwithyouruseraccount.
AnOVFPackageisthesetoffilesthatcomprisesthevirtualappliance.
Italwaysincludesadescriptorfileandanyotherfilesthatrepresentthefollowingattributesofthepackage:AttributeDescriptionDescriptor(.
ovf)Thedescriptoralwaysspecifiesthevirtualhardwarerequirementsofthepackage.
Itmayalsospecifyotherinformation,including:Descriptionsofvirtualdisks,thepackageitself,andguestoperatingsystemsAlicenseagreementInstructionstostartandstopVMsintheapplianceInstructionstoinstallthepackageSignature(.
cert)ThesignatureisthedigitalsignatureusedbyapublickeycertificateintheX.
509formattoauthenticatetheauthorofthepackage.
Manifest(.
mf)Themanifestallowsyoutoverifytheintegrityofthepackagecontents.
ItcontainstheSHA-1digestsofeveryfileinthepackage.
VirtualdisksOVFdoesnotspecifyadiskimageformat.
AnOVFpackageincludesfilescomprisingvirtualdisksintheformatdefinedbythevirtualizationproductthatexportedthevirtualdisks.
XenServerproducesOVFpackageswithdiskimagesinDynamicVHDformat;VMwareproductsandVirtualBoxproduceOVFpackageswithvirtualdisksinStream-OptimizedVMDKformat.
OVFpackagesalsosupportothernon-metadatarelatedcapabilities,suchascompression,archiving,EULAattachment,andannotations.
Note:WhenimportinganOVFpackagethathasbeencompressedorcontainscompressedfiles,youmayneedtofreeupadditionaldiskspaceontheXenServerhostinordertoimportitproperly.
47AnOpenVirtualAppliance(OVA)packageisasinglearchivefile,intheTapeArchive(.
tar)format,containingthefilesthatcompriseanOVFPackage.
12.
1.
1.
1.
SelectingOVForOVAFormatOVFpackagescontainaseriesofuncompressedfiles,whichmakesiteasierifyouwanttoaccessindividualdiskimagesinthefile.
AnOVApackagecontainsonelargefile,andwhileyoucancompressthisfile,itdoesnotgiveyoutheflexibilityofaseriesoffiles.
UsingtheOVAformatisusefulforspecificapplicationsforwhichitisbeneficialtohavejustonefile,suchascreatingpackagesforWebdownloads.
ConsiderusingOVAonlyasanoptiontomakethepackageeasiertohandle.
Usingthisformatlengthensboththeexportandimportprocesses.
12.
1.
2.
DiskImageFormats(VHDandVMDK)UsingXenCenter,youcanimportdiskimagesintheVirtualHardDisk(VHD)andVirtualMachineDisk(VMDK)formats.
Exportingstandalonediskimagesisnotsupported.
Note:Toimportdiskimages,youmustbeloggedinasrootorhavethePoolAdministratorRoleBasedAccessControl(RBAC)roleassociatedwithyouruseraccount.
YoumightchoosetoimportadiskimagewhenavirtualdiskimageisavailablewithoutanyassociatedOVFmetadata.
Situationsinwhichthismightoccurinclude:Itispossibletoimportadiskimage,buttheassociatedOVFmetadataisnotreadableAvirtualdiskisnotdefinedinanOVFpackageYouaremovingfromaplatformthatdoesnotallowyoutocreateanOVFpackage(forexample,olderplatformsorimages)YouwanttoimportanolderVMwareappliancethatdoesnothaveanyOVFinformationYouwanttoimportastandaloneVMthatdoesnothaveanyOVFinformationWhenavailable,CitrixrecommendsimportingappliancepackagesthatcontainOVFmetadataratherthananindividualdiskimage.
TheOVFdataprovidesinformationtheImportwizardrequirestorecreateaVMfromitsdiskimage,includingthenumberofdiskimagesassociatedwiththeVM,theprocessor,storage,network,memoryrequirementsandsoon.
Withoutthisinformation,itcanbemuchmorecomplexanderror-pronetorecreatetheVM.
12.
1.
3.
XVAFormatXVAisavirtualapplianceformatspecifictoXenServer,whichpackagesasingleVMasasinglesetoffiles,includingadescriptoranddiskimages.
Thefilenameextensionis.
xva.
Thedescriptor(fileextensionova.
xml)specifiesthevirtualhardwareofasingleVM.
Thediskimageformatisadirectoryoffiles.
Thedirectorynamecorrespondstoareferencenameinthedescriptorandcontains2filesforeach1MBblockofthediskimage.
Thebasenameofeachfileistheblocknumberindecimal.
Thefirstfilecontains1blockofthediskimageinrawbinaryformatanddoesnothaveanextension.
Thesecondfileisachecksumofthefirstfile,withtheextension.
checksum.
Important:IfaVMisexportedfromaXenServerhostandthenimportedintoanotherXenServerhostwithadifferentCPUtype,itmaynotrunproperly.
Forexample,aWindowsVMcreatedonaXenServerhostwithanIntelVTEnabledCPU,andthenexported,maynotrunwhenimportedintoaXenServerhostwithanAMD-VTMCPU.
4812.
1.
4.
XVAVersion1FormatXVAVersion1istheoriginalformatspecifictoXen-basedhypervisorsforpackaginganindividualVMasasinglefilearchive,includingadescriptoranddiskimages.
Itsfileextensionisova.
xml.
Thedescriptor(fileextensionova.
xml)specifiesthevirtualhardwareofasingleVM.
Thediskimageformatisadirectoryoffiles.
Thedirectorynamecorrespondstoareferencenameinthedescriptorandcontains1fileforeach1GBchunkofthediskimage.
Thebasenameofeachfileincludesthechunknumberindecimal.
Itcontains1blockofthediskimageinrawbinaryformat,compressedwithgzip.
Important:IfaVMisexportedfromaXenServerhostandthenimportedintoanotherXenServerhostwithadifferentCPUtype,itmaynotrunproperly.
Forexample,aWindowsVMcreatedonaXenServerhostwithanIntelVTEnabledCPU,andthenexported,maynotrunwhenimportedintoaXenServerhostwithanAMD-VTMCPU.
12.
2.
OperatingSystemFixupWhenimportingavirtualapplianceordiskimagecreatedandexportedfromavirtualizationplatformotherthanXenServer,itmaybenecessarytoconfigureor"fixup"theVMbeforeitwillbootproperlyonaXenServerhost.
XenCenterincludesanadvancedhypervisorinteroperabilityfeature—OperatingSystemFixup—whichaimstoensureabasiclevelofinteroperabilityforVMsthatyouimportintoXenServer.
YouneedtouseOperatingSystemFixupwhenimportingVMsfromOVF/OVApackagesanddiskimagescreatedonothervirtualizationplatforms.
TheOperatingSystemFixupprocessaddressestheoperatingsystemdeviceanddriverissuesinherentwhenmovingfromonehypervisortoanother,attemptingtorepairbootdevice-relatedproblemswiththeimportedVMthatmightpreventtheoperatingsystemwithinfrombootinginaXenServerenvironment.
Thisfeatureisnotdesignedtoperformconversionsfromoneplatformtoanother.
Note:ThisfeaturerequiresanISOstoragerepositorywith40MBoffreespaceand256MBofvirtualmemory.
OperatingSystemFixupissuppliedasanautomaticallybootingISOimagethatisattachedtotheDVDdriveoftheimportedVM.
ItperformsthenecessaryrepairoperationswhentheVMisfirststarted,andthenshutsdowntheVM.
ThenexttimethenewVMisstarted,thebootdeviceisreset,andtheVMstartsnormally.
TouseOperatingSystemFixuponimporteddiskimagesorOVF/OVApackages,youmustenablethefeatureontheAdvancedOptionspageoftheXenCenterImportwizardandthenspecifyalocationwheretheFixupISOshouldbecopiedsothatXenServercanuseit.
WhatDoesOperatingSystemFixupdototheVMTheOperatingSystemFixupoptionisdesignedtomaketheminimalchangespossibletoenableavirtualsystemtoboot.
Dependingontheguestoperatingsystemandthehypervisoroftheoriginalhost,additionalconfigurationchanges,driverinstallation,orotheractionsmightberequiredfollowingusingtheFixupfeature.
DuringtheFixupprocess,anISOiscopiedtoanISOSR.
TheISOisattachedtoaVM;thebootorderissettobootfromthevirtualDVDdrive,andtheVMbootsintotheISO.
TheenvironmentwithintheISOthencheckseachdiskoftheVMtodetermineifitisaLinuxoraWindowssystem.
IfaLinuxsystemisdetected,thenthelocationoftheGRUBconfigurationfileisdeterminedandanypointerstoSCSIdiskbootdevicesaremodifiedtopointtoIDEdisks.
Forexample,ifGRUBcontainsanentryof/dev/sda1representingthefirstdiskonthefirstSCSIcontroller,thisentryischangedto/dev/hda1representingthefirstdiskonthefirstIDEcontroller.
IfaWindowssystemisdetected,agenericcriticalbootdevicedriverisextractedfromthedriverdatabaseoftheinstalledoperatingsystemandregisteredwiththeoperatingsystem.
Thisisespeciallyimportantfor49olderWindowsoperatingsystemswhenthebootdeviceischangedbetweenaSCSIandIDEinterface.
IfcertainvirtualizationtoolsetsarediscoveredintheVM,theyaredisabledtopreventperformanceproblemsandunnecessaryeventmessages.
12.
3.
TheTransferVMTheTransferVMisabuilt-inVMthatonlyrunsduringtheimportorexportofavirtualdiskimagetotransferitscontentsbetweenthediskimagefilelocationandaXenServerstoragerepository.
OneTransferVMrunsforeachimportorexportofadiskimage.
Whenimportingorexportingavirtualappliancewithmorethanonediskimage,onlyonediskimagetransfersatatime.
RunningoneTransferVMhasthefollowingrequirements:VirtualCPU1VirtualMemory256MBStorage8MBNetworkReachablebytheXenServerhost;staticordynamicIPaddress(dynamic,recommended)ThedefaulttransferprotocolisiSCSI.
Inwhichcase,theTransferVMrequiresaniSCSIInitiatorontheXenServerhost.
AnalternatetransferprotocolisRawVDI.
TousetheRawVDItransferprotocol:1.
BackuptheXenCenterMain.
exe.
configfile,whichislocatedintheinstallationfolder.
2.
Usingatexteditor,opentheXenCenterMain.
exe.
configfile.
3.
AddthefollowingsectiongrouptotheconfigSection:4.
Totheendofthefile,addthefollowingsection:UploadRawVDI5.
SavetheXenCenterMain.
exe.
configfile.
Note:IfXenCenterfailstostartproperly,thencheckthatthenewsectiongroupandsectionwereaddedcorrectly.
12.
4.
ImportingVMsWhenyouimportaVM,youeffectivelycreateanewVM,usingmanyofthesamestepsrequiredtoprovisionanewVM,suchasnominatingahost,andconfiguringstorageandnetworking.
YoucanimportOVF/OVA,diskimage,XVAandXVAVersion1filesusingtheXenCenterImportwizard;youcanalsoimportXVAfilesviathexeCLI.
5012.
4.
1.
ImportingVMsfromOVF/OVANote:InordertoimportOVForOVApackages,youmustbeloggedinasrootorhavethePoolAdministratorRoleBasedAccessControl(RBAC)roleassociatedwithyouruseraccount.
TheXenCenterImportwizardallowsyoutoimportVMsthathavebeensavedasOVF/OVAfiles.
TheImportwizardtakesyouthroughtheusualstepsneededtocreateanewVMinXenCenter:nominatingahost,andthenconfiguringstorageandnetworkingforthenewVM.
WhenimportingOVFandOVAfiles,additionalstepsmayberequired,suchas:WhenimportingVMsthathavebeencreatedusingothervirtualizationplatforms,itisnecessarytoruntheOperatingSystemFixupfeaturetoensureabasiclevelofinteroperabilityfortheVM.
Formoreinformation,seeSection12.
2,"OperatingSystemFixup".
ItisnecessarytoconfigurenetworkingfortheTransferVMusedtoperformtheimportprocess.
Formoreinformation,seeSection12.
3,"TheTransferVM".
Tip:EnsurethetargethosthasenoughRAMtosupportthevirtualmachinesbeingimported.
AlackofavailableRAMwillresultinafailedimport.
SeeCTX125120fordetailsonhowtoresolvethisissue.
ImportedOVFpackagesappearasvAppswhenimportedusingXenCenter.
Whentheimportiscomplete,thenewVMswillappearintheXenCenterResourcespane,andthenewvAppwillappearintheManagevAppsdialogbox.
ToImportVMsfromOVF/OVAusingXenCenter:1.
OpentheImportwizardbydoingoneofthefollowing:IntheResourcespane,right-click,andthenselectImportontheshortcutmenu.
OntheFilemenu,selectImport.
2.
Onthefirstpageofthewizard,locatethefileyouwanttoimport,andthenclickNexttocontinue.
3.
ReviewandacceptEULAs,ifapplicable.
IfthepackageyouareimportingincludesanyEULAs,acceptthemandthenclickNexttocontinue.
IfnoEULAsareincludedinthepackage,thewizardwillskipthisstepandadvancestraighttothenextpage.
4.
SpecifythepoolorhosttowhichyouwanttoimporttheVM(s),andthen(optionally)assigntheVM(s)toahomeXenServerhost.
Toselectahostorpool,choosefromtheImportVM(s)todrop-downlist.
ToassigneachVMahomeXenServerhost,selectaserverfromthelistintheHomeServer.
Ifyouwishnottoassignahomeserver,selectDon'tassignahomeserver.
ClickNexttocontinue.
5.
ConfigurestoragefortheimportedVM(s):selectoneormorestoragerepositoriesonwhichtoplacetheimportedvirtualdisks,andthenclickNexttocontinue.
ToplacealltheimportedvirtualdisksonthesameSR,selectPlaceallimportedVMsonthistargetSR,andthenselectanSRfromthelist.
ToplacethevirtualdisksofincomingVMsontodifferentSRs,selectPlaceimportedVMsonthespecifiedtargetSRs.
ForeachVM,selectthetargetSRfromthelistintheSRcolumn.
6.
ConfigurenetworkingfortheimportedVMs:mapthevirtualnetworkinterfacesintheVMsyouareimportingtotargetnetworksinthedestinationpool.
TheNetworkandMACaddressshowninthelistof51incomingVMsarestoredaspartofthedefinitionoftheoriginal(exported)VMintheexportfile.
Tomapanincomingvirtualnetworkinterfacetoatargetnetwork,selectanetworkfromthelistintheTargetNetworkcolumn.
ClickNexttocontinue.
7.
Specifysecuritysettings:iftheselectedOVF/OVApackageisconfiguredwithsecurityfeatures,suchascertificatesoramanifest,specifytheinformationnecessary,andthenclickNexttocontinue.
DifferentoptionsappearontheSecuritypagedependingonwhichsecurityfeatureshavebeenconfiguredontheOVFappliance:Iftheapplianceissigned,aVerifydigitalsignaturecheckboxappears,automaticallyselected.
ClickViewCertificatetodisplaythecertificateusedtosignthepackage.
Ifthecertificateappearsasuntrusted,itislikelythattheeithertheRootCertificateortheIssuingCertificateAuthorityisnottrustedonthelocalcomputer.
CleartheVerifydigitalsignaturecheckboxifyoudonotwanttoverifythesignature.
Iftheapplianceincludesamanifest,aVerifymanifestcontentcheckboxappears.
Selectthischeckboxtohavethewizardverifythelistoffilesinthepackage.
Whenpackagesaredigitallysigned,theassociatedmanifestisverifiedautomatically,sotheVerifymanifestcontentcheckboxdoesnotappearontheSecuritypage.
Note:VMwareWorkstation7.
1.
xOVFfilesfailtoimportifyouchoosetoverifythemanifest,asVMwareWorkstation7.
1.
xproducesanOVFfilewithamanifestthathasinvalidSHA-1hashes.
Ifyoudonotchoosetoverifythemanifest,theimportissuccessful.
8.
EnableOperatingSystemFixup:iftheVM(s)inthepackageyouareimportingwerebuiltonavirtualizationplatformotherthanXenServer,selecttheUseOperatingSystemFixupcheckboxandthenselectanISOSRwheretheFixupISOcanbecopiedsothatXenServercanaccessit.
Formoreinformationaboutthisfeature,seeSection12.
2,"OperatingSystemFixup".
ClickNexttocontinue.
9.
ConfigureTransferVMnetworking.
Selectanetworkfromthelistofnetworkinterfacesavailableinthedestinationpoolorhost,andthenchoosetoautomaticallyormanuallyconfigurethenetworksettings.
TouseautomatedDynamicHostConfigurationProtocol(DHCP)toautomaticallyassignnetworkingsettingsincludingtheIPaddress,subnetmaskandgateway,selectAutomaticallyobtainnetworksettingsusingDHCP.
Toconfigurenetworkingsettingsmanually,selectUsethesenetworksettings,andthenentertherequiredvalues.
YoumustenteranIPaddress,butthesubnetmaskandgatewaysettingsareoptional.
ClickNexttocontinue.
10.
Reviewtheimportsettings,andthenclickFinishtobegintheimportprocessandclosethewizard.
Note:ImportingaVMmaytakesometime,dependingonthesizeoftheVMandthespeedandbandwidthofthenetworkconnection.
TheimportprogressisdisplayedinthestatusbaratthebottomoftheXenCenterwindowandontheLogstab.
Whenthenewly-importedVMisavailable,itappearsintheResourcespane,andthenewvAppwillappearintheManagevAppsdialogbox.
Note:AfterusingXenCentertoimportanOVFpackagethatcontainsWindowsoperatingsystems,youmustsettheplatformparameter.
ThiswillvaryaccordingtotheversionofWindowscontainedintheOVFpackage:52ForWindowsVista,Server2008,andlater,settheplatformparametertodevice_id=0002.
Forexample:xevm-param-setuuid=platform:device_id=0002ForallotherversionsofWindows,settheplatformparametertoviridian=true.
Forexample:xevm-param-setuuid=platform:viridian=true12.
4.
2.
ImportingDiskImagesTheXenCenterImportwizardallowsyoutoimportadiskimageintoapoolorspecifichostasaVM.
TheImportwizardtakesyouthroughtheusualstepsneededtocreateanewVMinXenCenter:nominatingahost,andthenconfiguringstorageandnetworkingforthenewVM.
RequirementsYoumustbeloggedinasrootorhavethePoolAdministratorRoleBasedAccessControl(RBAC)roleassociatedwithyouruseraccount.
DHCPhastoberunningonthemanagementnetworkXenServerisusing.
TheImportwizardrequireslocalstorageontheserveronwhichyouarerunningit.
ToImportVM(s)fromaDiskImageusingXenCenter:1.
OpentheImportwizardbydoingoneofthefollowing:IntheResourcespane,right-click,andthenselectImportontheshortcutmenu.
OntheFilemenu,selectImport.
2.
Onthefirstpageofthewizard,locatethefileyouwanttoimport,andthenclickNexttocontinue.
3.
SpecifytheVMnameandallocateCPUandmemoryresources.
EnteranameforthenewVMtobecreatedfromtheimporteddiskimage,andthenallocatethenumberofCPUsandamountofmemory.
ClickNexttocontinue.
4.
SpecifythepoolorhosttowhichyouwanttoimporttheVM(s),andthen(optionally)assigntheVM(s)toahomeXenServerhost.
Toselectahostorpool,choosefromtheImportVM(s)todrop-downlist.
ToassigneachVMahomeXenServerhost,selectaserverfromthelistintheHomeServer.
Ifyouwishnottoassignahomeserver,selectDon'tassignahomeserver.
ClickNexttocontinue.
5.
ConfigurestoragefortheimportedVM(s):selectoneormorestoragerepositoriesonwhichtoplacetheimportedvirtualdisks,andthenclickNexttocontinue.
ToplacealltheimportedvirtualdisksonthesameSR,selectPlaceallimportedVMsonthistargetSR,andthenselectanSRfromthelist.
ToplacethevirtualdisksofincomingVMsontodifferentSRs,selectPlaceimportedVMsonthespecifiedtargetSRs.
ForeachVM,selectthetargetSRfromthelistintheSRcolumn.
6.
ConfigurenetworkingfortheimportedVMs:mapthevirtualnetworkinterfacesintheVMsyouareimportingtotargetnetworksinthedestinationpool.
TheNetworkandMACaddressshowninthelistofincomingVMsarestoredaspartofthedefinitionoftheoriginal(exported)VMintheexportfile.
Tomapanincomingvirtualnetworkinterfacetoatargetnetwork,selectanetworkfromthelistintheTargetNetworkcolumn.
ClickNexttocontinue.
537.
EnableOperatingSystemFixup:ifthediskimage(s)youareimportingwerebuiltonavirtualizationplatformotherthanXenServer,selecttheUseOperatingSystemFixupcheckboxandthenselectanISOSRwheretheFixupISOcanbecopiedsothatXenServercanaccessit.
Formoreinformationaboutthisfeature,seeSection12.
2,"OperatingSystemFixup".
ClickNexttocontinue.
8.
ConfigureTransferVMnetworking.
Selectanetworkfromthelistofnetworkinterfacesavailableinthedestinationpoolorhost,andthenchoosetoautomaticallyormanuallyconfigurethenetworksettings.
TouseautomatedDynamicHostConfigurationProtocol(DHCP)toautomaticallyassignnetworkingsettingsincludingtheIPaddress,subnetmaskandgateway,selectAutomaticallyobtainnetworksettingsusingDHCP.
Toconfigurenetworkingsettingsmanually,selectUsethesenetworksettings,andthenentertherequiredvalues.
YoumustenteranIPaddress,butthesubnetmaskandgatewaysettingsareoptional.
ClickNexttocontinue.
9.
Reviewtheimportsettings,andthenclickFinishtobegintheimportprocessandclosethewizard.
Note:ImportingaVMmaytakesometime,dependingonthesizeoftheVMandthespeedandbandwidthofthenetworkconnection.
TheimportprogressisdisplayedinthestatusbaratthebottomoftheXenCenterwindowandontheLogstab.
Whenthenewly-importedVMisavailable,itappearsintheResourcespane.
Note:AfterusingXenCentertoimportadiskimagethatcontainsWindowsoperatingsystems,youmustsettheplatformparameter.
ThiswillvaryaccordingtotheversionofWindowscontainedinthediskimage:ForWindowsVista,Server2008,andlater,settheplatformparametertodevice_id=0002.
Forexample:xevm-param-setuuid=platform:device_id=0002ForallotherversionsofWindows,settheplatformparametertoviridian=true.
Forexample:xevm-param-setuuid=platform:viridian=true12.
4.
3.
ImportingVMsfromXVAYoucanimportVMs,templatesandsnapshotsthathavepreviouslybeenexportedandstoredlocallyinXVAformat(withthe.
xvafileextension)orXVAVersion1format(withtheova.
xmlfileextension).
Todoso,youfollowtheusualstepsneededtocreateanewVM:nominatingahost,andthenconfiguringstorageandnetworkingforthenewVM.
Warning:ItmaynotalwaysbepossibletorunanimportedVMthatwasexportedfromanotherserverwithadifferentCPUtype.
Forexample,aWindowsVMcreatedonaserverwithanIntelVTEnabledCPU,thenexported,maynotrunwhenimportedtoaserverwithanAMD-VTMCPU.
ToImportVM(s)fromXVAFilesVMusingXenCenter:1.
OpentheImportwizardbydoingoneofthefollowing:54IntheResourcespane,right-click,andthenselectImportontheshortcutmenu.
OntheFilemenu,selectImport.
2.
Onthefirstpageofthewizard,locatethefileyouwanttoimport(.
xvaorova.
xml),andthenclickNexttocontinue.
IfyouenteraURLlocation(http,https,file,orftp)intheFilenamebox,andthenclickNext,aDownloadPackagedialogboxopensandyoumustspecifyafolderonyourXenCenterhostwherethefilewillbecopied.
3.
SelectapoolorhostfortheimportedVMtostarton,andthenchooseNexttocontinue.
4.
Selectthestoragerepositoriesonwhichtoplacetheimportedvirtualdisk,andthenclickNexttocontinue.
5.
ConfigurenetworkingfortheimportedVM:mapthevirtualnetworkinterfaceintheVMyouareimportingtotargetanetworkinthedestinationpool.
TheNetworkandMACaddressshowninthelistofincomingVMsarestoredaspartofthedefinitionoftheoriginal(exported)VMintheexportfile.
Tomapanincomingvirtualnetworkinterfacetoatargetnetwork,selectanetworkfromthelistintheTargetNetworkcolumn.
ClickNexttocontinue.
6.
Reviewtheimportsettings,andthenclickFinishtobegintheimportprocessandclosethewizard.
Note:ImportingaVMmaytakesometime,dependingonthesizeoftheVMandthespeedandbandwidthofthenetworkconnection.
TheimportprogressisdisplayedinthestatusbaratthebottomoftheXenCenterwindowandontheLogstab.
Whenthenewly-importedVMisavailable,itappearsintheResourcespane.
ToImportaVMfromXVAusingthexeCLI:ToimporttheVMtothedefaultSRonthetargetXenServerhost,enterthefollowing:xevm-import-h-u-pw\filename=ToimporttheVMtoadifferentSRonthetargetXenServerhost,addtheoptionalsr-uuidparameter:xevm-import-h-u-pw\filename=sr-uuid=IfyouwishtopreservetheMACaddressoftheoriginalVM,addtheoptionalpreserveparameterandsettotrue:xevm-import-h-u-pw\filename=preserve=trueNote:ImportingaVMmaytakesometime,dependingonthesizeoftheVMandthespeedandbandwidthofthenetworkconnection.
OncetheVMhasbeenimported,thecommandpromptreturnstheUUIDofthenewly-importedVM.
12.
5.
ExportingVMsYoucanexportOVF/OVAandXVAfilesusingtheXenCenterExportwizard;youcanalsoexportXVAfilesviathexeCLI.
12.
5.
1.
ExportingVMsasOVF/OVAUsingtheXenCenterExportwizard,youcanexportoneormoreVM(s)asanOVF/OVApackage.
WhenyouexportVMsasanOVF/OVApackage,theconfigurationdataisexportedalongwiththevirtualharddisksofeachVM.
55Note:InordertoexportOVForOVApackages,youmustbeloggedinasrootorhavethePoolAdministratorRoleBasedAccessControl(RBAC)roleassociatedwithyouruseraccount.
ToExportVM(s)asOVF/OVAusingXenCenter:1.
ShutdownorsuspendtheVM(s)thatyouwishtoexport.
2.
OpentheExportwizard:intheResourcespane,right-clickthepoolorhostcontainingtheVM(s)youwanttoexport,andthenselectExport.
3.
Onthefirstpageofthewizard,enterthenameoftheexportfile,specifythefolderwhereyouwantthefile(s)tobesaved,andselectOVF/OVAPackage(*.
ovf,*.
ova)fromtheFormatdrop-downlist.
ClickNexttocontinue.
4.
FromthelistofavailableVMs,selecttheVM(s)thatyouwanttoincludeintheOVF/OVApackage,andthenclickNexttocontinue.
5.
Ifrequired,youcanaddtoapreviously-preparedEndUserLicensingAgreement(EULA)document(.
rtf,.
txt)tothepackage.
ToaddaEULA,clickAddandbrowsetothefileyouwishtoadd.
Onceyouhaveaddedthefile,youcanviewthedocumentbyselectingitfromtheEULAfileslistandthenclickingView.
EULAscanprovidethelegaltermsandconditionsforusingtheapplianceand/ortheapplicationsdeliveredintheappliance.
TheabilitytoincludeoneormoreEULAsletsyoulegallyprotectthesoftwareontheappliance.
Forexample,ifyourapplianceincludesaproprietaryoperatingsystemononeormoreofitsVMs,youmaywanttoincludetheEULAtextfromthatoperatingsystem.
Thetextisdisplayedandmustbeacceptedbythepersonwhoimportstheappliance.
Note:AttemptingtoaddEULAfilesthatarenotinsupportedformats,includingXMLorbinaryfiles,cancausetheimportEULAfunctionalitytofail.
SelectNexttocontinue.
6.
OntheAdvancedoptionspage,specifyamanifest,signatureandoutputfileoptions,orjustclickNexttocontinue.
a.
Tocreateamanifestforthepackage,selecttheCreateamanifestcheckbox.
Themanifestprovidesaninventoryorlistoftheotherfilesinapackageandisusedtoensurethefilesoriginallyincludedwhenthepackagewascreatedarethesamefilespresentwhenthepackagearrives.
Whenthefilesareimported,achecksumisusedtoverifythatthefileshavenotchangedsincethepackagewascreated.
b.
Toaddadigitalsignaturetothepackage,selecttheSigntheOVFpackagecheckbox,browsetolocateacertificate,andthenentertheprivatekeyassociatedwiththecertificateinthePrivatekeypasswordfield.
Whenasignedpackageisimported,theusercanverifytheidentityofthecreatorbyusingthepublickeytovalidatethedigitalsignature.
UseaX.
509certificatewhichyouhavealreadycreatedfromaTrustedAuthorityandexportedaseithera.
pemor.
pfxfilethatcontainsthesignatureofthemanifestfileandthecertificateusedtocreatethatsignature.
c.
TooutputtheselectedVMsasasingle(tar)fileinOVAformat,selecttheCreateOVApackage(singleOVAexportfile)checkbox.
Formoreonthedifferentfileformats,seeSection12.
1.
1,"OpenVirtualizationFormat(OVFandOVA)".
d.
Tocompressvirtualharddiskimages(.
VHDfiles)includedinthepackage,selecttheCompressOVFfilescheckbox.
56WhenyoucreateanOVFpackage,thevirtualharddiskimagesare,bydefault,allocatedthesameamountofspaceastheexportedVM.
Forexample,aVMthatisallocated26GBofspacewillhaveaharddiskimagethatconsumes26GBofspace,regardlessofwhetherornottheVMactuallyrequiresit.
Note:CompressingtheVHDfilesmakestheexportprocesstakelongertocomplete,andimportingapackagecontainingcompressedVHDfileswillalsotakelonger,astheImportwizardmustextractalloftheVHDimagesasitimportsthem.
IfboththeCreateOVApackage(singleOVAexportfile)andCompressOVFfilesoptionsarechecked,theresultisacompressedOVAfilewiththefileextension.
ova.
gz.
7.
ConfigureTransferVMnetworking.
Selectanetworkfromthelistofnetworkinterfacesavailableinthedestinationpoolorhost,andthenchoosetoautomaticallyormanuallyconfigurethenetworksettings.
TouseautomatedDynamicHostConfigurationProtocol(DHCP)toautomaticallyassignnetworkingsettingsincludingtheIPaddress,subnetmaskandgateway,selectAutomaticallyobtainnetworksettingsusingDHCP.
Toconfigurenetworkingsettingsmanually,selectUsethesenetworksettings,andthenentertherequiredvalues.
YoumustenteranIPaddress,butthesubnetmaskandgatewaysettingsareoptional.
ClickNexttocontinue.
8.
Reviewtheexportsettings.
Tohavethewizardverifytheexportedpackage,selecttheVerifyexportoncompletioncheckbox.
ClickFinishtobegintheexportprocessandclosethewizard.
Note:ExportingaVMmaytakesometime,dependingonthesizeoftheVMandthespeedandbandwidthofthenetworkconnection.
TheexportprogressisdisplayedinthestatusbaratthebottomoftheXenCenterwindowandontheLogstab.
Tocancelanexportinprogress,clickontheLogstab,findtheexportinthelistofevents,andclicktheCancelbutton.
12.
5.
1.
1.
ExportingVMsasXVAYoucanexportanexistingVMasanXVAfileusingtheXenCenterExportwizardorthexeCLI.
CitrixdoesrecommendexportingaVMtoamachineotherthanaXenServerhost,onwhichyoucanmaintainalibraryofexportfiles(forexample,tothemachinerunningXenCenter).
Warning:ItmaynotalwaysbepossibletorunanimportedVMthatwasexportedfromanotherserverwithadifferentCPUtype.
Forexample,aWindowsVMcreatedonaserverwithanIntelVTEnabledCPU,thenexported,maynotrunwhenimportedtoaserverwithanAMD-VTMCPU.
ToExportVM(s)asXVAFilesusingXenCenter:1.
ShutdownorsuspendtheVMthatyouwishtoexport.
2.
OpentheExportwizard:fromtheResourcespane,right-clicktheVMwhichyouwanttoexport,andthenselectExport.
3.
Onthefirstpageofthewizard,enterthenameoftheexportfile,specifythefolderwhereyouwantthefile(s)tobesaved,andselectXVAFile(*.
xva)fromtheFormatdrop-downlist.
ClickNexttocontinue.
4.
FromthelistofavailableVMs,selecttheVMthatyouwanttoexport,andthenclickNexttocontinue.
575.
Reviewtheexportsettings.
Tohavethewizardverifytheexportedpackage,selecttheVerifyexportoncompletioncheckbox.
ClickFinishtobegintheexportprocessandclosethewizard.
Note:ExportingaVMmaytakesometime,dependingonthesizeoftheVMandthespeedandbandwidthofthenetworkconnection.
TheexportprogressisdisplayedinthestatusbaratthebottomoftheXenCenterwindowandontheLogstab.
Tocancelanexportinprogress,clickontheLogstab,findtheexportinthelistofevents,andclicktheCancelbutton.
ToExportVM(s)asXVAFilesusingthexeCLI:1.
ShutdowntheVMthatyouwanttoexport.
2.
ExporttheVMbyrunningthefollowing:xevm-export-h-u-pwvm=\filename=Note:Besuretoincludethe.
xvaextensionwhenspecifyingtheexportfilename.
IftheexportedVMdoesnothavethisextension,andyoulaterattempttoimportitusingXenCenter,itmightfailtorecognizethefileasavalidXVAfile.
58AppendixA.
WindowsVMReleaseNotesA.
1.
ReleaseNotesTherearemanyversionsandvariationsofWindowswithdifferentlevelsofsupportforthefeaturesprovidedbyXenServer.
Thissectionlistsnotesanderratafortheknowndifferences.
A.
1.
1.
GeneralWindowsIssuesWheninstallingWindowsVMs,startoffwithnomorethanthreevirtualdisks.
OncetheVMandXenServerToolshavebeeninstalledyoucanaddadditionalvirtualdisks.
ThebootdeviceshouldalwaysbeoneoftheinitialdiskssothattheVMcansuccessfullybootwithouttheXenServerTools.
MultipleVCPUsareexposedasCPUsocketstoWindowsguests,andaresubjecttothelicensinglimitationspresentintheVM.
ThenumberofCPUspresentintheguestcanbeconfirmedbycheckingDeviceManager.
ThenumberofCPUsactuallybeingusedbyWindowscanbeseenintheTaskManager.
ThediskenumerationorderinaWindowsguestmaydifferfromtheorderinwhichtheywereinitiallyadded.
ThisisbecauseofinteractionbetweenthePVdriversandthePnPsubsysteminWindows.
Forexample,thefirstdiskmayshowupasDisk1,thenextdiskhotpluggedasDisk0,asubsequentdiskasDisk2,andthenupwardsintheexpectedfashion.
ThereisabugintheVLCplayerDirectXbackendthatcausesyellowtobereplacedbybluewhenplayingvideoiftheWindowsdisplaypropertiesaresetto24-bitcolor.
VLCusingOpenGLasabackendworkscorrectly,andanyotherDirectX-orOpenGL-basedvideoplayerworkstoo.
Itisnotaproblemiftheguestissettouse16-bitcolorratherthan24.
ThePVEthernetAdapterreportsaspeedof1GbpsinWindowsVMs.
ThisspeedisahardcodedvalueandisnotrelevantinavirtualenvironmentbecausethevirtualNICisconnectedtoavirtualswitch.
Thedatarateisnotlimitedbytheadvertisednetworkspeed.
A.
1.
2.
WindowsServer2003WindowsServer200332-bitdoesnotbootsuccessfullyifanyvirtualdiskslargerthan2TB(terabytes)insizeareattachedtotheVM.
SeethisarticleintheWindowsHardwareDeveloperCentralwebsite.
A.
1.
3.
Windows7NoknownissuesA.
1.
4.
WindowsVistaMicrosoftVistarecommendsarootdiskofsize20GBorhigher.
Thedefaultsizewheninstallingthistemplateis24GB,whichis4GBgreaterthantheminimum.
Considerincreasingthis.
59AppendixB.
LinuxVMReleaseNotesB.
1.
ReleaseNotesMostmodernLinuxdistributionssupportXenparavirtualizationdirectly,buthavedifferentinstallationmechanismsandsomekernellimitations.
B.
1.
1.
RedHatEnterpriseLinux4.
5to4.
8ThefollowingissueshavebeenreportedtoRedHatandarealreadyfixedintheXenkernel(whichcanbeinstalledbyusingthe/mnt/Linux/install.
shscriptinthebuilt-inxs-tools.
isoCDimage):TheXenkernelinRHEL4.
8canoccasionallyenterticklessmodewhenanRCUispending.
Whenthistriggers,itisusuallyinsynchronize_kernel()whichmeanstheguestessentiallyhangsuntilsomeexternalevent(suchasaSysRQ)releasesit(RedHatBugzilla427998)Livemigrationcanoccasionallycrashthekernelunderlowmemoryconditions(RedHatBugzilla249867)GuestkernelcanoccasionallyhangduetootherXenStoreactivity(RedHatBugzilla250381)RHEL4.
7containsabugwhichnormallypreventsitfrombootingonahostwithmorethan64GiBofRAM(RedHatBugzilla311431).
ForthisreasonXenServerRHEL4.
7guestsareonlyallocatedRAMaddressesintherangebelow64GiBbydefault.
ThismaycauseRHEL4.
7gueststofailtostartevenifRAMappearstobeavailable,inwhichcaserebootingorshuttingdownotherguestscancausesuitableRAMtobecomeavailable.
Ifallelsefails,temporarilyshutdownotherguestsuntilyourRHEL4.
7VMcanboot.
OnceyouhavesucceededinbootingyourRHEL4.
7VM,installtheXenServerToolsandrunthecommand:xevm-param-removeuuid=param-name=other-config\param-key=machine-address-sizetoremovethememoryrestriction.
Onsomehardware(generallynewersystems),theCPUwillgenerateoccasionalspuriouspagefaultswhichtheOSshouldignore.
UnfortunatelyversionsofRHEL4.
5to4.
7failtoignorethespuriousfaultanditcausesthemtocrash(RedHatBugzilla465914).
Thishasbeenfixedinourkernel.
TheRHEL4VMtemplateshavebeensetwiththesuppress-spurious-page-faultsparameter.
ThisassuresthattheinstallationwillcontinuesafelytothepointthatthestandardkernelisreplacedwiththeCitrix-providedkernel.
Thereisaperformanceimpactwiththisparameterset,so,aftertheVMinstallationiscomplete,attheVMcommandprompt,runthecommand:xevm-param-removeuuid=other-config:\param-key=suppress-spurious-page-faultsInRHEL4.
5to4.
7,ifaxenbustransactionendcommandfailsitispossibleforthesuspend_mutextoremainlockedpreventinganyfurtherxenbustraffic.
ApplyingtheCitrixRHEL4.
8kernelresolvesthisissue.
[EXT-5]InRHEL4.
5to4.
8,useoftheXFSfilesystemcanleadtokernelpanicunderexceptionalcircumstances.
ApplyingtheCitrixRHEL4.
8kernelresolvesthisissue.
[EXT-16]InRHEL4.
5to4.
8,thekernelcanenternotickidlemodewithRCUpending;thisleadstoaguestoperatingsystemlockup.
ApplyingtheCitrixRHEL4.
8kernelresolvesthisissue.
[EXT-21]InRHEL4.
7,4.
8,VMsmaycrashwhenahosthas64GiBRAMorhigherconfigured.
ApplyingtheCitrixRHEL4.
8kernelresolvesthisissue.
[EXT-30]InRHEL4.
5to4.
8,thenetworkdrivercontainsanissuethatcan,inrarecircumstances,leadtoakerneldeadlock.
ApplyingtheCitrixRHEL4.
8kernelresolvesthisissue.
[EXT-45]AdditionalNotes:60RHEL4.
7,4.
8,sometimeswhentherearemanydevicesattachedtoaVM,thereisnotenoughtimeforallofthesedevicestoconnectandstartupfails.
[EXT-17]IfyoutrytoinstallRHEL4.
xonaVMthathasmorethantwovirtualCPUs(whichRHEL4.
xdoesnotsupport),anerrormessageincorrectlyreportsthenumberofCPUsdetected.
B.
1.
1.
1.
PreparingaRHEL4.
5to4.
8guestforcloningToprepareaRHEL4.
5to4.
8guestforcloning(seeSection5.
7.
3,"MACaddress"),edit/etc/sysconfig/network-scripts/ifcfg-eth0beforeconvertingtheVMintoatemplate,andremovetheHWADDRline.
Note:RedHatrecommendstheuseofKickstarttoperformautomatedinstallations,insteadofdirectlycloningdiskimages(seeRedHatKBArticle1308).
B.
1.
1.
2.
RHELGraphicalInstallSupportToperformagraphicalinstallation,inXenCenterstepthroughtheNewVMwizard.
IntheInstallationMediapage,intheAdvancedOSbootparameterssection,addvnctothelistparameters:graphicalutf8vncYouwillthenbepromptedtoprovidenetworkingconfigurationforthenewVMtoenableVNCcommunication.
WorkthroughtheremainderoftheNewVMwizard.
Whenthewizardcompletes,intheInfrastructureview,selecttheVM,andclickConsoletoviewaconsolesessionoftheVM;atthispointitwillusethestandardinstaller.
TheVMinstallationwillinitiallystartintextmode,andmayrequestnetworkconfiguration.
Onceprovided,theSwitchtoGraphicalConsolebuttonwilldisplayedinthetoprightcorneroftheXenCenterwindow.
B.
1.
2.
RedHatEnterpriseLinux5XenServerrequiresthatyouruntheRHEL5.
4kernelorhigher.
Olderkernelshavethefollowingknownissues:RHEL5.
064-bitguestoperatingsystemswiththeiroriginalkernelswillfailtobootonXenServer6.
5ServicePack1.
BeforeattemptingtoupgradeaXenServerhosttoversion6.
5ServicePack1,customersshouldupdatethekerneltoversion5.
4(2.
6.
18-164.
el5xen)orlater.
CustomersrunningtheseguestswhohavealreadyupgradedtheirhosttoXenServer6.
5ServicePack1,shouldrefertoCTX134845forinformationonupgradingthekernel.
DuringtheresumeoperationonasuspendedVM,allocationscanbemadethatcancauseswapactivitywhichcannotbeperformedbecausetheswapdiskisstillbeingreattached.
Thisisarareoccurrence.
(RedHatBugzilla429102).
CustomersrunningRHEL5.
3or5.
4(32/64-bit)shouldnotuseDynamicMemoryControl(DMC)asthismaycausetheguesttocrash.
IfyouwishtouseDMC,CitrixrecommendsthatcustomersupgradetomorerecentversionsofRHELorCentOS.
[EXT-54]61InRHEL5.
3,sometimeswhentherearemanydevicesattachedtoaVM,thereisnotenoughtimeforallofthesedevicestoconnectandstartupfails.
[EXT-17]InRHEL5.
0to5.
3,useoftheXFSfilesystemcanleadtokernelpanicunderexceptionalcircumstances.
ApplyingtheRedHatRHEL5.
4kernelonwardsresolvesthisissue.
[EXT-16]InRHEL5.
2,5.
3,VMsmaycrashwhenahosthas64GiBRAMorhigherconfigured.
ApplyingtheRedHatRHEL5.
4kernelonwardsresolvesthisissue.
[EXT-30]InRHEL5.
0to5.
3,thenetworkdrivercontainsanissuethatcan,inrarecircumstances,leadtoakerneldeadlock.
ApplyingtheRedHatRHEL5.
4kernelonwardsresolvesthisissue.
[EXT-45]Note:Inpreviousreleases,XenServerincludedareplacementRHEL5kernelthatfixedcriticalissuesthatpreventedRHEL5fromrunningeffectivelyasavirtualmachine.
RedHathasresolvedtheseissuesinRHEL5.
4andhigher.
Consequently,XenServernolongerincludesaRHEL5specifickernel.
B.
1.
2.
1.
PreparingaRHEL5.
xguestforcloningToprepareaRHEL5.
xguestforcloning(seeSection5.
7.
3,"MACaddress"),edit/etc/sysconfig/network-scripts/ifcfg-eth0beforeconvertingtheVMintoatemplateandremovetheHWADDRline.
Note:RedHatrecommendstheuseofKickstarttoperformautomatedinstallations,insteadofdirectlycloningdiskimages(seeRedHatKBArticle1308).
B.
1.
3.
RedHatEnterpriseLinux6Note:RedHatEnterpriseLinux6alsoincludesRedHatEnterpriseLinuxWorkstation6.
6(64-bit)andRedHatEnterpriseLinuxClient6.
6(64-bit).
TheRHEL6.
0kernelhasabugwhichaffectsdiskI/Oonmultiplevirtualizationplatforms.
ThisissuecausesVMsrunningRHEL6.
0toloseinterrupts.
Formoreinformation,seeRedHatBugzilla681439,603938,and652262.
AttemptstodetachaVirtualDiskImage(VDI)fromarunningaRHEL6.
1and6.
2(32-/64-bit)VM,maybeunsuccessfulandcanresultinaguestkernelcrashwithaNULLpointerdereferenceaterrormessage.
Customersshouldupdatethekerneltoversion6.
3(2.
6.
32-238.
el6)orlatertoresolvethisissue.
Formoreinformation,seeRedHatBugzilla773219.
B.
1.
4.
RedHatEnterpriseLinux7Afterperformingamigrationorsuspendoperation,RHEL7guestsmayfreezeduringresume.
Formoreinformation,seeRedHatBugzilla1141249.
B.
1.
5.
CentOS4PleaserefertoSectionB.
1.
1,"RedHatEnterpriseLinux4.
5to4.
8"forthelistofCentOS4releasenotes.
B.
1.
6.
CentOS5PleaserefertoSectionB.
1.
2,"RedHatEnterpriseLinux5"forthelistofCentOS5releasenotes.
B.
1.
7.
CentOS6PleaserefertoSectionB.
1.
3,"RedHatEnterpriseLinux6"forthelistofCentOS6releasenotes.
62B.
1.
8.
CentOS7PleaserefertoSectionB.
1.
4,"RedHatEnterpriseLinux7"forthelistofCentOS7releasenotes.
B.
1.
9.
OracleLinux5PleaserefertoSectionB.
1.
2,"RedHatEnterpriseLinux5"forthelistofOracleLinux5releasenotes.
B.
1.
10.
OracleLinux6OracleLinux6guestswhichwereinstalledonaXenServerhostrunningversionsearlierthanv6.
5,willcontinuetoruntheRedhatkernelfollowinganupgradetov6.
5.
ToswitchtotheUEKkernel(thedefaultwithacleaninstallation)deletethe/etc/pygrub/rules.
d/oracle-5.
6fileindom0.
YoucanchoosewhichkerneltouseforanindividualVMbyeditingthebootloaderconfigurationwithintheVM.
PleaserefertoSectionB.
1.
3,"RedHatEnterpriseLinux6"foralistofOEL6releasenotes.
B.
1.
11.
OracleLinux7PleaserefertoSectionB.
1.
4,"RedHatEnterpriseLinux7"forthelistofOracleLinux7releasenotes.
B.
1.
12.
ScientificLinux5PleaserefertoSectionB.
1.
2,"RedHatEnterpriseLinux5"forthelistofScientificLinux5releasenotes.
B.
1.
13.
ScientificLinux6PleaserefertoSectionB.
1.
3,"RedHatEnterpriseLinux6"forthelistofScientificLinux6releasenotes.
B.
1.
14.
ScientificLinux7PleaserefertoSectionB.
1.
4,"RedHatEnterpriseLinux7"forthelistofScientificLinux7releasenotes.
B.
1.
15.
SUSEEnterpriseLinux10SP1XenServerusesthestandardNovellkernelsuppliedwithSLES10SP2astheguestkernel.
AnybugsfoundinthiskernelarereportedupstreamtoNovellandlistedbelow:Amaximumof3virtualnetworkinterfacesissupported.
Diskssometimesdonotattachcorrectlyonboot.
(NovellBugzilla290346).
B.
1.
16.
SUSEEnterpriseLinux10SP3DuetoadefectinthepackagingofNovellSUSELinuxEnterpriseServer10SP3(32-bit)edition,userswillnotbeabletocreateanewVMofthisedition.
Asaworkaround,youmustinstallSLES10SP2andthenupgradeittoSLESSP3using,forexample,"yast"withintheVM.
Formoreinformation,refertotheNovelldocumentation7005079.
B.
1.
17.
SUSEEnterpriseLinux11XenServerusesthestandardNovellkernelsuppliedwithSLES11astheguestkernel.
AnybugsfoundinthiskernelarereportedupstreamtoNovellandlistedbelow:LivemigrationofaSLES11VMwhichisunderhighloadmayfailwiththemessageAnerroroccurredduringthemigrationprocess.
ThisisduetoaknownissuewiththeSLES11kernelwhichhasbeenreportedtoNovell.
Itisexpectedthatkernelupdate2.
6.
27.
23-0.
1.
1andlaterfromNovellwillresolvethisissue.
63B.
1.
18.
SUSEEnterpriseLinux11SP2CreatingaSLES11SP2(32-bit)VMcancausetheSLESinstallerortheVMtocrashduetoabugintheSLES11SP2kernel.
Toworkaroundthisissue,customersshouldallocateatleast1GBmemorytotheVM.
NotethattheamountofassignedmemorycanbereducedafterinstallingupdatestotheVM.
Formoreinformation,seeNovellBugzilla809166.
B.
1.
19.
PreparingaSLESguestforcloningNote:BeforeyouprepareaSLESguestforcloning,ensurethatyoucleartheudevconfigurationfornetworkdevicesasfollows:cat/etc/udev/rules.
d/30-net_persistent_names.
rulesToprepareaSLESguestforcloning(seeSection5.
7.
3,"MACaddress"):1.
Openthefile/etc/sysconfig/network/config2.
Editthelinethatreads:FORCE_PERSISTENT_NAMES=yestoFORCE_PERSISTENT_NAMES=no3.
SavethechangesandreboottheVM.
B.
1.
20.
Ubuntu10.
04OnanUbuntu10.
04(64-bit)VM,attemptstosetthevalueofmaximumnumberofvCPUsavailabletoaVM(VCPUs-max),higherthanthevCPUsavailableduringboot(VCPUs-at-startup),cancausetheVMtocrashduringboot.
Formoreinformation,seeUbuntuLaunchpad1007002.
B.
1.
21.
Ubuntu14.
04AttemptstobootaPVguestmaycausetheguesttocrashwiththefollowingerror:kernelBUGat/build/buildd/linux-3.
13.
0/arch/x86/kernel/paravirt.
c:239!
.
Thisiscausedbyimproperlycallinganon-atomicfunctionfrominterruptcontext.
Customersshouldupdatethelinux-imagepackagetoversion3.
13.
0-35.
62inordertofixthisissue.
Formoreinformation,seeUbuntuLaunchpad1350373.
64AppendixC.
CreatingISOImagesXenServercanuseISOimagesofCD-ROMorDVD-ROMdisksasinstallationmediaanddatasourcesforWindowsorLinuxVMs.
ThissectiondescribeshowtomakeISOimagesfromCD/DVDmedia.
CreatinganISOonaLinuxcomputer1.
PuttheCD-orDVD-ROMdiskintothedrive.
Thediskshouldnotbemounted.
Tocheck,runthecommand:mountIfthediskismounted,unmountthedisk.
Refertoyouroperatingsystemdocumentationforassistanceifrequired.
2.
Asroot,runthecommandddif=/dev/cdromof=/path/cdimg_filename.
isoThiswilltakesometime.
Whentheoperationiscompletedsuccessfully,youshouldseesomethinglike:1187972+0recordsin1187972+0recordsoutYourISOfileisready.
OnaWindowscomputerWindowscomputersdonothaveanequivalentoperatingsystemcommandtocreateanISO.
MostCD-burningtoolshaveameansofsavingaCDasanISOfile.
OnesimpleandfreeutilityisISORecorder.
ItworksonWindowsXPSP2/SP3,andWindowsServer2003.
Onceinstalled,right-clickonaCD/DVDdriveandselectCreateimagefromCDfromthecontextmenu.
65AppendixD.
EnablingVNCforLinuxVMsVMsmightnotbesetuptosupportVirtualNetworkComputing(VNC),whichXenServerusestocontrolVMsremotely,bydefault.
BeforeyoucanconnectwiththeXenCentergraphicalconsole,youneedtoensurethattheVNCserverandanXdisplaymanagerareinstalledontheVMandproperlyconfigured.
ThissectiondescribestheproceduresforconfiguringVNConeachofthesupportedLinuxoperatingsystemdistributionstoallowproperinteractionswiththeXenCentergraphicalconsole.
CentOS-basedVMsshouldusetheinstructionsfortheRedHat-basedVMsbelow,astheyusethesamebasecodetoprovidegraphicalVNCaccess.
CentOS4isbasedonRedHatEnterpriseLinux4,andCentOS5isbasedonRedHatEnterpriseLinux5.
D.
1.
EnablingaGraphicalConsoleonDebianSqueezeVMsNote:BeforeenablingagraphicalconsoleonyourDebianSqueezeVM,ensurethatyouhaveinstalledtheLinuxguestagent.
SeeSection5.
5,"InstallingtheLinuxGuestAgent"fordetails.
ThegraphicalconsoleforDebianSqueezevirtualmachinesisprovidedbyaVNCserverrunninginsidetheVM.
Intherecommendedconfiguration,thisiscontrolledbyastandarddisplaymanagersothatalogindialogisprovided.
1.
InstallyourSqueezeguestwiththedesktopsystempackages,orinstallGDM(thedisplaymanager)usingapt(followingstandardprocedures).
2.
InstalltheXvncserverusingapt-get(orsimilar):apt-getinstallvnc4serverNote:SignificantCPUtimecanbetakenbytheDebianSqueezeGraphicalDesktopEnvironment,whichusestheGnomeDisplayManagerversion3daemon.
CitrixstronglyadvisesthatcustomersuninstalltheGnomeDisplayManagergdm3packageandinstallthegdmpackageasfollows:apt-getinstallgdmapt-getpurgegdm33.
SetupaVNCpassword(nothavingoneisaserioussecurityrisk)usingthevncpasswdcommand,passinginafilenametowritethepasswordinformationto.
Forexample:vncpasswd/etc/vncpass4.
Modifyyourgdm.
conffile(/etc/gdm/gdm.
conf)toconfigureaVNCservertomanagedisplay0byextendingthe[servers]and[daemon]sectionsasfollows:[servers]0=VNC[daemon]VTAllocation=false[server-VNC]name=VNCcommand=/usr/bin/Xvnc-geometry800x600-PasswordFile/etc/vncpassBlacklistTimeout=0flexible=true5.
RestartGDM,andthenwaitforthegraphicalconsoletobedetectedbyXenCenter:/etc/init.
d/gdmrestart66Note:YoucancheckthattheVNCserverisrunningusingacommandlikepsax|grepvnc.
D.
2.
EnablingaGraphicalConsoleonRedHat,CentOS,orOracleLinuxVMsNote:BeforesettingupyourRedHatVMsforVNC,besurethatyouhaveinstalledtheLinuxguestagent.
SeeSection5.
5,"InstallingtheLinuxGuestAgent"fordetails.
ToconfigureVNConRedHatVMs,youneedtomodifytheGDMconfiguration.
TheGDMconfigurationisheldinafilewhoselocationvariesdependingontheversionofRedHatLinuxyouareusing.
Beforemodifyingit,firstdeterminethelocationofthisconfigurationfile;thisfilewillthenbemodifiedinanumberofsubsequentproceduresinthissection.
Note:ForinformationonenablingVNCforRHEL,CentOS,orOEL6.
xVMs,seeSectionD.
2.
5,"EnablingVNCforRHEL,CentOS,orOEL6.
xVMs".
D.
2.
1.
DeterminingtheLocationofyourVNCConfigurationFileIfyouareusingRedHatLinuxversion4theGDMconfigurationfileis/etc/X11/gdm/gdm.
conf.
ThisisaunifiedconfigurationfilethatcontainsdefaultvaluesasspecifiedbytheproviderofyourversionofGDMinadditiontoyourowncustomizedconfiguration.
ThistypeoffileisusedbydefaultinolderversionsofGDM,asincludedintheseversionsofRedHatLinux.
IfyouareusingRedHatLinuxversion5theGDMconfigurationfileis/etc/gdm/custom.
conf.
Thisisasplitconfigurationfilethatcontainsonlyuser-specifiedvaluesthatoverridethedefaultconfiguration.
ThistypeoffileisusedbydefaultinnewerversionsofGDM,asincludedintheseversionsofRedHatLinux.
D.
2.
2.
ConfiguringGDMtouseVNC1.
AsrootonthetextCLIintheVM,runthecommandrpm-qvnc-servergdm.
Thepackagenamesvnc-serverandgdmshouldappear,withtheirversionnumbersspecified.
Ifthesepackagenamesaredisplayed,theappropriatepackagesarealreadyinstalled.
Ifyouseeamessagesayingthatoneofthepackagesisnotinstalled,thenyoumaynothaveselectedthegraphicaldesktopoptionsduringinstallation.
Youwillneedtoinstallthesepackagesbeforeyoucancontinue.
SeetheappropriateRedHatLinuxx86InstallationGuidefordetailsregardinginstallingadditionalsoftwareonyourVM.
2.
OpentheGDMconfigurationfilewithyourpreferredtexteditorandaddthefollowinglinestothefile:[server-VNC]name=VNCServercommand=/usr/bin/Xvnc-SecurityTypesNone-geometry1024x768-depth16\-BlacklistTimeout0flexible=trueWithconfigurationfileson4,thisshouldbeaddedabovethe[server-Standard]section.
WithconfigurationfilesonRedHatLinux5,thisshouldbeaddedintotheempty[servers]section.
3.
ModifytheconfigurationsothattheXvncserverisusedinsteadofthestandardXserver:IfyouareusingRedHatLinux3or4,therewillbealinejustabovethatreads:0=Standard67Modifyittoread:0=VNCIfyouareusingRedHatLinux5orgreater,addtheabovelinejustbelowthe[servers]sectionandbeforethe[server-VNC]section.
4.
Saveandclosethefile.
RestartGDMforyourchangeinconfigurationtotakeeffect,byrunningthecommand/usr/sbin/gdm-restart.
Note:RedHatLinuxusesrunlevel5forgraphicalstartup.
Ifyourinstallationisconfiguredtostartupinrunlevel3,changethisforthedisplaymanagertobestarted(andthereforetogetaccesstoagraphicalconsole).
SeeSectionD.
4,"CheckingRunlevels"forfurtherdetails.
D.
2.
3.
FirewallSettingsThefirewallconfigurationbydefaultdoesnotallowVNCtraffictogothrough.
IfyouhaveafirewallbetweentheVMandXenCenter,youneedtoallowtrafficovertheportthattheVNCconnectionuses.
Bydefault,aVNCserverlistensforconnectionsfromaVNCvieweronTCPport5900+n,wherenisthedisplaynumber(usuallyjustzero).
SoaVNCserversetupforDisplay-0willlistenonTCPport5900,Display-1isTCP-5901,andsoon.
Consultyourfirewalldocumentationtomakesuretheseportsareopen.
YoumightwanttofurthercustomizeyourfirewallconfigurationifyouwanttouseIPconnectiontrackingorlimittheinitiationofconnectionstobefromonesideonly.
TocustomizeRedHat-basedVMsfirewalltoopentheVNCport1.
ForRedHatLinux4and5,usesystem-config-securitylevel-tui.
2.
Select"Customize"andadd5900totheotherportslist.
Alternatively,youcandisablethefirewalluntilthenextrebootbyrunningthecommandserviceiptablesstop,orpermanentlybyrunningchkconfigiptablesoff.
ThiscanofcourseexposeadditionalservicestotheoutsideworldandreducetheoverallsecurityofyourVM.
D.
2.
4.
VNCScreenResolutionIf,afterconnectingtoaVMwiththegraphicalconsole,thescreenresolutionismismatched(forexample,theVMdisplayistoobigtocomfortablyfitintheGraphicalConsolepane),youcancontrolitbysettingtheVNCservergeometryparameterasfollows:1.
OpentheGDMconfigurationfilewithyourpreferredtexteditor.
SeeSectionD.
2.
1,"DeterminingtheLocationofyourVNCConfigurationFile"forinformationaboutdeterminingthelocationofthisfile.
2.
Findthe[server-VNC]sectionyouaddedabove.
3.
Editthecommandlinetoread,forexample:command=/usr/bin/Xvnc-SecurityTypesNone-geometry800x600wherethevalueofthegeometryparametercanbeanyvalidscreenwidthandheight.
4.
Saveandclosethefile.
68D.
2.
5.
EnablingVNCforRHEL,CentOS,orOEL6.
xVMsIfyouareusingRedHatLinuxversion6,theGDMconfigurationfileis/etc/gdm/custom.
conf.
Thisisasplitconfigurationfilethatcontainsonlyuser-specifiedvaluesthatoverridethedefaultconfiguration.
ThistypeoffileisusedbydefaultinnewerversionsofGDM,asincludedintheseversionsofRedHatLinux.
Duringtheoperatingsysteminstallation,selectDesktopmode.
Todothis,ontheRHELinstallationscreen,selectDesktop,CustomizenowandthenclickNext:ThisdisplaystheBaseSystemscreen,ensurethatLegacyUNIXcompatibilityisselected:SelectDesktop,Optionalpackages,thenclickNext:69ThisdisplaysthePackagesinDesktopwindow,selecttigervnc-server-andthenclickNext:WorkthroughthefollowingstepstocontinuethesetupofyourRHEL6.
xVMs:1.
OpentheGDMconfigurationfilewithyourpreferredtexteditorandaddthefollowinglinestotheappropriatesections:[security]DisallowTCP=false[xdmcp]Enable=true2.
Createthefile,/etc/xinetd.
d/vnc-server-stream:servicevnc-server{id=vnc-serverdisable=notype=UNLISTEDport=5900socket_type=streamwait=nouser=nobodygroup=ttyserver=/usr/bin/Xvncserver_args=-inetd-once-querylocalhost-SecurityTypesNone\-geometry800x600-depth16}3.
Enterthefollowingcommandtostartthexinetdservice:#servicexinetdstart4.
Openthefile,/etc/sysconfig/iptablesandaddthefollowingline.
Notethatthelineshouldbeaddedabovethelinereading,-AINPUT-jREJECT--reject-withicmp-host-prohibited:-AINPUT-mstate--stateNEW-mtcp-ptcp--dport5900-jACCEPT5.
Enterthefollowingcommandtorestartiptables:#serviceiptablesrestart6.
Enterthefollowingcommandtorestartgdm:70#telinit3#telinit5Note:RedHatLinuxusesrunlevel5forgraphicalstartup.
Ifyourinstallationisconfiguredtostartupinrunlevel3,changethisforthedisplaymanagertobestarted(andthereforetogetaccesstoagraphicalconsole).
SeeSectionD.
4,"CheckingRunlevels"forfurtherdetails.
D.
3.
SettingupSLES-basedVMsforVNCNote:BeforesettingupyourSUSELinuxEnterpriseServerVMsforVNC,besurethatyouhaveinstalledtheLinuxguestagent.
SeeSection5.
5,"InstallingtheLinuxGuestAgent"fordetails.
SLEShassupportforenabling"RemoteAdministration"asaconfigurationoptioninYaST.
YoucanselecttoenableRemoteAdministrationatinstalltime,availableontheNetworkServicesscreenoftheSLESinstaller.
ThisallowsyoutoconnectanexternalVNCviewertoyourguesttoallowyoutoviewthegraphicalconsole;themethodologyforusingtheSLESremoteadministrationfeatureisslightlydifferentthanthatprovidedbyXenCenter,butitispossibletomodifytheconfigurationfilesinyourSUSELinuxVMsuchthatitisintegratedwiththegraphicalconsolefeature.
D.
3.
1.
CheckingforaVNCServerBeforemakingconfigurationchanges,verifythatyouhaveaVNCserverinstalled.
SUSEshipsthetightvncserverbydefault;thisisasuitableVNCserver,butyoucanalsousethestandardRealVNCdistributionifyouprefer.
Youcancheckthatyouhavethetightvncsoftwareinstalledbyrunningthecommand:rpm-qtightvncD.
3.
2.
EnablingRemoteAdministrationIfRemoteAdministrationwasnotenabledduringinstallationoftheSLESsoftware,youcanenableitasfollows:1.
OpenatextconsoleontheVMandruntheYaSTutility:yast2.
UsethearrowkeystoselectNetworkServicesintheleftmenu,thenTabtotherightmenuandusethearrowkeystoselectRemoteAdministration.
PressEnter.
3.
IntheRemoteAdministrationscreen,TabtotheRemoteAdministrationSettingssection.
UsethearrowkeystoselectAllowRemoteAdministrationandpressEntertoplaceanXinthecheckbox.
4.
TabtotheFirewallSettingssection.
UsethearrowkeystoselectOpenPortinFirewallandpressEntertoplaceanXinthecheckbox.
5.
TabtotheFinishbuttonandpressEnter.
6.
Amessageboxisdisplayed,tellingyouthatyouwillneedtorestartthedisplaymanagerforyoursettingstotakeeffect.
PressEntertoacknowledgethemessage.
7.
Theoriginaltop-levelmenuofYaSTappears.
TabtotheQuitbuttonandpressEnter.
D.
3.
3.
ModifyingthexinetdConfigurationAfterenablingRemoteAdministration,youneedtomodifyaconfigurationfileifyouwanttoallowXenCentertoconnect,orelseuseathirdpartyVNCclient.
1.
Openthefile/etc/xinetd.
d/vncinyourpreferredtexteditor.
71Thefilecontainssectionslikethefollowing:servicevnc1{socket_type=streamprotocol=tcpwait=nouser=nobodyserver=/usr/X11R6/bin/Xvncserver_args=:42-inetd-once-querylocalhost-geometry1024x768-depth16type=UNLISTEDport=5901}2.
Edittheportlinetoreadport=59003.
Saveandclosethefile.
4.
Restartthedisplaymanagerandxinetdservicewiththefollowingcommands:/etc/init.
d/xinetdrestartrcxdmrestartSUSELinuxusesrunlevel5forgraphicalstartup.
Ifyourremotedesktopdoesnotappear,verifythatyourVMisconfiguredtostartupinrunlevel5.
RefertoSectionD.
4,"CheckingRunlevels"fordetails.
D.
3.
4.
FirewallSettingsBydefaultthefirewallconfigurationdoesnotallowVNCtraffictogothrough.
IfyouhaveafirewallbetweentheVMandXenCenter,youneedtoallowtrafficovertheportthattheVNCconnectionuses.
Bydefault,aVNCserverlistensforconnectionsfromaVNCvieweronTCPport5900+n,wherenisthedisplaynumber(usuallyjustzero).
SoaVNCserversetupforDisplay-0willlistenonTCPport5900,Display-1isTCP-5901,etc.
Consultyourfirewalldocumentationtomakesuretheseportsareopen.
YoumightwanttofurthercustomizeyourfirewallconfigurationifyouwanttouseIPconnectiontrackingorlimittheinitiationofconnectionstobefromonesideonly.
ToOpentheVNCPortonSLES10.
xVMs'Firewall1.
OpenatextconsoleontheVMandruntheYaSTutility:yast2.
UsethearrowkeystoselectSecurityandUsersintheleftmenu,thenTabtotherightmenuandusethearrowkeystoselectFirewall.
PressEnter.
3.
IntheFirewallscreen,usethearrowkeystoselecttheAllowedServicesintheleftmenu.
4.
TabtotheFirewallConfiguration:AllowedServicesfieldsontheright.
UsethearrowkeystoselecttheAdvancedbutton(nearthebottomright,justabovetheNextbutton)andpressEnter.
5.
IntheAdditionalAllowedPortsscreen,enter5900intheTCPPortsfield.
TabtotheOKbuttonandpressEnter.
6.
TabtotheNextbuttonandpressEnter,thenintheSummaryscreenTabtotheAcceptbuttonandpressEnter,andfinallyonthetop-levelYaSTscreenTabtotheQuitbuttonandpressEnter.
7.
Restartthedisplaymanagerandxinetdservicewiththefollowingcommands:/etc/init.
d/xinetdrestartrcxdmrestartAlternatively,youcandisablethefirewalluntilthenextrebootbyrunningthercSuSEfirewall2stopcommand,orpermanentlybyusingYaST.
ThiscanofcourseexposeadditionalservicestotheoutsideworldandreducetheoverallsecurityofyourVM.
72ToOpentheVNCPortonSLES11.
xVMs'Firewall1.
OpenatextconsoleontheVMandruntheYaSTutility:yast2.
UsethearrowkeystoselectSecurityandUsersintheleftmenu,thenTabtotherightmenuandusethearrowkeystoselectFirewall.
PressEnter.
3.
IntheFirewallscreen,usethearrowkeystoselectCustomRulesintheleftmenuandthenpressEnter.
4.
TabtotheAddbuttonintheCustomAllowedRulessectionandthenpressEnter.
5.
IntheSourceNetworkfield,enter0/0.
TabtotheDestinationPortfieldandenter5900.
6.
TabtotheAddbuttonandthenpressEnter.
7.
TabtotheNextbuttonandpressEnter,thenintheSummaryscreenTabtotheFinishbuttonandpressEnter,andfinallyonthetop-levelYaSTscreenTabtotheQuitbuttonandpressEnter.
8.
Restartthedisplaymanagerandxinetdservicewiththefollowingcommands:/etc/init.
d/xinetdrestartrcxdmrestartAlternatively,youcandisablethefirewalluntilthenextrebootbyrunningthercSuSEfirewall2stopcommand,orpermanentlybyusingYaST.
ThiscanofcourseexposeadditionalservicestotheoutsideworldandreducetheoverallsecurityofyourVM.
D.
3.
5.
VNCScreenResolutionIf,afterconnectingtoaVirtualMachinewiththeGraphicalConsole,thescreenresolutionismismatched(forexample,theVMdisplayistoobigtocomfortablyfitintheGraphicalConsolepane),youcancontrolitbysettingtheVNCservergeometryparameterasfollows:1.
Openthe/etc/xinetd.
d/vncfilewithyourpreferredtexteditorandfindtheservice_vnc1section(correspondingtodisplayID1).
2.
Editthegeometryargumentintheserver-argslinetothedesireddisplayresolution.
Forexample,server_args=:42-inetd-once-querylocalhost-geometry800x600-depth16wherethevalueofthegeometryparametercanbeanyvalidscreenwidthandheight.
3.
Saveandclosethefile.
4.
RestarttheVNCserver:/etc/init.
d/xinetdrestartrcxdmrestartD.
4.
CheckingRunlevelsRedHatandSUSELinuxVMsuserunlevel5forgraphicalstartup.
ThissectiondescribeshowtoverifythatyourVMisconfiguredtostartupinrunlevel5andhowtochangeitifitisnot.
1.
Check/etc/inittabtoseewhatthedefaultrunlevelissetto.
Lookforthelinethatreads:id:n:initdefault:Ifnisnot5,editthefiletomakeitso.
2.
Youcanrunthecommandtelinitq;telinit5afterthischangetoavoidhavingtoactuallyreboottoswitchrunlevels.
73AppendixE.
TroubleshootingVMProblemsCitrixprovidestwoformsofsupport:free,self-helpsupportontheCitrixSupportwebsiteandpaid-forSupportServices,whichyoucanpurchasefromtheSupportSite.
WithCitrixTechnicalSupport,youcanopenaSupportCaseonlineorcontactthesupportcenterbyphoneifyouexperiencetechnicaldifficulties.
TheCitrixSupportsitehostsanumberofresourcesthatmaybehelpfultoyouifyouexperienceunusualbehavior,crashes,orotherproblems.
Resourcesinclude:SupportForums,KnowledgeBasearticlesandproductdocumentation.
IfyouexperienceunusualVMbehavior,thischapteraimstohelpyousolvetheproblemdescribeswhereapplicationlogsarelocatedandotherinformationthatcanhelpyourXenServerSolutionProviderandCitrixtrackandresolvetheissue.
TroubleshootingofinstallationissuesiscoveredintheXenServerInstallationGuide.
TroubleshootingofXenServerhostissuesiscoveredintheXenServerAdministrator'sGuide.
Note:CitrixrecommendsthatyoufollowthetroubleshootinginformationinthischaptersolelyundertheguidanceofyourXenServerSolutionProviderorCitrixSupport.
VendorUpdates:CitrixrecommendsthatVMsarekeptuptodatewithoperatingsystemvendor-suppliedupdates.
VMcrashedandotherfailures,mayhavebeenfixedbythevendor.
E.
1.
VMCrashesIfyouareexperiencingVMcrashes,itispossiblethatakernelcrashdumpcanhelpidentifytheproblem.
Ifthecrashisreproducible,followthisprocedureandconsultyourguestOSvendorforfurtherinvestigationonthisissue.
E.
1.
1.
ControllingLinuxVMCrashdumpBehaviorForLinuxVMs,thecrashdumpbehaviorcanbecontrolledthroughtheactions-after-crashparameter.
Thefollowingarethepossiblevalues:ValueDescriptionpreserveleavetheVMinapausedstate(foranalysis)restartnocoredump,justrebootVM(thisisthedefault)destroynocoredump,leaveVMhaltedToenablesavingofLinuxVMcrashdumps1.
OntheXenServerhost,determinetheUUIDofthedesiredVMbyrunningthefollowingcommand:xevm-listname-label=params=uuid--minimal2.
Changetheactions-after-crashvalueusingxevm-param-set;forexample,runthefollowingcommandondom0:xevm-param-setuuid=actions-after-crash=preserve3.
CrashtheVM.
ForPVguests,runthefollowingcommandontheVM:echoc|sudotee/proc/sysrq-trigger74ForHVMguests,runthefollowingcommandondom0:/usr/lib/xen/bin/crash_guest4.
Executethedumpcoreondom0.
Forexample,run:xldump-coreE.
1.
2.
ControllingWindowsVMCrashdumpBehaviourForWindowsVMs,thecoredumpbehaviorcannotbecontrolledbytheactions-after-crashparameter.
BydefaultWindowscrashdumpsareputinto%SystemRoot%\MinidumpintheWindowsVMitself.
YoucanconfiguretheVMsdumplevelbyfollowingthemenupathMyComputer>Properties>Advanced>StartupandRecovery.
E.
2.
TroubleshootingBootProblemsonLinuxVMsThereisautilityscriptnamedxe-edit-bootloaderintheXenServerhostcontroldomainwhichcanbeusedtoeditthebootloaderconfigurationofashutdownLinuxVM.
Thiscanbeusedtofixproblemswhicharepreventingitfrombooting.
Tousethisscript:1.
Runthecommandxevm-listtoensurethattheVMinquestionisshutdown(thevalueofpower-statewillbehalted).
2.
YoucanusetheUUIDasfollows:xe-edit-bootloader-u-porthename-labelasfollows:xe-edit-bootloader-n-pThepartitionnumberrepresentsthesliceofthediskwhichhasthefilesystem.
InthecaseofthedefaultDebiantemplate,thisis1sinceitisthefirstpartition.
3.
Youwillbedroppedintoaneditorwiththegrub.
conffileforthespecifiedVMloaded.
Makethechangestofixit,andsavethefile,exittheeditor,andstarttheVM.
- AMDcentos6.0相关文档
- leadcentos6.0
- HSLT72A3200centos6.0
- insightscentos6.0
- goalscentos6.0
- 虚拟centos6.0
- 安装centos6.0
RAKsmart 黑色星期五云服务器七折优惠 站群服务器首月半价
一年一度的黑色星期五和网络星期一活动陆续到来,看到各大服务商都有发布促销活动。同时RAKsmart商家我们也是比较熟悉的,这次是继双十一活动之后的促销活动。在活动产品中基本上沿袭双11的活动策略,比如有提供云服务器七折优惠,站群服务器首月半价、还有新人赠送红包等活动。如果我们有需要RAKsmart商家VPS、云服务器、独立服务器等产品的可以看看他们家的活动。这次活动截止到11月30日。第一、限时限...

月费$389,RackNerd美国大硬盘独立服务器
这次RackNerd商家提供的美国大硬盘独立服务器,数据中心位于洛杉矶multacom,可选Windows、Linux镜像系统,默认内存是64GB,也可升级至128GB内存,而且硬盘采用的是256G SSD系统盘+10个16TSAS数据盘,端口提供的是1Gbps带宽,每月提供200TB,且包含5个IPv4,如果有需要更多IP,也可以升级增加。CPU核心内存硬盘流量带宽价格选择2XE5-2640V2...
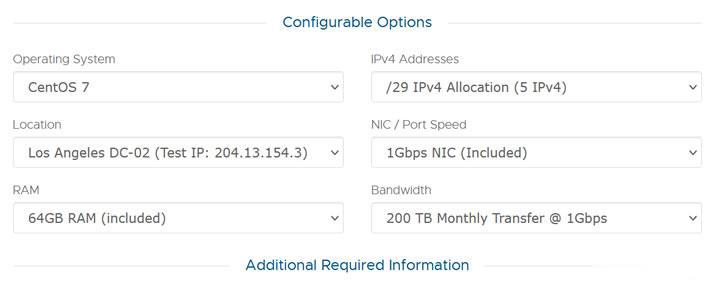
月神科技 国内上新成都高防 全场八折促销续费同价!
月神科技是由江西月神科技有限公司运营的一家自营云产品的IDC服务商,提供香港安畅、香港沙田、美国CERA、成都电信等机房资源,月神科技有自己的用户群和拥有创宇认证,并且也有电商企业将业务架设在月神科技的平台上。本次带来的是全场八折促销,续费同价。并且上新了国内成都高防服务器,单机100G集群1.2T真实防御,上层屏蔽UDP,可定制CC策略。非常适合网站用户。官方网站:https://www.ysi...
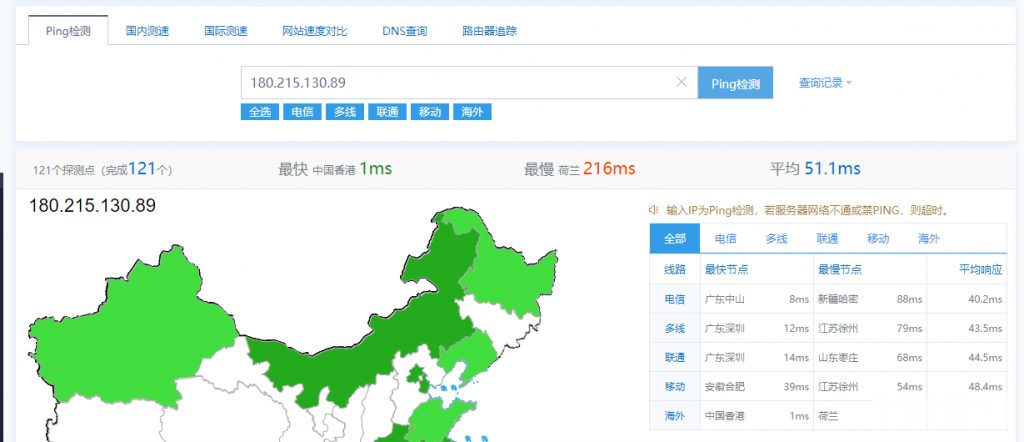
centos6.0为你推荐
-
地图应用哪个手机定位软件最好用?xyq.163.cbg.comhttp://xyq.cbg.163.com/cgi-bin/equipquery.py?act=buy_show_equip_info&equip_id=475364&server_id=625 有金鱼贵吗?www.522av.com跪求 我的三个母亲高清在线观看地址 我的三个母亲高清QVOD下载播放地址 我的三个母亲高清迅雷高速下载地址www.zjs.com.cn怎么查询我的平安信用卡寄送情况抓站工具抓鸡要什么工具?杨丽晓博客杨丽晓是怎么 出道的广告法新修订的《广告法》有哪些内容www.123qqxx.com我的首页http://www.hao123.com被改成了http://www.669dh.cn/?yhcww.66bobo.com有的网址直接输入***.com就行了,不用WWW, 为什么?www.diediao.com这是什么电影